
Are you ready to unleash your creativity and innovation right from the comfort of your home? Making electronic gadgets doesn’t have to be a daunting task reserved for tech wizards.
In fact, with just a few simple steps, you can transform ordinary materials into extraordinary gadgets. Imagine the thrill of building your own mini robot or designing a cool LED light setup, all without leaving your house. This guide will show you how to make easy electronic gadgets at home, sparking not only your curiosity but also impressing your friends and family with your newfound skills.
Dive in to discover how you can turn your DIY dreams into reality, creating fascinating gadgets that are as fun to make as they are to use.
Basic Tools And Components
Starting simple electronic projects at home needs the right tools and parts. These basics help you build gadgets without hassle. Having the proper setup saves time and improves your results.
Tools and components form the foundation for every DIY electronics project. Knowing what to use makes the process smooth and fun. Let’s explore what you need to begin.
Essential Tools For Diy Electronics
- Soldering iron – joins parts with melted metal
- Wire cutters – trim wires cleanly and safely
- Needle-nose pliers – hold and bend small parts
- Multimeter – measures voltage, current, and resistance
- Screwdrivers – tighten or loosen screws
- Breadboard – test circuits without soldering
- Wire stripper – remove insulation from wires
Common Electronic Components
- Resistors – control electric current flow
- Capacitors – store and release electrical energy
- LEDs – light up when powered
- Transistors – amplify or switch electronic signals
- Diodes – allow current to flow one way only
- Switches – open or close electrical circuits
- Integrated circuits (ICs) – small chips with many functions
- Batteries – power your gadgets
Safety Tips For Electronics Projects
- Work in a dry, clean area to avoid accidents
- Unplug devices before starting any work
- Wear safety glasses to protect your eyes
- Handle the soldering iron carefully to prevent burns
- Check connections twice to avoid short circuits
- Keep liquids away from your workspace
- Use proper ventilation when soldering to avoid fumes

Credit: www.youtube.com
Getting Started With Simple Circuits
Diving into simple circuits can feel overwhelming at first, but breaking the process down makes it much easier. Understanding the basics gives you the confidence to build your own electronic gadgets at home. Starting with clear steps helps you avoid common mistakes and keeps your projects enjoyable.
How To Read Circuit Diagrams
Circuit diagrams are like maps for your electronic projects. Each symbol represents a different component, such as resistors, capacitors, or LEDs. Learning to read these symbols helps you understand how components connect and work together.
Try comparing a simple circuit diagram with the actual components on your desk. Notice how wires connect each part and how current flows from the power source to the output. Asking yourself what each symbol means and how it fits into the circuit can improve your understanding quickly.
Breadboarding Basics
Breadboards allow you to build circuits without soldering, making them perfect for experimenting. The holes are connected in rows and columns, so you can easily plug in components and wires. This setup helps you test and modify your circuit before making it permanent.
Start with a simple LED and resistor circuit to see how power flows and components light up. Keep your wires short and organized to avoid confusion. You might find that adjusting connections on a breadboard feels like solving a fun puzzle—have you tried rearranging components to see what changes?
Soldering Tips For Beginners
Soldering makes your circuits sturdy and reliable by permanently connecting components. Use a soldering iron with a fine tip and work in a well-ventilated area. Practice on spare wires before working on your actual project to build steady hand control.
Heat the joint first, then apply solder to the heated metal, not directly to the iron. Avoid using too much solder to prevent shorts. Remember, patience is key—if a joint looks dull or cracked, reheat and add a little more solder for a solid connection.
Easy Diy Gadget Ideas
Easy DIY gadget ideas open the door to hands-on learning and fun. You don’t need to be an expert or have expensive tools to create useful electronic devices at home. These projects help you understand basic electronics while giving you something practical to use or show off.
Building A Simple Led Torch
Creating an LED torch is one of the simplest ways to start with electronics. You only need a few components: an LED bulb, a resistor, a battery, and some wires. Connect the battery to the LED through the resistor to avoid burning out the LED, and you’ll have a bright, energy-efficient torch.
This project teaches you about current flow and resistance. Plus, it’s satisfying to see your torch light up after assembling it. Have you ever thought about how a tiny resistor can protect your LED from damage?
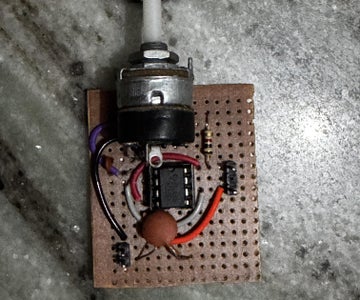
Creating A Basic Fm Radio
Making a basic FM radio might sound complicated, but it’s manageable with a simple circuit kit or components like a transistor, capacitor, and coil. The radio picks up local FM signals and converts them into sound through a small speaker or earphone.
This project helps you learn about radio waves and signal processing. It also sharpens your soldering and circuit-building skills. Imagine tuning into your favorite station using a radio you built yourself—how cool is that?
Making A Miniature Fan
A miniature fan is a practical gadget you can build with a small motor, fan blades, and a battery pack. Connecting these parts correctly will power the fan and provide a refreshing breeze on a hot day.
This project demonstrates how electrical energy converts into mechanical energy. It’s a great way to understand motors and power sources in a hands-on manner. What if you could customize the fan speed by adding a switch or variable resistor?
Using Microcontrollers
Microcontrollers are small computers you can use to build electronic gadgets at home. They control devices by reading inputs and turning them into outputs. Using microcontrollers lets you create smart tools and fun projects with simple parts and coding. Many microcontrollers are affordable and beginner-friendly.
Intro To Arduino And Raspberry Pi
Arduino and Raspberry Pi are popular microcontrollers for beginners. Arduino is great for simple electronics like lights and motors. It uses a small chip to run one program at a time. Raspberry Pi is a mini computer that runs a full operating system. It handles more complex tasks and connects to screens and keyboards. Both have large communities and many tutorials online.
Simple Coding For Beginners
Programming microcontrollers is easy with basic coding skills. Arduino uses C/C++ language, but you can start with simple commands. Raspberry Pi supports Python, a friendly language for beginners. You write short codes to control sensors, lights, and sounds. Testing code is quick, letting you see results fast. Many free tools help you write and upload code to your device.
Project Ideas With Microcontrollers
- Automatic plant watering system that senses soil moisture
- LED light show controlled by sound or buttons
- Simple alarm system using motion sensors
- Temperature monitor displaying data on an LCD screen
- Remote-controlled car using Bluetooth or Wi-Fi
These projects use common parts and basic coding. They teach key skills and encourage creativity. Start small and build your confidence with each project.
Troubleshooting And Maintenance
Troubleshooting and maintenance are key to keeping your homemade electronic gadgets working smoothly. Even simple devices can face issues like loose connections or power problems. Knowing how to identify and fix these issues saves time and keeps your projects enjoyable.
Common Problems And Fixes
One frequent issue is a gadget not powering on. Check the power source and connections first. Loose wires or a drained battery often cause this.
Another common problem is a circuit that behaves erratically. Look for cold solder joints or misplaced components. Re-soldering connections or swapping parts usually resolves these hiccups.
If your device overheats, ensure components are rated correctly and have proper ventilation. Overheating can damage sensitive electronics quickly.
Testing Your Circuits
Testing your circuits regularly helps catch problems early. Use a multimeter to check voltage, current, and continuity. This tool shows if your connections are intact and components work as expected.
Try powering the circuit step-by-step instead of all at once. This approach helps isolate the faulty section.
Have you thought about using a breadboard for initial testing? It makes swapping parts easy and reduces soldering mistakes.
Maintaining Your Gadgets
Keep your gadgets clean and dry to avoid corrosion and short circuits. Dust buildup can block ventilation and cause overheating.
Store your devices in a safe place where they won’t be bumped or dropped. Physical damage is a hidden enemy of electronics.
Regularly check connections and batteries. Even a tiny loose wire can stop your gadget from working.

Credit: www.youtube.com
Expanding Your Skills
Expanding your skills is a key step in building better electronic gadgets. It helps you create more complex projects and solve problems faster. Learning new techniques and connecting with others who share your interest can make the process enjoyable and rewarding.
Learning Advanced Electronics
Dive deeper into topics like microcontrollers, sensors, and circuit design. Study how different components work together in a system. Practice assembling and programming small projects to improve your confidence. Experiment with new tools and parts to broaden your knowledge.
Joining Maker Communities
Find groups of hobbyists and experts who build electronics. Share your ideas and ask questions in forums or social media. Attend local meetups or online workshops to learn from others. Collaboration often leads to discovering new tips and tricks.
Finding Resources And Tutorials
Access free tutorials, videos, and guides online. Use step-by-step instructions to build projects at your own pace. Bookmark websites and channels that explain concepts clearly. Keep a list of trusted resources to return to when needed.
Credit: www.instructables.com
Frequently Asked Questions
What Basic Tools Are Needed For Making Electronic Gadgets?
You need a soldering iron, multimeter, wire cutters, screwdrivers, and a breadboard. These tools help assemble and test circuits easily at home.
Which Simple Gadgets Can Beginners Build Easily?
Beginners can start with LED flashlights, mini radios, or simple alarms. These projects use basic components and teach essential electronics skills.
Where To Find Components For Diy Electronic Gadgets?
You can buy components online, at local electronics stores, or salvage parts from old devices. Quality parts ensure better performance and durability.
How To Ensure Safety While Making Electronic Gadgets At Home?
Always work in a well-ventilated area, wear protective gear, and unplug devices before working on circuits. Follow instructions carefully to avoid accidents.
Conclusion
Making simple electronic gadgets at home is fun and rewarding. You can learn new skills step by step. Start with easy projects and build your confidence. Use common parts and follow instructions carefully. Practice helps you improve every time. Creating gadgets sparks creativity and problem-solving.
Enjoy the process and keep experimenting. Small projects lead to bigger ideas. Stay curious and keep building. Your skills will grow with each gadget you make.
Leave a Reply