Have you ever faced a broken gadget and wondered how to find the exact electronic part to fix it? Identifying the right electronic component for replacement can feel confusing and overwhelming.
But it doesn’t have to be that way. With a few simple steps and clear tips, you can quickly spot the component you need. This guide will help you save time, avoid mistakes, and get your device working again faster.
Ready to become confident in choosing the right part? Let’s dive in and make your repair process easier than ever.

Credit: www.reddit.com
Common Electronic Components
Identifying electronic components for replacement is crucial in repairs. Understanding common components helps in making accurate replacements. Let’s explore key components you’ll often encounter.
Resistors And Capacitors
Resistors control current flow in circuits. They have colored bands indicating resistance values. Capacitors store electrical energy temporarily. They have capacitance values printed on their bodies. Both components are fundamental in electronic devices.
Diodes And Transistors
Diodes allow current to flow in one direction only. They are crucial for rectifying currents. Transistors act as amplifiers or switches. They have three terminals: emitter, base, and collector. Recognizing these components is vital for circuit functionality.
Integrated Circuits
Integrated circuits, or ICs, are compact and complex. They contain multiple components like resistors and transistors. ICs perform various functions in a single package. Identifying their part numbers is essential for replacement. They are found in almost every electronic device.
Tools For Identification
Identifying an electronic component accurately is crucial before you replace it. Using the right tools can save you time and prevent costly mistakes. These tools help you check the component’s condition and verify its specifications quickly.
Multimeter Usage
A multimeter is your go-to tool for testing many electronic components. It measures voltage, current, and resistance, helping you spot faulty parts like resistors, capacitors, and diodes.
For example, you can check a resistor’s resistance value to see if it matches the expected rating. If it’s way off, you know replacement is necessary. Learning to use a multimeter effectively will give you confidence in pinpointing problems yourself.
Component Testers
Component testers are specialized devices designed to identify and test a range of components such as transistors, capacitors, and inductors. They provide quick results, often displaying component type and value on a screen.
If you’ve ever struggled with tiny, unlabeled parts, a component tester can be a game changer. It removes guesswork and speeds up the repair process, especially when working with complex circuit boards.
Magnification Tools
Sometimes, the smallest details make the biggest difference. Magnification tools like magnifying glasses or digital microscopes let you examine components closely.
Look for signs of damage like cracks, burns, or corrosion that are hard to see with the naked eye. Have you ever missed a tiny broken leg on a chip? Using magnification can prevent those oversights and ensure you replace the right part.
Visual Inspection Techniques
Visual inspection is your first and most straightforward tool for identifying faulty electronic components. It allows you to catch obvious signs of damage before moving on to more complex diagnostic methods. With just a careful look, you can often pinpoint the component that needs replacement and save valuable time.
Checking For Physical Damage
Look closely at the component’s body for cracks, chips, or deformations. Even a small crack can indicate internal failure. Have you ever noticed how a tiny fracture on a capacitor’s casing often signals it’s time for a swap?
Also, check for swelling or bulging, especially in capacitors. These signs often mean the component has overheated or degraded. Hold the board at different angles under good lighting to spot subtle flaws.
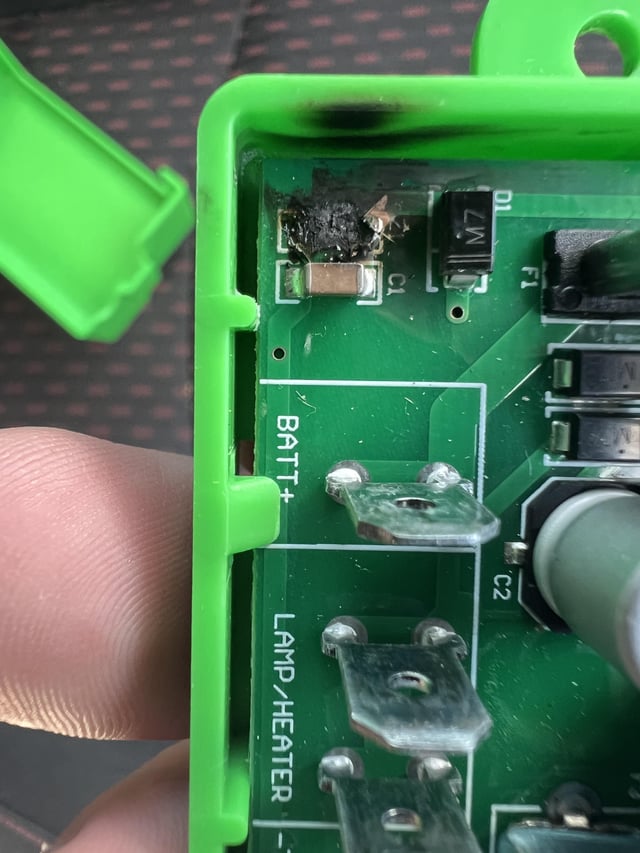
Identifying Burn Marks
Burn marks are a clear red flag on any circuit board. They usually appear as darkened or discolored areas around or on the component. If you spot any, focus your attention there immediately.
Sometimes, burn marks spread beyond the component to nearby traces or solder pads. Don’t ignore these; they can indicate a short circuit or excessive current flow. Ask yourself: could this damage have compromised the component’s function?
Examining Solder Joints
Bad solder joints often cause intermittent or complete failure. Look for dull, cracked, or uneven solder around the component’s pins. A well-soldered joint should be shiny and smooth.
Wiggling the component gently can reveal loose joints you might miss visually. If a joint moves or the component feels unstable, it’s a candidate for resoldering or replacement. How often have you fixed a stubborn electronic issue by simply touching up these joints?

Credit: www.reddit.com
Reading Component Markings
Reading the markings on electronic components helps you identify them quickly. These markings include letters, numbers, and symbols printed on the parts. Understanding these codes reveals important information like type, value, and ratings.
Markings vary by component type. Resistors show resistance values, capacitors show capacitance, and semiconductors display part numbers. Learning to read these details reduces guesswork and errors in replacement.
Decoding Codes And Labels
Component markings often follow standard codes or labels. For example, resistors use color bands or numeric codes to indicate resistance. Capacitors may have values in microfarads or picofarads printed on them.
Semiconductors like transistors and diodes usually have alphanumeric part numbers. These numbers can tell you the exact model and specifications. Sometimes, small symbols or logos help identify the manufacturer.
- Look for numbers indicating value or rating.
- Check letters that show tolerance or type.
- Note any special codes for temperature or voltage.
Manufacturer Datasheets
Datasheets provide detailed information about components. They explain markings, electrical characteristics, and physical dimensions. You can find datasheets on manufacturer websites or electronics catalogs.
Reading datasheets helps confirm the exact replacement part. It also gives you safe operating limits and pin configurations. Always compare the datasheet with the component’s markings before ordering replacements.
Using Online Databases
Online databases collect component information from many sources. You can search by part number or code to find details quickly. These databases often include datasheets, images, and cross-reference lists.
Popular electronic component databases help identify unknown parts. They assist in finding compatible replacements if the original is unavailable. Use these tools to save time and avoid mistakes.
Testing Components In Circuits
Testing components directly within a circuit is a critical skill for anyone looking to replace faulty parts without dismantling the entire setup. It saves time and helps pinpoint issues more accurately. Understanding how to test components in their working environment can make your repairs more efficient and less guesswork-driven.
In-circuit Testing Methods
In-circuit testing lets you check components without removing them, which keeps the circuit intact. You can use a multimeter to measure voltage, resistance, and continuity right on the board. This approach quickly reveals if a resistor is open, a capacitor is shorted, or a diode is damaged.
One personal tip: Always power off the device first to avoid damage to your meter or the component. Then, power it back on for voltage checks, but be cautious about live measurements to protect yourself and your tools.
Signal Tracing
Signal tracing helps you follow the path of electrical signals through the circuit to find where they stop or distort. Use a signal injector and probe to send a test signal and observe how it moves through components.
If a signal disappears at a certain point, it often indicates a faulty component or broken connection there. Ask yourself: Is the signal consistent and clean, or does it weaken and vanish? This can guide your replacement decisions.
Using Oscilloscopes
Oscilloscopes provide a detailed view of voltage changes over time, offering insights you can’t get with simple meters. They show waveforms that reveal noise, spikes, or irregularities in the circuit’s operation.
For example, a distorted waveform on a transistor’s output can hint at internal damage or a failing capacitor nearby. If you haven’t used an oscilloscope before, start with basic waveform observation to build confidence before interpreting complex signals.

Credit: electronics.stackexchange.com
Safety Precautions
Safety should be your top priority when identifying electronic components for replacement. Ignoring precautions can damage sensitive parts or even harm you. Taking simple, careful steps protects your equipment and keeps you safe.
Handling Static Sensitive Parts
Static electricity can silently destroy delicate electronic components. Always ground yourself before touching any part by using an anti-static wrist strap or touching a metal surface connected to the ground.
Keep components in anti-static bags until you’re ready to use them. Even a small static shock can ruin a transistor or microchip, so don’t underestimate this invisible threat.
Power Off Before Testing
Never test or replace components while the device is powered on. This can cause short circuits or electric shocks.
Unplug the device and, if possible, remove the battery before you start. It might seem obvious, but I’ve seen many overlook this and pay the price with fried boards and personal injury.
Proper Workstation Setup
Organize your workspace to avoid accidents and loss of tiny components. Use a clean, well-lit area with a non-conductive surface like a rubber mat.
Keep tools and parts within easy reach to minimize unnecessary movement. A cluttered desk increases the chance of dropping or mixing up components, which wastes your time and effort.
Sourcing Replacement Components
Sourcing replacement components is a crucial part of repairing or upgrading any electronic device. Knowing where to find the right parts saves you time and prevents further issues down the line. It’s not just about grabbing any component; it’s about finding one that fits perfectly and works reliably.
Choosing Compatible Parts
Compatibility is more than matching the part number. You need to check the specifications like voltage, current, and physical size. Sometimes, even a small difference can cause the component to fail or damage your device.
Look at the datasheet carefully. If you’re unsure, ask yourself: Does this part support the same functions? Can it handle the same workload? If the answer is no, keep searching.
Reliable Suppliers
Not all suppliers are created equal. You want to buy from sources known for quality and authenticity. Trusted suppliers often provide warranties and good customer support, which can save you headaches later.
Consider suppliers with positive reviews and industry certifications. Have you ever received a faulty part from an unknown seller? Choosing a reputable supplier minimizes that risk.
Avoiding Counterfeits
Counterfeit components look real but can ruin your project. They often fail early or cause unpredictable behavior. Spotting them requires vigilance and knowing what to check.
Buy components with clear labeling and proper packaging. Check the supplier’s reputation and avoid prices that seem too good to be true. Have you ever been tempted by a cheap deal only to regret it later?
Frequently Asked Questions
How To Recognize A Faulty Electronic Component?
Look for physical damage, discoloration, or burn marks. Test the component with a multimeter for continuity or resistance. Listen for unusual sounds or check if the device malfunctions.
What Tools Help Identify Electronic Parts For Replacement?
Use a multimeter, oscilloscope, or component tester. These tools measure voltage, current, resistance, and functionality, helping to spot defective parts accurately.
Can Component Datasheets Aid In Identifying Replacements?
Yes, datasheets provide specifications, pin configurations, and ratings. They help match the exact type, ensuring compatibility and proper functionality during replacement.
How To Match A Replacement Component Correctly?
Check the component’s type, value, voltage, and tolerance. Use datasheets and manufacturer details to find an exact or equivalent match for reliable performance.
Conclusion
Identifying the right electronic component saves time and money. Check labels and markings carefully for accurate info. Use a multimeter to test if the part works well. Compare the old part with the new one before replacing. Keep a good light source and magnifier handy for small details.
Taking these steps helps avoid mistakes and ensures your device runs smoothly. Simple checks make repair tasks easier and safer for everyone. Stay patient and focused to find the best replacement part.
Leave a Reply