Imagine never worrying about your plants drying out again. With a DIY electronic sensored watering system, you can take control of your garden’s health effortlessly.
This smart setup senses when your soil is dry and waters your plants automatically, saving you time and stress. If you want healthier plants without the hassle, keep reading to discover how you can build this simple, effective system yourself.
Your garden will thank you!

Credit: www.youtube.com
Benefits Of Electronic Sensored Watering
Electronic sensored watering systems bring many benefits to gardeners and plant lovers. These systems use sensors to detect soil moisture and water plants only when needed. This precision helps save water, keep plants healthier, and reduce time spent on watering chores.
Water Conservation
These systems prevent overwatering by supplying water only when soil is dry. They reduce water waste and help preserve this valuable resource. Efficient water use also lowers water bills for homeowners and farmers.
Plant Health Improvement
Consistent watering avoids stress caused by too much or too little water. Sensors ensure plants get just the right amount to grow strong and healthy. Healthier plants resist disease and produce better yields.
Time And Effort Savings
Automatic watering means less manual work and fewer watering mistakes. Gardeners can focus on other tasks or enjoy more free time. The system works day and night, providing reliable care without constant attention.
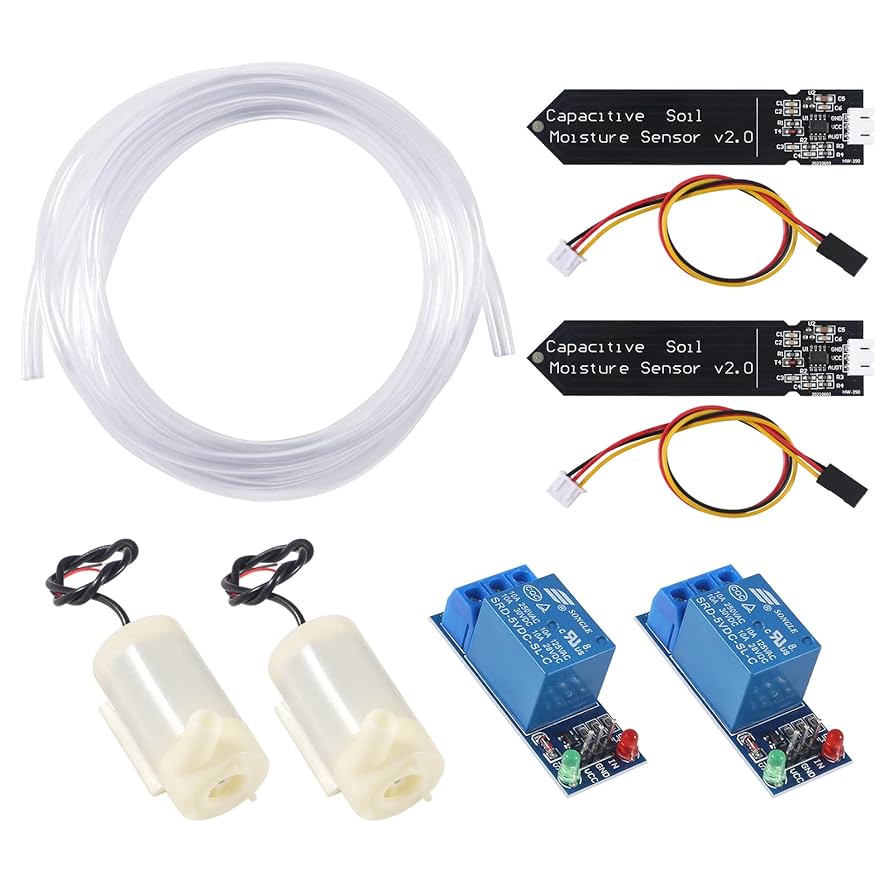
Essential Components
Building a DIY electronic sensored watering system needs a few key parts. Each component works together to keep plants healthy by watering them correctly. Understanding these parts helps to create a system that saves water and time.
Soil Moisture Sensors
Soil moisture sensors measure water levels in the soil. They send data to the microcontroller to decide when to water plants. Common types include resistive and capacitive sensors. Capacitive sensors last longer and avoid corrosion issues. Choose sensors that fit the size and type of your garden.
Microcontroller Options
The microcontroller acts as the brain of the system. It reads sensor data and controls the water pump or valve. Popular choices include Arduino, Raspberry Pi, and ESP8266. Arduino is beginner-friendly and has many tutorials. ESP8266 offers Wi-Fi connectivity for remote control. Pick a microcontroller based on your experience and project needs.
Water Pump And Valve Choices
Water pumps move water from the source to plants. Small submersible pumps work well for indoor gardens. For outdoor or larger setups, use larger pumps or solenoid valves. Solenoid valves control water flow with electric signals. Match pumps and valves to your water source and garden size for best results.
Power Supply Considerations
Powering the system reliably is essential. Options include batteries, solar panels, or AC adapters. Batteries offer portability but need regular charging. Solar panels provide clean energy and reduce running costs. AC adapters supply constant power but limit placement. Choose a power source that fits your location and usage.
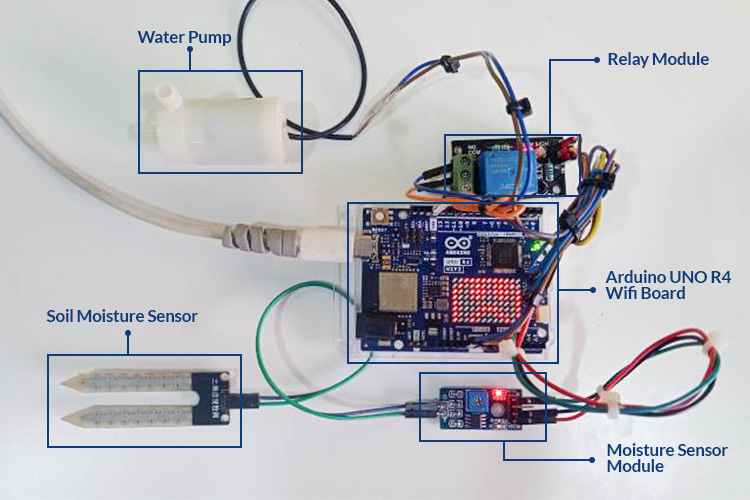
Designing The Circuit
Designing the circuit is a key part of building a DIY electronic sensored watering system. The circuit connects sensors, microcontroller, and water pump to work smoothly. Careful planning ensures the system waters plants accurately and saves water.
Wiring The Sensors
Sensors detect soil moisture levels and send signals to the microcontroller. Connect each sensor’s power pin to the 5V supply and ground pin to the circuit ground. The sensor output pins link to the microcontroller’s analog input pins.
Use jumper wires for secure connections. Avoid loose wires to prevent false readings. Label each wire to keep track during assembly.
Connecting The Microcontroller
The microcontroller acts as the brain of the system. Connect the sensor outputs to the microcontroller’s analog inputs. Power the microcontroller with a stable 5V supply.
Use a breadboard or PCB for neat wiring. Connect the microcontroller’s ground to the circuit ground for a common reference. Upload the control code after wiring is complete.
Integrating The Water Pump
The water pump delivers water based on sensor input. Connect the pump to a relay module controlled by the microcontroller’s digital output pin. The relay safely switches the pump on and off.
Power the pump with an external power source matching its voltage. Connect the relay ground to the microcontroller ground. Test the pump operation before final assembly.
Programming The System
Programming your DIY electronic sensored watering system is where the magic happens. This is the stage where you turn raw data from sensors into smart decisions for your plants. Writing the code carefully ensures your plants get just the right amount of water without wasting resources.
Sensor Calibration
Calibrating your sensors is crucial for accuracy. Each sensor might give different readings even if placed in the same soil. You can start by comparing sensor readings with a simple moisture test using your fingers or a moisture meter you trust.
Adjust your code to map sensor output to actual moisture levels. For example, if your sensor reads 300 when the soil is moist and 700 when dry, set these as calibration points in your program. This step helps your system understand what “wet” and “dry” really mean.
Threshold Settings
Setting the right moisture threshold decides when your system waters the plants. Too low, and your plants might dry out; too high, and you risk overwatering. Try starting with a threshold that triggers watering just before the soil feels dry to touch.
Consider different thresholds for different plants if your setup supports multiple sensors. You can store these values in variables and tweak them as you observe your plants’ reactions. This flexibility makes your system smarter over time.
Automated Watering Logic
The core of your program is the logic controlling the watering. Your code should continuously read sensor data and compare it to your thresholds. When the soil moisture drops below the set level, the watering system activates automatically.
Include timing controls to prevent watering too often. For instance, add a minimum gap of a few hours between watering cycles. This prevents waterlogging and saves energy, making your system more efficient.
Error Handling
Errors happen, so plan for them in your code. Sensors might fail or give strange readings, and pumps could get stuck. Include checks that detect sensor values outside normal ranges and pause watering if something looks wrong.
Adding simple alerts like blinking LEDs or serial messages can help you quickly spot issues. This way, you avoid overwatering or underwatering caused by system faults. Have you thought about how your system will behave if a sensor goes offline?
Installation Tips
Setting up your DIY electronic sensored watering system correctly ensures it works well and lasts long. Proper installation avoids common problems and keeps plants healthy. Focus on key areas during setup for best results.
Sensor Placement
Place the soil moisture sensor where plant roots grow most. Usually, this is about 2 to 4 inches deep. Avoid placing the sensor near rocks or hard soil. Keep it away from water drips or puddles to prevent false readings. Position the sensor in a spot that receives typical sunlight and shade.
Water Source Setup
Connect the water source securely to avoid leaks. Use a clean water supply to protect plants. Check the hose or tubing for cracks before use. Install a filter if your water has debris to protect the system. Set the water flow rate to match your plant’s needs.
Protecting Electronics Outdoors
Electronics must stay dry to avoid damage. Use waterproof enclosures for sensors and control units. Seal all cable connections with silicone or waterproof tape. Place the control box in a shaded, elevated area. Avoid direct sunlight and heavy rain exposure to extend device life.
Testing And Troubleshooting
Testing and troubleshooting your DIY electronic sensored watering system ensures it works correctly. This step helps catch errors early and improves system reliability. It also saves water and keeps plants healthy by providing precise watering.
System Testing Procedures
Start by powering up the system and checking sensor readings. Use a multimeter to verify voltage levels on sensors and control circuits. Observe if the water pump activates when soil moisture falls below the set threshold.
Test the system in different soil conditions—dry, moist, and wet. Confirm the sensor detects changes quickly and triggers watering only when needed. Monitor the response time and ensure no false activations occur.
Check all wiring connections for firmness. Loose wires can cause intermittent failures. Run the system for a full watering cycle and watch for consistent behavior throughout.
Common Issues And Fixes
- Sensor not detecting moisture:Clean the sensor probes and check for corrosion.
- Pump not turning on:Verify power supply and inspect relay or transistor switches.
- Continuous watering:Calibrate sensor thresholds or replace faulty sensors.
- Inconsistent readings:Shield sensors from direct water splashes or sunlight.
- Loose connections:Re-solder or tighten all electrical joints.
Maintenance Tips
- Regularly clean sensor probes to prevent dirt buildup.
- Inspect wiring for wear or damage every few weeks.
- Test system sensors before each planting season.
- Replace batteries or power sources as needed.
- Keep the pump free from debris to avoid clogging.
Advanced Features
The advanced features of a DIY electronic sensored watering system make plant care smarter and easier. These features add convenience and precision to watering routines. They help save water and keep plants healthy.
Remote Monitoring
Remote monitoring lets you check your garden from anywhere. Sensors send real-time data about soil moisture and temperature. You get alerts if plants need water or if something goes wrong. This feature saves time and effort by reducing the need for physical checks.
Mobile App Integration
Mobile app integration connects your watering system to your smartphone. You can control watering schedules and settings with a few taps. The app shows detailed reports and sensor readings. It allows easy customization and quick adjustments on the go.
Weather-based Adjustments
Weather-based adjustments use local weather data to fine-tune watering. The system skips watering during rain or reduces water on cool days. This smart feature prevents overwatering and conserves water. It adapts watering plans to changing weather automatically.

Credit: medium.com
Cost And Material Sourcing
Building a DIY electronic sensored watering system can be affordable and simple. Understanding cost and material sourcing helps keep the project budget-friendly. Choosing the right parts affects both performance and price. Smart shopping can save money without sacrificing quality.
Budget-friendly Parts
Many components for a watering system are inexpensive. Sensors like soil moisture detectors often cost just a few dollars. Microcontrollers such as Arduino or ESP8266 are affordable and widely available. Small pumps and valves can also be found at low prices.
Simple wiring, resistors, and breadboards add little to the total cost. Reusing old electronics or parts from broken devices lowers expenses. Focus on buying only what is necessary to avoid overspending.
Where To Buy Components
Online stores offer a wide variety of electronic parts. Websites like Amazon, eBay, and AliExpress provide competitive prices. Specialized electronics shops carry quality sensors and microcontrollers.
Local electronics markets or hobby stores may offer quick access to parts. Some sellers provide kits with all needed components for easier sourcing. Checking reviews and seller ratings ensures trustworthy purchases.
Credit: circuitdigest.com
Frequently Asked Questions
What Is A Diy Electronic Sensored Watering System?
A DIY electronic sensored watering system automatically waters plants using moisture sensors. It detects soil dryness and activates watering, saving time and water.
How Does The Moisture Sensor Work In Watering Systems?
The moisture sensor measures soil water content. When dryness is detected, it triggers the water pump to hydrate plants effectively and precisely.
Can I Build This System Without Coding Skills?
Yes, many kits use plug-and-play components. Basic wiring and simple programming or pre-built modules make it beginner-friendly.
What Are The Key Benefits Of Using This System?
It conserves water, ensures optimal plant hydration, reduces manual effort, and prevents overwatering, promoting healthier plant growth consistently.
Conclusion
Building your own electronic sensored watering system is rewarding. You save water and time. This DIY project is simple and cost-effective. Ideal for beginners and tech enthusiasts alike. No need for expert skills. Just follow the steps carefully. Your plants get the right amount of water.
Less effort, more growth. Experiment and adjust settings as needed. Enjoy healthier plants and a greener garden. This system makes plant care easy. Perfect for anyone with a busy schedule. Ready to enhance your gardening experience? Start today. Your plants will thank you.
Leave a Reply