Have you ever wondered how even the simplest gadgets around you work? At the heart of many electronic devices is a basic assembly made up of just two components.
Understanding this simple setup can unlock a whole new world of electronics for you. You’ll discover exactly what these two parts are and how they come together to create something powerful. By the end, you’ll see electronics in a way that feels clear and exciting—ready to inspire your own projects or spark your curiosity even further.
Keep reading, because what you learn here could change how you think about technology forever.
Basics Of Electronic Assemblies
Understanding the basics of electronic assemblies is essential if you’re diving into the world of electronics. At its core, a simple electronic assembly often consists of just two components working together to perform a function. This simplicity helps you grasp how electronics come to life and prepares you for more complex projects.
What Are Electronic Assemblies?
Electronic assemblies are combinations of components connected to create a working circuit. These can be as simple as a battery connected to a light bulb or as complex as a computer motherboard. Even the simplest assemblies teach you how electricity flows and components interact.
Key Components In A Simple Assembly
In a basic electronic assembly, two primary components usually appear:
- Power Source:This supplies the energy needed for the circuit, like a battery.
- Load:The part that uses the power to do something, such as a light bulb or a motor.
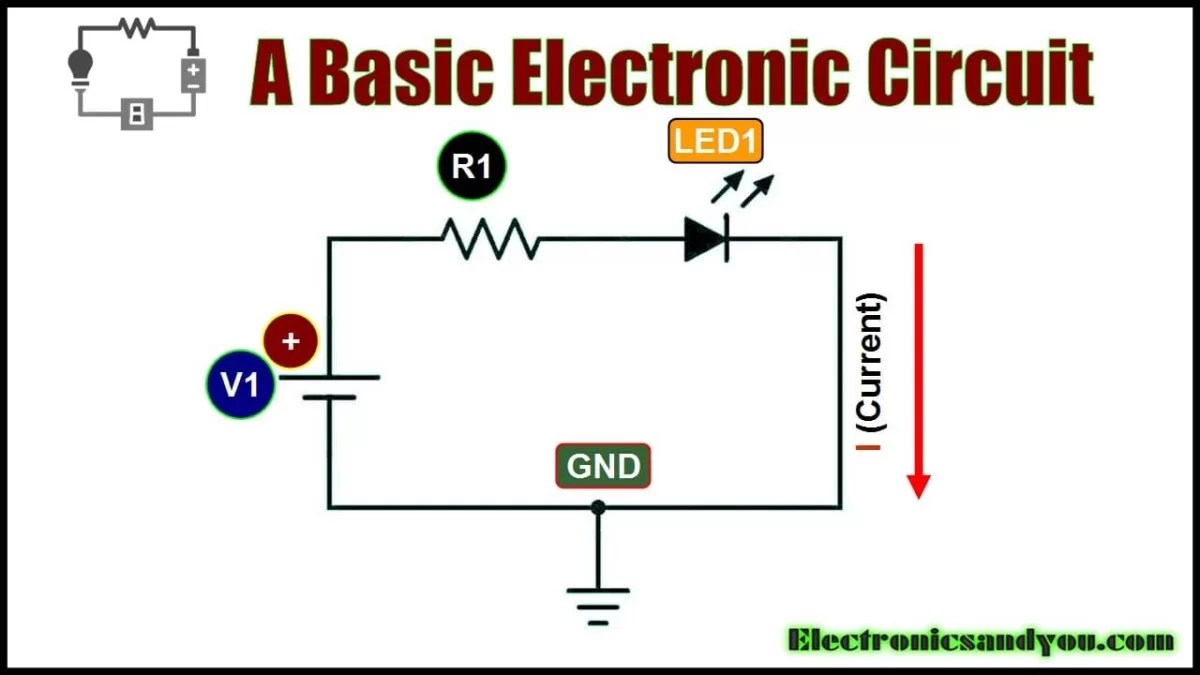
Try connecting a battery to a small LED. You’ll see how these two parts can create light with just a simple connection.
How Components Work Together
The power source pushes electric current through the load, making it operate. Without the power source, the load stays inactive. Without a load, the power source has nowhere to send energy.
Have you ever wondered why a circuit won’t work if one component is missing or faulty? It’s because every part plays a crucial role in completing the path for electricity.
Basic Tools You Need
To build or repair simple assemblies, keep these tools handy:
- Soldering iron for joining wires and components
- Wire cutters and strippers for preparing cables
- Multimeter to test voltage and continuity
Using these tools properly can save you time and frustration. When I first started, a multimeter helped me find a broken connection quickly, proving its value.
Understanding Components
Understanding the basic components of an electronic assembly is key to building and troubleshooting circuits effectively. Even the simplest assemblies rely heavily on just a few parts, each performing a crucial role. By knowing what these components do, you can design smarter circuits and fix problems faster.
Role Of Resistors
Resistors control the flow of electric current by providing resistance. Think of them as traffic lights that manage how much current passes through a circuit. Without resistors, components could receive too much current and get damaged.
Resistors come in different values, measured in ohms (Ω), which determine how much they reduce current. You might wonder why a particular resistor value is chosen. It all depends on how much current you want to allow through your circuit.
When I first experimented with LEDs, I learned the hard way that skipping a resistor can burn them out instantly. Adding the right resistor not only protects the LED but also ensures it shines at the perfect brightness. What could happen if you don’t use resistors in your circuit?
Function Of Capacitors
Capacitors store and release electrical energy quickly. They smooth out voltage fluctuations and filter noise in circuits. Think of them as tiny energy reservoirs that keep your circuit stable.
They come in various sizes and types, like ceramic or electrolytic, each suited for different tasks. You might use a capacitor to keep a motor running smoothly or to filter out interference in a radio signal.
In one project, adding a capacitor fixed a flickering display that was driving me crazy. The capacitor absorbed voltage spikes and stabilized the power supply. Can you think of any devices around you that might rely on capacitors to work properly?
Tools For Assembly
Tools are vital for a smooth electronic assembly process. They help connect parts and test circuits. Having the right tools saves time and improves quality. Two essential tools for simple assembly include the soldering iron and multimeter. Each tool has specific uses and features to understand.
Soldering Iron Essentials
The soldering iron joins electronic parts with melted solder. It heats up quickly and melts solder wire to form strong connections. Choose a soldering iron with adjustable temperature for better control. A fine tip helps reach small parts easily.
- Use rosin-core solder for clean joints.
- Keep the tip clean with a damp sponge.
- Work in a well-ventilated area to avoid fumes.
- Always unplug the soldering iron when not in use.
Multimeter Usage
The multimeter measures voltage, current, and resistance in circuits. It helps find faults and verify connections. Digital multimeters show precise readings on a screen. Set the dial to the correct measurement type before testing.
- Check battery voltage to ensure power supply is good.
- Test continuity to confirm wires connect properly.
- Measure resistance to check component health.
- Use probes carefully to avoid short circuits.

Credit: www.electronicsandyou.com
Step-by-step Assembly Process
Building a simple electronic assembly with just two components might seem straightforward, but a careful approach makes all the difference. The process demands focus, the right setup, and precise technique to ensure your project works perfectly. Let’s break down the essential actions that will lead you from parts to a functional circuit.
Preparing The Workspace
Your workspace sets the tone for success. Choose a clean, well-lit area free from clutter and distractions. This helps you spot small parts easily and prevents mistakes that come from a rushed or messy environment.
Gather all your tools before you start—soldering iron, solder wire, tweezers, and a small screwdriver. Having everything within reach reduces interruptions and keeps your flow steady. Ever noticed how a cluttered desk slows down your work? Clearing your space is not just about neatness; it’s about efficiency.
Consider using an anti-static mat if you’re working with sensitive components. Even if your parts are simple, static can damage them or cause unpredictable behavior. Don’t underestimate the power of a grounded workspace; it protects both you and your project.
Soldering Techniques
Soldering is where your components come alive, and getting it right takes practice. Heat your soldering iron to the correct temperature—usually around 350°C (662°F) for most electronics. Too hot, and you risk damaging the parts; too cold, and the solder won’t flow properly.
Touch the soldering iron tip to both the component lead and the pad on the circuit board simultaneously. Then, feed the solder into the joint, not directly onto the iron. This ensures a strong, clean connection.
Watch for shiny, smooth joints that look like tiny volcanoes. Dull or cracked joints can cause poor connections and intermittent failures. If a joint looks suspicious, reheat and add a bit more solder. Have you ever been frustrated by a project that worked one moment and failed the next? Often, a bad solder joint is the culprit.
- Keep the soldering tip clean by wiping it on a damp sponge regularly.
- Avoid using too much solder; it can create shorts between pads.
- Use a small amount of flux to help solder flow if needed.
With patience and attention, your simple assembly will become a reliable circuit you can be proud of. What small habit could you adopt to improve your next soldering session?
Testing And Troubleshooting
Testing and troubleshooting play a vital role in electronic assembly. They confirm the device works correctly and fix any faults. Careful checks prevent damage and ensure safety. This process saves time and cost by spotting errors early.
Identifying Common Issues
Start by checking all connections. Loose wires often cause problems. Look for burnt components or broken parts. Use a multimeter to test voltage and resistance. Signs of overheating or unusual smells indicate trouble. Visual inspection can catch many issues quickly.
- Check solder joints for cracks or cold soldering.
- Verify component placement matches the circuit diagram.
- Test power supply voltage levels.
- Look for short circuits or open circuits.
Ensuring Functionality
Power the assembly carefully. Observe if it powers on without errors. Test the output signals to match expected values. Use simple tools like oscilloscopes or logic testers. Recheck the components if performance is off. Keep a checklist of tests to cover all parts.
- Confirm power input and output voltages.
- Test signal flow through the circuit.
- Measure resistance and current draw.
- Repeat tests after any repairs.
Credit: www.wevolver.com
Safety Tips
Working with electronic components might seem straightforward, but safety should never be overlooked. Even simple assemblies can pose risks if you don’t handle parts or tools carefully. Paying attention to safety tips not only protects you but also ensures your project works as intended without damage.
Handling Components Safely
Always start by grounding yourself to avoid static electricity damage. Static shocks can silently ruin sensitive components, leaving you puzzled when your circuit doesn’t work.
Keep components in anti-static bags or containers until you need them. Never touch metal leads or circuit pins directly with your fingers—hold parts by the edges instead.
Ask yourself: Have you checked the voltage ratings and polarity before connecting components? A small mistake here can lead to overheating or even explosions.
Proper Use Of Tools
Use the right tool for each task to prevent injury and component damage. For instance, a fine-tipped soldering iron is better for small joints, while a wire stripper makes clean cuts without crushing wires.
Make sure your tools are in good condition. Dull blades or worn-out tips can slip and cause accidents or poor connections.
Always work in a well-lit, organized space. Clutter can lead to mistakes or accidents—have you experienced frustration trying to find the right tool in a messy drawer?
Applications Of Simple Assemblies
Simple electronic assemblies, made up of just two components, have a surprising range of uses. Their simplicity makes them ideal for hands-on learning and basic practical applications. Understanding where and how these assemblies fit into real-world scenarios can spark your creativity and deepen your appreciation for electronics.
Educational Uses
Simple assemblies are perfect for beginners who want to grasp the basics of electronics. They help you see how components like resistors and LEDs work together without overwhelming complexity.
Teachers often use these assemblies to demonstrate fundamental concepts such as current flow and circuit behavior. Building a circuit with just two parts allows you to focus on the cause and effect, making learning more interactive and memorable.
Have you ever tried building a blinking LED circuit in a classroom? It’s a great example of how simple setups can turn abstract ideas into tangible experiences.
Practical Implementations
Beyond education, simple assemblies are useful in everyday gadgets and basic devices. For instance, a basic sensor connected to a light indicator can alert you to changes without needing complicated circuitry.
These assemblies are often found in household items like night lights or simple alarm systems. Their reliability and ease of repair make them a practical choice when you want something that works without fuss.
Imagine creating your own low-cost temperature indicator using just two components. Wouldn’t that be a rewarding project that also serves a useful purpose?

Credit: www.electronicsandyou.com
Frequently Asked Questions
What Are The Two Main Components In Simple Electronic Assembly?
A simple electronic assembly mainly includes a power source and an electronic load. The power source supplies energy. The electronic load processes or uses that energy to perform a function.
How Do Two Components Work In Electronic Assembly?
The two components interact where one supplies power, and the other controls or uses it. Their cooperation enables the device to function effectively.
Why Use Only Two Components In Basic Electronic Assemblies?
Using two components simplifies design and reduces costs. It makes assembly easier and troubleshooting faster for beginners and basic applications.
Can A Simple Electronic Assembly Function With Just Two Parts?
Yes, basic devices like LED circuits or switches function efficiently with just two components. This minimal setup suits simple electronic tasks.
Conclusion
A simple electronic assembly needs just two parts. These parts work together to make a circuit. Understanding these components helps you build basic electronics. You can create many devices by combining them in different ways. This knowledge forms the base for learning more complex systems.
Start small, practice often, and enjoy the process. Electronics become easier with each new project you try. Keep experimenting and stay curious about how things work.
Leave a Reply