Are you ready to take your electronics skills to the next level? Knowing how to properly solder electronic components is a game-changer.
It can save you time, money, and frustration while building or fixing gadgets. But if your soldering isn’t done right, it can cause weak connections or even damage your devices. You’ll learn simple, clear steps that anyone can follow to master soldering.
By the end, you’ll feel confident handling your projects like a pro. Keep reading to unlock the secrets to strong, reliable solder joints that last.
Essential Tools For Soldering
Soldering electronic components requires the right tools for precision and safety. Beginners and experts alike benefit from understanding essential tools. Let’s explore the key components needed for effective soldering.
Types Of Soldering Irons
Soldering irons come in various types, each suited for specific tasks. Pencil soldering irons are great for small, detailed work. They are lightweight and easy to handle. For more extensive projects, consider a soldering station. These offer temperature control, enhancing precision. Cordless soldering irons provide mobility. They’re battery-powered and ideal for quick repairs.
Choosing The Right Solder
Choosing the right solder is crucial for a strong connection. Lead-based solder melts easily and is commonly used. Ensure proper ventilation when using it. Lead-free solder is safer and environmentally friendly. It requires a higher temperature to melt. Rosin-core solder contains flux, aiding in the soldering process. It helps clean the surfaces, ensuring better adhesion.
Additional Accessories
Certain accessories make soldering more efficient. A soldering stand holds the iron safely when not in use. It prevents accidental burns or damage. A sponge or brass wool helps keep the iron tip clean. Clean tips ensure better heat transfer. Desoldering tools are essential for correcting mistakes. They help remove excess solder or components. Tweezers and clamps hold components steady, ensuring precision.
Credit: www.circuitrework.com
Preparing Components And Workspace
Preparing your components and workspace is vital for a smooth soldering process. Clean parts and a well-organized area help create strong, reliable connections. This step reduces mistakes and improves the overall quality of your work.
Cleaning Components And Boards
Dirty components or circuit boards cause poor solder joints. Oils, dust, and oxidation block solder flow. Use isopropyl alcohol with a lint-free cloth to clean surfaces. Gently wipe metal leads and pads until shiny. A clean surface ensures better solder adhesion and electrical contact.
Setting Up A Safe Workspace
Choose a well-ventilated area to avoid fumes. Use a sturdy table free of clutter. Organize tools like soldering iron, wire cutters, and tweezers within reach. Keep a damp sponge or brass tip cleaner nearby. Use a heat-resistant mat to protect your desk. Always wear safety glasses to protect your eyes.
Soldering Techniques
Mastering soldering techniques is essential to create strong, reliable connections in your electronic projects. Each step in the soldering process affects the quality of your work, from preparing your tools to applying the solder itself. Paying attention to these details helps you avoid common issues like cold joints or damaged components.
Tinning The Tip
Tinning the soldering iron tip means coating it with a thin layer of solder before you start. This improves heat transfer, making your work faster and cleaner. Without tinning, your tip can oxidize quickly, reducing its effectiveness.
Make sure your tip is clean and hot, then melt a small amount of solder on it. The solder should flow smoothly and cover the entire tip. If you notice the solder beads up or doesn’t stick, clean the tip with a damp sponge and try again.
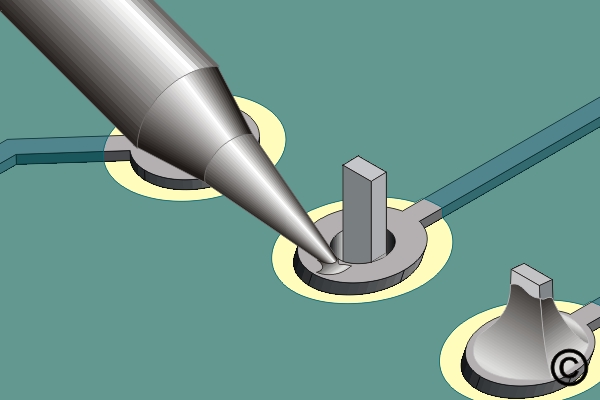
Heating The Joint Correctly
Instead of heating the solder directly, heat the joint where the component lead and the PCB pad meet. This ensures the solder flows properly and creates a strong bond. Hold the iron there for just enough time to warm the joint evenly—usually around 1 to 2 seconds.
Are you waiting too long or too little? Too much heat can damage components, while too little results in weak connections. Practice heating the joint until it’s hot enough to melt solder immediately when applied.
Applying Solder Properly
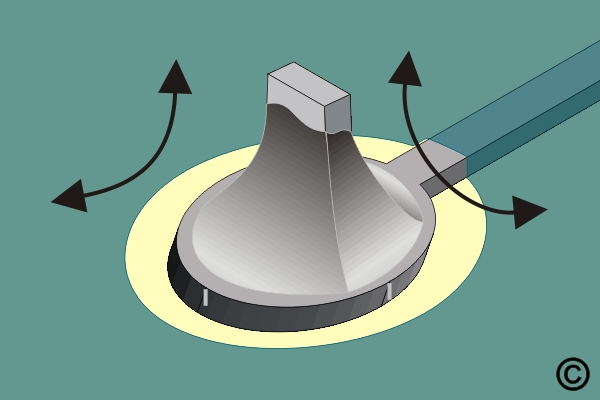
Once the joint is heated, apply solder to the joint—not the iron tip. The solder should melt and flow smoothly around the lead and pad, creating a shiny, cone-shaped joint. Avoid adding too much solder; a small amount is enough for a solid connection.
If the solder looks dull or forms a blob, it’s often a sign of a cold joint. Reheat and add a bit more solder if needed. Good soldering feels like a quick dance between heat and metal—are you letting the solder do the work or forcing it?

Credit: www.berklingtools.com
Common Soldering Mistakes
Soldering electronic components requires precision and care, but even experienced hobbyists can fall into common traps. Mistakes like cold joints, using too much solder, or damaging components can lead to unreliable circuits and frustration. Understanding these errors and how to avoid them will improve your soldering skills and ensure your projects work as expected.
Cold Joints And How To Fix Them
A cold joint happens when the solder doesn’t melt properly, creating a weak, brittle connection. This often looks dull or grainy instead of shiny and smooth. Cold joints can cause intermittent failures or complete circuit breaks, which are hard to diagnose.
To fix a cold joint, reheat the connection with your soldering iron until the solder flows evenly. Add a little fresh solder if needed, but avoid moving the component while the solder cools. A reliable joint should look shiny and cover the pad and component lead completely.
Avoiding Excessive Solder
Too much solder can create shorts between adjacent pins or pads, ruining your circuit. It also makes the joint bulky and prone to cracking over time. Using the right amount is about balance—you want enough solder to cover the connection without spilling over.
Try touching the solder wire to the heated joint just briefly, letting it flow naturally. If you notice solder blobs, wipe your iron tip on a damp sponge and try again. Keeping your soldering iron tip clean helps control solder flow and prevents excess buildup.
Preventing Component Damage
Applying heat for too long or using a soldering iron with too high a temperature can damage sensitive components. I’ve seen LEDs and ICs fail simply because they were exposed to heat for several seconds. Components may crack, discolor, or stop working without any visible sign.
To protect your parts, use a soldering iron set to the lowest temperature that melts solder effectively, usually between 350°C and 400°C. Work quickly—aim to complete each joint in under 3 seconds. If you need more time, allow the component to cool before continuing.
Advanced Tips For Better Results
Getting better results in soldering goes beyond just heating the metal and melting solder. It requires mastering small but crucial details that can make your joints stronger, cleaner, and more reliable. The following advanced tips will help you fine-tune your technique and avoid common pitfalls that even experienced hobbyists sometimes face.
Using Flux Effectively
Flux is your best friend when soldering, yet many overlook its true power. It cleans the metal surfaces and helps the solder flow smoothly. Applying a small amount of flux before soldering can prevent oxidation and improve the bond.
Too much flux, however, can leave sticky residues that attract dirt. Use just enough to cover the joint area, and clean any excess after soldering with isopropyl alcohol. Have you ever noticed how a clean joint shines more and lasts longer? That’s the flux doing its job well.
Soldering Surface-mount Devices
Soldering tiny surface-mount devices (SMDs) demands precision and patience. Use a fine-tipped soldering iron and work under good lighting or a magnifier. Tack one corner of the component first to hold it in place before soldering the other pins.
A steady hand is critical here. If you struggle with small parts, try pre-tinning the pads or use solder paste with a hot air rework station. This approach can save time and reduce the risk of damaging delicate components. Have you tried practicing on old circuit boards to build confidence before tackling your project?
Maintaining Your Tools
Good soldering starts with well-maintained tools. Keep your soldering iron tip clean by wiping it on a damp sponge regularly during work. A dirty tip won’t transfer heat efficiently and will cause poor joints.
Replace tips that are worn or pitted to maintain consistent performance. Also, check your solder wire for freshness; old solder can oxidize and become hard to melt. How often do you pause to clean and check your tools during a project? Small habits like these save you from frustrating rework later.
Testing And Troubleshooting
Testing and troubleshooting are essential to ensure your soldered electronic components work correctly. Proper inspection can catch issues before powering the device. Troubleshooting fixes common problems and improves circuit reliability.
Inspecting Solder Joints
Look closely at each solder joint under good light. The joint should be shiny and smooth, forming a small cone shape. Avoid dull, cracked, or blob-like joints. These often cause poor electrical connections or shorts.
Check for solder bridges where excess solder connects two pads. Also, ensure the component leads are fully covered but not flooded with solder. Proper joints hold components firmly and conduct electricity well.
Using Multimeters For Verification
A multimeter helps test electrical continuity and voltage levels. Use the continuity mode to check if the circuit paths are complete. Touch the probes on each side of the joint; a beep means good connection.
Measure voltage at key points to confirm the circuit powers correctly. Use resistance mode to detect shorts or open circuits. Multimeters are valuable tools for quick and accurate checks.
Reworking Faulty Connections
Remove faulty solder by heating the joint and using a solder wick or pump. Clean the pad with isopropyl alcohol to remove residue. Then, reapply fresh solder to create a strong joint.
Make sure the soldering iron is hot enough to melt solder quickly. Avoid overheating components to prevent damage. Recheck the joint after rework to ensure proper connection.
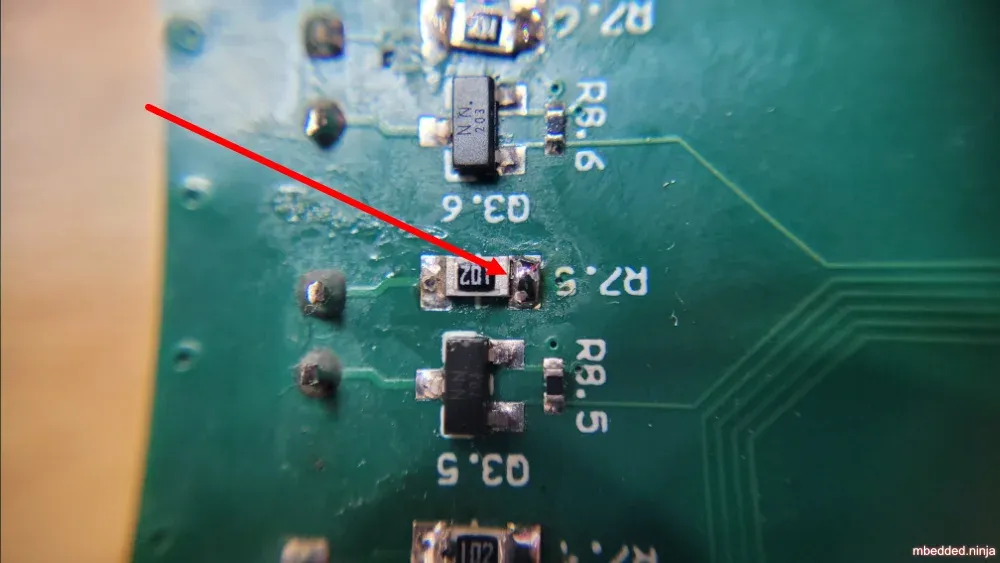
Credit: blog.mbedded.ninja
Frequently Asked Questions
What Tools Are Essential For Soldering Electronic Components?
Essential tools include a soldering iron, solder wire, flux, tweezers, and a wire cutter. These tools ensure precise and clean solder joints for reliable connections.
How Do I Prepare Components Before Soldering?
Clean component leads and circuit boards with isopropyl alcohol. This removes dirt and oxidation, ensuring better solder adhesion and stronger electrical connections.
What Is The Correct Soldering Temperature For Electronics?
Set the soldering iron between 350°C and 400°C. This range melts solder effectively without damaging sensitive components or circuit boards.
How Long Should I Apply Heat When Soldering?
Apply heat for 2 to 3 seconds until solder flows smoothly. Prolonged heat can damage components or lift pads from the PCB.
Conclusion
Proper soldering makes your electronic projects last longer and work better. Use the right tools and keep your workspace clean. Heat the joint evenly and apply solder carefully for strong connections. Practice often to improve your skills and avoid mistakes.
Safety matters—work in a well-ventilated area and wear protective gear. With patience and care, soldering becomes easier and more precise. Keep these tips in mind to build reliable circuits every time. Simple steps lead to great results.
Leave a Reply