Are you ready to take control of your electronics projects? Knowing how to solder and desolder electronic components is a skill that can save you time, money, and frustration.
Whether you’re fixing a broken device or building something new, mastering these techniques gives you the power to bring your ideas to life. In this guide, you’ll discover simple, clear steps to help you solder and desolder with confidence—no confusing jargon, just practical tips you can use right away.
Keep reading, and you’ll unlock the secrets that make your electronics work perfectly every time.
Tools And Materials
Understanding the right tools and materials is crucial for soldering success. Quality tools make the process easier and safer. Let’s explore the essentials you need for soldering and desoldering electronic components.
Essential Soldering Tools
A good soldering iron is your primary tool. Choose one with adjustable temperature settings. It helps in handling different components. A soldering station offers more control and stability. Always have a soldering stand to hold the iron when not in use. Tweezers are useful for handling small parts. Desoldering pumps or wicks help in removing solder efficiently.
Types Of Solder
Solder comes in different types. Lead-based solder is common but poses health risks. Lead-free solder is a safer alternative, though it requires higher temperatures. Solder wire with flux core improves flow and adhesion. Choose the right diameter for your project. Thinner wires suit delicate tasks, thicker ones for larger joints.
Safety Equipment
Safety is essential in soldering. Wear safety glasses to protect your eyes from splashes. A fume extractor or fan reduces exposure to harmful fumes. Heat-resistant gloves prevent burns. Always work in a well-ventilated area. Keep a fire extinguisher nearby for emergencies.
Credit: www.allpcb.com
Preparing For Soldering
Preparing for soldering is a crucial step that ensures strong and clean connections. Proper preparation helps avoid common issues like cold joints and damaged components. Taking time to prepare improves the quality of your work and saves time in the long run.
Before starting, gather all necessary tools and materials. Organize your workspace to keep everything within reach. This setup helps maintain focus and precision throughout the soldering process.
Cleaning Components And Boards
Clean components and circuit boards remove dirt, grease, and oxidation. Use isopropyl alcohol and a soft brush to wipe surfaces gently. Dirty surfaces prevent solder from sticking properly.
Make sure to dry everything before soldering. Dust and moisture can cause poor connections and corrosion later.
Setting Up The Workspace
Choose a well-lit and ventilated area for soldering. Good lighting helps see small parts clearly. Ventilation removes harmful fumes produced during soldering.
Use a heat-resistant mat or surface to protect your workspace. Keep tools like solder wire, tweezers, and cutters nearby. Arrange components so you can access them easily.
Choosing The Right Soldering Iron Tip
Select a soldering iron tip that fits your project. Fine tips suit small, delicate parts. Larger tips work better for bigger components and joints.
Use tips made from quality materials for better heat transfer. Clean the tip regularly with a damp sponge to keep it effective. A well-maintained tip improves solder flow and joint strength.
Soldering Techniques
Soldering is a skill that needs patience and practice. Good technique ensures strong and lasting connections. Poor soldering can cause weak joints or damage parts.
Focus on three main steps: preparing the tip, heating the joint, and applying solder. Each step helps create a clean and reliable bond. Avoid common mistakes to improve your results.
Tinning The Tip
Tinning means coating the soldering iron tip with a thin layer of solder. It helps heat transfer and stops oxidation. Heat the iron, then touch the solder to the tip. Wipe off excess on a wet sponge. Repeat often during work.
Heating The Joint
Heat the component lead and the pad together. Hold the soldering iron tip so it touches both parts. Wait a second or two for heat to spread evenly. Proper heating melts solder quickly and bonds well.
Applying Solder
Touch solder wire to the heated joint, not the iron tip. Let solder flow onto the parts naturally. Remove solder first, then the iron. The joint should look shiny and smooth. Avoid blobs or gaps.
Common Mistakes To Avoid
- Using a cold or dirty tip, which causes poor heat transfer.
- Applying solder to the iron tip only, not the joint.
- Overheating parts, risking damage to components or board.
- Moving parts before solder cools, leading to weak joints.
- Using too much solder, creating shorts or messy joints.
Desoldering Methods
Desoldering is essential for fixing or replacing parts on a circuit board. Different techniques suit different situations. Choosing the right method makes the work easier and prevents damage to components or the board. Here are common desoldering methods used by hobbyists and professionals.
Using A Desoldering Pump
A desoldering pump is a simple tool that sucks melted solder away. Heat the solder joint with a soldering iron until it melts. Quickly place the pump’s nozzle over the molten solder. Press the pump’s button to create suction. The solder gets pulled into the pump chamber. Repeat if needed to clear all solder. Clean the pump regularly for best results.
Desoldering Braid Technique
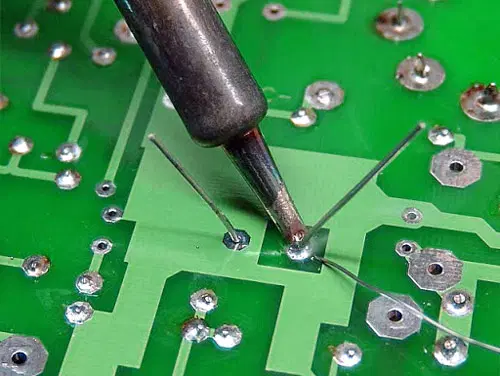
Desoldering braid is a copper wire mesh designed to absorb solder. Place the braid over the solder joint. Press a heated soldering iron tip on top of the braid. The solder melts and flows into the braid. Remove the braid and iron carefully. Cut off the used portion of the braid before next use. This method is good for small joints and tight spaces.
Hot Air Desoldering
Hot air desoldering uses heated air to melt solder evenly. A hot air tool blows hot air on the joint. The solder melts and you can remove the component easily. This method works well for surface mount devices. It reduces the risk of damaging parts. Control the temperature and airflow to avoid overheating. Use tweezers to lift components after solder melts.
Handling Different Components
Handling different electronic components requires careful attention and the right technique. Each type of component reacts differently to heat and solder. Using the correct approach helps prevent damage and ensures strong connections.
Through-hole Components
Through-hole parts have leads that pass through the circuit board. Heat the lead and pad evenly to create a good joint. Use a soldering iron with a fine tip for better control. Avoid applying heat for too long. This protects the component and the board.
Surface Mount Devices
Surface mount devices (SMD) are small and sit on the board surface. Use a fine tip soldering iron or a hot air rework station. Apply solder sparingly to avoid bridging between pins. Hold the device steady while soldering to prevent misalignment. SMD work demands steady hands and patience.
Delicate And Heat-sensitive Parts
Some components, like LEDs or ICs, are sensitive to heat. Use a temperature-controlled soldering iron set to a low heat. Apply solder quickly to reduce heat exposure. Use heat sinks or tweezers to protect pins and bodies. Always work in a well-lit, clean area to avoid mistakes.

Credit: www.youtube.com
Troubleshooting And Tips
Troubleshooting is key to successful soldering and desoldering. Small errors can cause big problems in your circuits. Knowing how to spot and fix these issues saves time and frustration. Proper care of your tools also keeps your work clean and effective.
Identifying Cold Joints
Cold joints happen when solder does not melt properly. They look dull or cracked and may feel rough. These joints can cause weak connections or failure.
- Check for a shiny, smooth surface on the joint.
- Look for gaps between the solder and the component lead.
- Test the connection by gently moving the component.
Reheat the joint with your soldering iron. Add a small amount of fresh solder to improve flow.
Fixing Bridges And Shorts
Solder bridges happen when solder connects two or more pins accidentally. This causes shorts and errors in your circuit.
- Inspect closely under good light or use a magnifier.
- Use desoldering braid or a solder sucker to remove excess solder.
- Apply flux to help clean the area and prevent new bridges.
- Resolder carefully, keeping solder only on the pads and leads.
Maintaining Your Equipment
Clean and well-maintained tools make soldering easier and safer. Dirty tips or broken equipment cause poor joints and damage.
- Wipe your soldering iron tip on a damp sponge often.
- Use tip tinner or cleaner to remove stubborn residue.
- Replace worn tips to ensure good heat transfer.
- Store your iron properly to avoid damage and oxidation.
- Check solder wire for contaminants or old flux.

Credit: www.anzer-usa.com
Frequently Asked Questions
What Tools Do I Need For Soldering And Desoldering?
You need a soldering iron, solder wire, desoldering pump or braid, flux, tweezers, and a safety mat. These tools ensure precise and safe work on electronic components.
How Do I Safely Solder Electronic Components?
Heat the soldering iron, apply solder to the joint, not the iron tip. Hold components steady and avoid overheating to prevent damage.
What Is The Best Technique To Desolder Components?
Heat the solder joint, then use a desoldering pump or braid to remove molten solder. Work quickly to avoid damaging the board or components.
Can I Reuse Electronic Components After Desoldering?
Yes, if removed carefully without overheating, components can be reused. Inspect them for damage before reinstallation to ensure proper function.
Conclusion
Soldering and desoldering need patience and practice. Use the right tools for better results. Keep the work area clean and safe. Take your time to avoid damaging parts. Always check your connections carefully. With steady hands, you can fix many electronics.
Small mistakes can cause big problems. Remember, practice helps improve your skills daily. Enjoy the process of learning and fixing. You will get better with each attempt. Electronics repair becomes easier over time. Keep trying, and don’t give up.
Leave a Reply