Are you tired of guessing when your plants need water? What if your garden could tell you exactly when it’s thirsty?
A DIY electronic-sensored watering system can do just that—making sure your plants get the perfect amount of water, every time. Imagine saving time, avoiding overwatering, and watching your plants thrive like never before. You’ll learn how to build your own smart watering system step-by-step, even if you’re new to electronics.
Ready to take your gardening to the next level? Let’s dive in!
Benefits Of A Sensor-based Watering System
Using a sensor-based watering system changes how you care for your plants. It takes the guesswork out of watering and lets technology handle the timing and amount. This means your plants get exactly what they need, and you avoid wasting water or overwatering.
Water Conservation
A sensor-based system waters only when your soil is dry, preventing unnecessary watering. This precise approach saves a significant amount of water compared to traditional schedules.
Think about the last time you watered your garden just because it was “time” — did the soil really need it? Sensors help you avoid this common mistake.
Healthier Plants
Plants thrive when their watering matches their actual needs. Too much water can drown roots, while too little stresses plants.
With sensors, you get consistent moisture levels. Your plants stay healthier, grow stronger, and produce better blooms or harvests.
Time And Effort Savings
Imagine not having to remember your watering schedule or rush outside during hot afternoons. Sensors do the monitoring for you, freeing up your time.
This automation is perfect for busy gardeners or those who travel often. You spend less time worrying and more time enjoying your garden.

Credit: www.amazon.com
Essential Components
Building a DIY electronic-sensored watering system requires a careful selection of components that work well together. Each part plays a key role in ensuring your plants get the right amount of water exactly when they need it. Let’s look at the essential components that make this system reliable and efficient.
Soil Moisture Sensors
Soil moisture sensors detect the water level in the soil and send data to the controller. You can choose between resistive sensors, which are cheap but prone to corrosion, and capacitive sensors, which last longer and give more accurate readings.
Choosing the right sensor depends on your budget and how often you want to maintain the system. Have you thought about how often you want to check your plants’ moisture levels? This will guide your sensor choice.
Microcontroller Options
The microcontroller acts as the brain of your watering system. Popular choices include Arduino, ESP8266, and Raspberry Pi, each offering different power and programming capabilities.
Arduino boards are beginner-friendly and perfect for simple setups, while ESP8266 adds Wi-Fi connectivity for remote monitoring. Raspberry Pi is more powerful but requires more coding skills. What features are most important to you—simplicity, connectivity, or power?
Water Pump And Tubing
The water pump moves water from the reservoir to your plants. Small submersible pumps are common for indoor gardens, while peristaltic pumps offer precise control over water flow.
Use flexible tubing that fits securely on the pump outlet to avoid leaks. Make sure the tubing length fits your garden layout without kinks or sharp bends. Have you planned how your tubing will run without disturbing your plants?
Power Supply Choices
Your system needs a steady power source to operate smoothly. Options include USB power adapters, rechargeable batteries, or solar panels for outdoor setups.
Batteries offer portability but need regular charging or replacement. Solar panels add sustainability but require sunlight exposure and a charge controller. What power option suits your setup location and usage frequency?
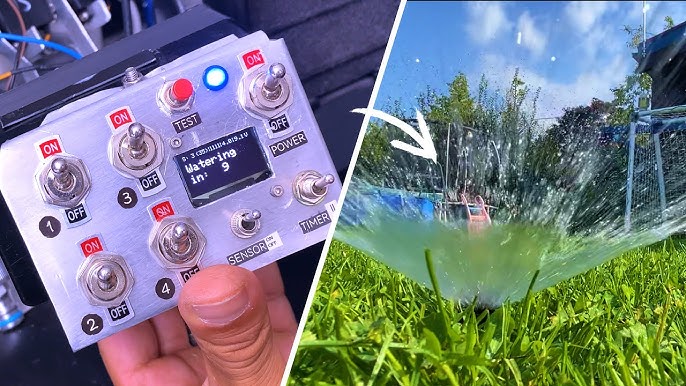
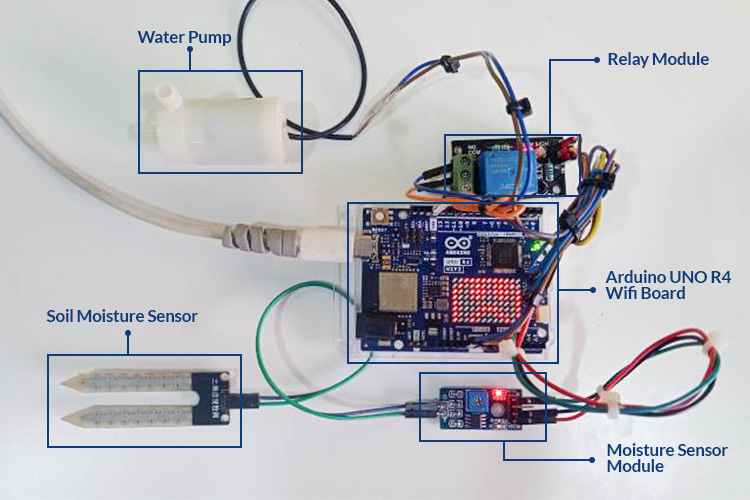
Building The Circuit
Building the circuit for your DIY electronic-sensored watering system is where your project truly comes to life. This stage brings together all the components, ensuring they work harmoniously to keep your plants hydrated. Careful attention to wiring and connections will save you hours troubleshooting later.
Connecting Sensors To Microcontroller
Start by connecting your soil moisture sensors to the microcontroller’s analog input pins. These sensors detect moisture levels and send data your microcontroller can interpret.
Use jumper wires to link the sensor’s power, ground, and signal pins properly. Double-check the pin layout in your microcontroller’s datasheet to avoid mistakes.
Test the sensor readings by uploading a simple code that prints moisture values to your serial monitor. This helps confirm your sensors are working before adding complexity.
Integrating The Water Pump
Next, connect the water pump to your circuit using a relay or a MOSFET transistor. Directly powering a pump from your microcontroller can damage it due to high current.
Wiring the pump through a relay lets your microcontroller safely control the on/off state without risking overload. Make sure to include a diode across the relay coil to prevent voltage spikes.
Try running the pump manually through your code first. This step ensures your wiring is correct and the pump responds as expected before automating watering.
Ensuring Safe Power Management
Power management is crucial to protect your components and ensure consistent operation. Use a regulated power supply that matches your microcontroller and pump voltage requirements.
Adding capacitors near the microcontroller and motor helps smooth out voltage fluctuations. This prevents resets or erratic behavior during pump activation.
Think about heat dissipation as well—components like voltage regulators or transistors can get warm. Mount them on heatsinks or ventilated areas to avoid overheating.

Credit: projecthub.arduino.cc
Programming The System
Programming the electronic-sensored watering system brings it to life. This phase involves coding the microcontroller to read sensor data and act on it. The goal is to make the system smart enough to water plants automatically. Precise programming ensures plants get the right amount of water at the right time.
Reading Sensor Data
The soil moisture sensor sends data to the microcontroller. This data reflects the soil’s wetness level. The program reads this data continuously or at set intervals. It converts raw electrical signals into readable moisture values. Accurate reading is key to deciding when to water.
Setting Moisture Thresholds
Moisture thresholds define when the system should water plants. The program compares sensor readings to these thresholds. If the soil moisture falls below the set point, watering starts. Setting the right threshold avoids overwatering or underwatering. Thresholds can be adjusted based on plant type or season.
Automating Water Delivery
The program controls the water pump or valve based on moisture data. When moisture is low, it activates the pump to deliver water. Once the soil reaches the desired moisture level, the system stops watering. This automation saves water and keeps plants healthy. Timing and duration of watering can be fine-tuned in the code.
Installing The System In Your Garden
Installing your DIY electronic-sensored watering system requires care and precision. Proper setup ensures plants get the right water at the right time. This section covers key steps for placing sensors, connecting your water source, and protecting components from weather.
Sensor Placement Tips
Place sensors near plant roots for accurate moisture readings. Avoid direct sunlight on sensors to prevent false data. Use stakes or clips to keep sensors stable in soil. Test sensor placement by checking moisture levels before final setup. Spread sensors evenly if covering a large garden area.
Water Source Setup
Choose a reliable water source close to your garden. Connect tubing or drip lines securely to avoid leaks. Use a filter to keep debris from clogging the system. Position valves where you can easily reach them for manual control. Check water pressure to ensure even distribution across plants.
Weatherproofing Components
Cover electronic parts with waterproof cases or enclosures. Seal all cable connections with silicone or electrical tape. Mount sensors and controllers off the ground to avoid water damage. Use UV-resistant materials to protect from sun exposure. Regularly inspect weatherproofing to maintain system durability.
Credit: circuitdigest.com
Advanced Features To Consider
Adding advanced features to your DIY electronic-sensored watering system can significantly boost its efficiency and your gardening experience. These features not only make the system smarter but also save you time and help prevent overwatering or underwatering. Let’s dive into some practical options that you can consider to upgrade your setup.
Mobile Notifications
Receiving instant alerts on your phone when the soil moisture reaches a certain level or when the water reservoir is low keeps you in control, even when you’re away. You can set up simple push notifications or SMS alerts using platforms like IFTTT or Blynk. This way, you never miss a watering event or an issue that needs your attention.
Imagine being at work and getting a notification that your garden needs watering. It gives you peace of mind and helps avoid plant stress without constantly checking your system manually.
Integration With Smart Home Devices
Connecting your watering system to smart home assistants like Amazon Alexa or Google Home adds hands-free control. You can ask your assistant to start watering or check the system’s status with voice commands. This seamless integration also allows you to schedule watering based on weather forecasts automatically.
Have you thought about syncing your system with smart thermostats or weather stations? This can prevent watering on rainy days, saving water and keeping your plants happy.
Data Logging And Analytics
Tracking soil moisture levels and watering patterns over time provides valuable insights into your garden’s needs. Using tools like an SD card module or cloud-based services, you can collect data and analyze trends. This information helps you adjust watering schedules for different plants or seasons more precisely.
When I started logging my garden’s watering data, I noticed some plants needed less frequent watering than I assumed. This simple step reduced water waste and improved plant health.
Troubleshooting And Maintenance
Keeping your DIY electronic-sensored watering system running smoothly requires regular attention. Troubleshooting and maintenance are key to avoiding dry plants or water waste. Understanding common problems and how to fix them can save you time and keep your garden thriving.
Common Issues And Fixes
Sensor errors often cause the system to water too much or too little. Check for loose connections or dirt blocking the sensor’s view of the soil. Sometimes, simply cleaning the sensor or tightening wires solves the problem quickly.
If the pump doesn’t activate, verify the power supply first. A weak battery or faulty wiring could be the culprit. Resetting the controller or replacing the battery often restores function.
Unexpected watering schedules might mean a software glitch or wrong settings. Review your programming and sensor thresholds carefully. Have you checked the system after a power outage or update?
Regular Cleaning And Calibration
Dirt and debris can build up on sensors and valves, leading to inaccurate readings or blockages. Clean the sensors gently with a soft cloth and mild soap every few weeks. Avoid harsh chemicals that might damage sensitive parts.
Calibration ensures your sensor measures moisture correctly. Recalibrate your sensor monthly by comparing its readings to a manual soil moisture test. This helps you trust the system’s decisions and avoid overwatering.
Maintaining clean water filters also protects the pump and pipes from clogging. Flushing the system occasionally keeps water flowing freely and extends component life.
Upgrading System Components
As you gain experience, you might notice performance limits in your system. Upgrading sensors to more precise models can improve watering accuracy. Look for sensors with better resistance to weather and soil conditions.
Consider swapping out the basic pump for a quieter, energy-efficient model to save power and reduce noise. Adding a solar panel can make your system more sustainable if you haven’t tried that yet.
Don’t hesitate to update the controller board or software for better programming options. Newer microcontrollers often offer easier interfaces and more features, making your system smarter and easier to manage.
Frequently Asked Questions
What Is A Diy Electronic-sensored Watering System?
A DIY electronic-sensored watering system uses sensors to monitor soil moisture. It automates watering, saving water and time for gardeners. This system helps plants get optimal hydration without manual effort. It’s cost-effective and customizable for various plant types.
How Does The Sensor Detect Soil Moisture?
The sensor measures electrical resistance or capacitance in the soil. Wet soil conducts electricity better, so the sensor detects moisture levels. It sends signals to the watering system to activate or stop watering. This ensures plants receive water only when needed.
What Components Are Needed For This System?
Key components include a moisture sensor, microcontroller (like Arduino), water pump, and tubing. You’ll also need a power source and relay module. These parts work together to sense moisture and control watering. Most components are affordable and easily available online.
Can This System Save Water Effectively?
Yes, it reduces water waste by watering only when soil is dry. The sensor triggers watering precisely, preventing overwatering. This helps conserve water and promotes healthier plants. It’s an eco-friendly solution ideal for home gardens and small farms.
Conclusion
Building a DIY electronic-sensored watering system is fun and rewarding. It ensures plants get the right amount of water. Save time and resources by automating this task. The system is easy to set up and maintain. Anyone can try it with basic tools and instructions.
This project is perfect for tech enthusiasts and gardening fans alike. Explore creativity while helping your plants thrive. With this system, you take control of plant care. Start today and make gardening easier and more efficient. Enjoy the satisfaction of a smart, self-watering garden.
Leave a Reply