Have you ever wondered if you could create electrons right at home? It sounds like science fiction, but with simple materials and easy steps, you can actually generate these tiny particles that power so much of our world.
Imagine the thrill of controlling electricity yourself and learning how it works firsthand. You’ll discover straightforward methods to make electrons safely and effectively. Ready to unlock the secrets of electricity and impress your friends with real science? Keep reading to find out how!
Basics Of Electrons
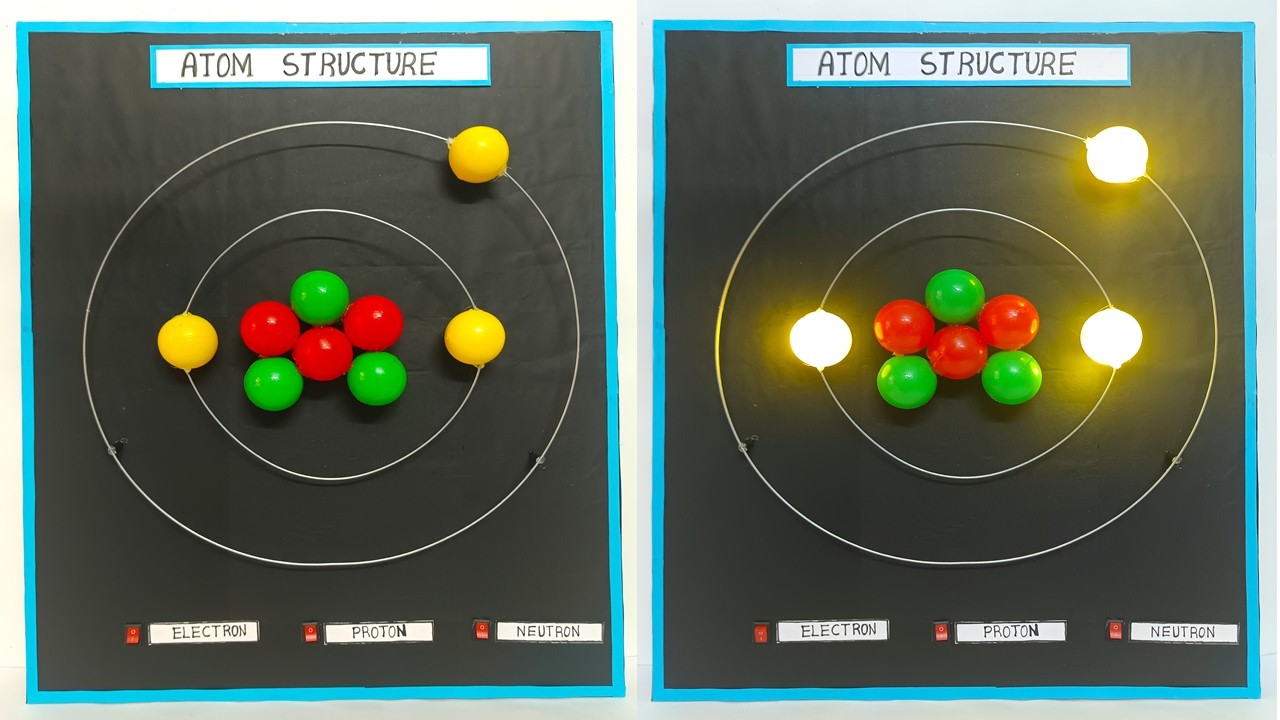
Understanding electrons is fundamental to grasping how electricity works. Electrons are tiny particles found in atoms. They play a crucial role in electrical activities. Let’s explore more about them and their movement.
What Electrons Are
Electrons are subatomic particles with a negative charge. They orbit the nucleus of an atom. Each electron carries a tiny amount of energy. Their movement creates electricity. Electrons are much smaller than atoms. In fact, they are one of the smallest particles known. Despite their size, they are vital for many processes.
How Electrons Move
Electrons move in paths around the nucleus. This movement is not random. They follow specific routes called orbits or shells. When an electron moves, it creates an electric current. This current is what powers most electronic devices. Electrons can jump from one atom to another. This jumping causes a flow of electricity.
In a metal wire, electrons move freely. Metals have many free electrons. These electrons flow easily when connected to a power source. This flow is what we call electricity. Understanding electron movement helps in making electrical circuits.

Credit: www.youtube.com
Materials Needed
Before you start generating electrons at home, it’s crucial to gather the right materials. Having everything ready not only makes the process smoother but also keeps you safe. Let’s look at what you’ll need from around your house and what tools will help protect you during the experiment.
Common Household Items
You might be surprised how many everyday items can help you produce electrons. Simple things like:
- Aluminum foil– acts as a conductor and is easy to shape.
- Lemons or potatoes– natural sources of acid that help generate an electric current.
- Copper wire or pennies– serve as another type of conductor.
- Salt– enhances the conductivity of liquids.
- Small light bulbs or LED lights– to test if your electron flow is working.
These items are usually easy to find, and their simplicity lets you experiment without complicated setups. Have you ever thought about how common kitchen ingredients can become a tiny power source?
Tools For Safety
Handling electrical experiments at home requires caution, even if the voltages are low. Protect yourself by having these tools on hand:
- Rubber gloves– prevent any accidental shocks and protect your skin from acids.
- Safety goggles– shield your eyes from splashes or unexpected sparks.
- Insulated tools– like pliers or wire strippers, to handle wires safely.
- Non-conductive workspace– use a wooden or plastic table to avoid grounding yourself.
Safety isn’t just a rule; it’s a mindset. Have you checked your safety gear before starting any experiment?
Simple Electron Generation Methods
Generating electrons at home can be surprisingly simple and fun. You don’t need advanced equipment or a science lab. Just basic materials and some curiosity can get you started on creating your own flow of electrons.
Static Electricity Experiments
Static electricity is one of the easiest ways to generate electrons. You can create it by rubbing certain materials together, like a balloon and your hair. This friction causes electrons to move, making the balloon stick to surfaces or even attract small paper bits.
Try sliding your hand across a plastic comb and then bringing it near small pieces of paper. You’ll see the paper jump toward the comb as electrons transfer. This simple experiment shows how electrons move without needing a battery or wires.
Using Batteries For Electron Flow
Batteries are a straightforward source of electrons that you can use at home. Inside a battery, chemical reactions push electrons from the negative terminal to the positive terminal. When you connect a wire, the electrons flow through the circuit, powering devices like flashlights or small motors.
Have you ever noticed how a flashlight works as soon as you insert batteries? That’s electrons moving through the circuit. You can easily test this by connecting a battery to a small bulb and watching it light up.
Creating A Lemon Battery
Making a lemon battery is a classic DIY project that shows how fruit can generate electricity. You need a lemon, a copper coin, and a zinc nail or galvanized nail. Insert the nail and coin into the lemon, but don’t let them touch each other.
The lemon juice acts as an electrolyte, allowing electrons to flow from the zinc to the copper. You can connect wires to the coin and nail to power a small LED or digital clock. It’s a hands-on way to see chemical energy turn into electric energy right in your kitchen.

Credit: thehomeschoolscientist.com
Building A Static Electricity Generator
Building a static electricity generator at home is a simple way to create and observe electrons in action. This small project helps to understand how static electricity works. It uses materials that are easy to find and safe to handle. You can watch how electrons move and create sparks. This is a great hands-on experiment for curious minds of all ages.
Gathering Materials
- A plastic comb or balloon
- Wool cloth or a piece of fur
- Aluminum foil
- Glass or plastic rod
- Small metal object (like a paperclip)
- Insulating stand (like a plastic cup)
- Dark room or low light area
Step-by-step Assembly
Start by rubbing the plastic comb or balloon with the wool cloth. Rub it quickly and firmly for about one minute. This action builds up static electricity on the surface.
Next, place the aluminum foil on the insulating stand. Attach the small metal object to the foil. This setup will help you see the electron flow.
Hold the charged comb close to the metal object without touching it. You may see the foil move or hear a small crackle. This shows static electricity is working.
Testing Electron Flow
Darken the room to make the effect clearer. Slowly bring the charged comb near the metal object again. Watch for tiny sparks or a faint glow. These are electrons jumping across the gap.
You can also try different materials to rub the comb. Notice which ones create more static electricity. This helps understand how electrons move and build up.
Electron Flow In Circuits
Electron flow in circuits is the movement of tiny charged particles through a path. This flow creates electric current, which powers many devices. Understanding how electrons move helps in building simple circuits at home.
Basic Circuit Components
Every circuit needs a few key parts to work:
- Power source:This pushes electrons through the circuit. Common sources are batteries.
- Conductors:Wires that carry electrons from one part to another.
- Load:A device that uses electricity, like a light bulb or motor.
- Switch:Controls the flow by opening or closing the circuit.
These parts form a loop allowing electrons to move continuously.
Connecting Your Electron Source
Start by attaching the power source to the wires. Connect the positive terminal to one wire and the negative to another. This sets up a path for electron flow.
Next, link the wires to the load. Make sure connections are tight to avoid breaks.
Include a switch in the circuit for control. Place it on one wire to stop or start electron flow easily.
Check all connections before turning on the power. Proper setup ensures electrons flow smoothly and safely.
Credit: thehomeschoolscientist.com
Safety Tips And Precautions
Working with electricity at home needs care and attention. Safety helps prevent accidents and injuries. Following key precautions ensures a safe experience while making electrons.
Handling Electricity Safely
Always use insulated tools to avoid shocks. Keep your hands dry when working with electrical parts. Never touch wires or devices with bare hands if power is on. Use protective gloves and goggles for extra safety. Work in a well-lit area to see clearly. Turn off power sources before connecting or disconnecting anything. Keep liquids far from electrical equipment to prevent short circuits. Make sure your workspace is clean and free of clutter to avoid trips or falls.
Avoiding Common Mistakes
- Do not overload circuits with too many devices.
- Check wires for damage before use.
- Never use metal objects to connect electrical parts.
- Do not ignore warning signs like sparks or burning smells.
- Follow instructions carefully and do not improvise.
- Keep children and pets away from the work area.
- Use the correct power source for your project.
Fun Experiments To Try
Exploring how to make electrons at home can be both fun and educational. Simple experiments help understand electricity and how electrons move. These activities use easy materials found around the house. They show the basics of electricity in action.
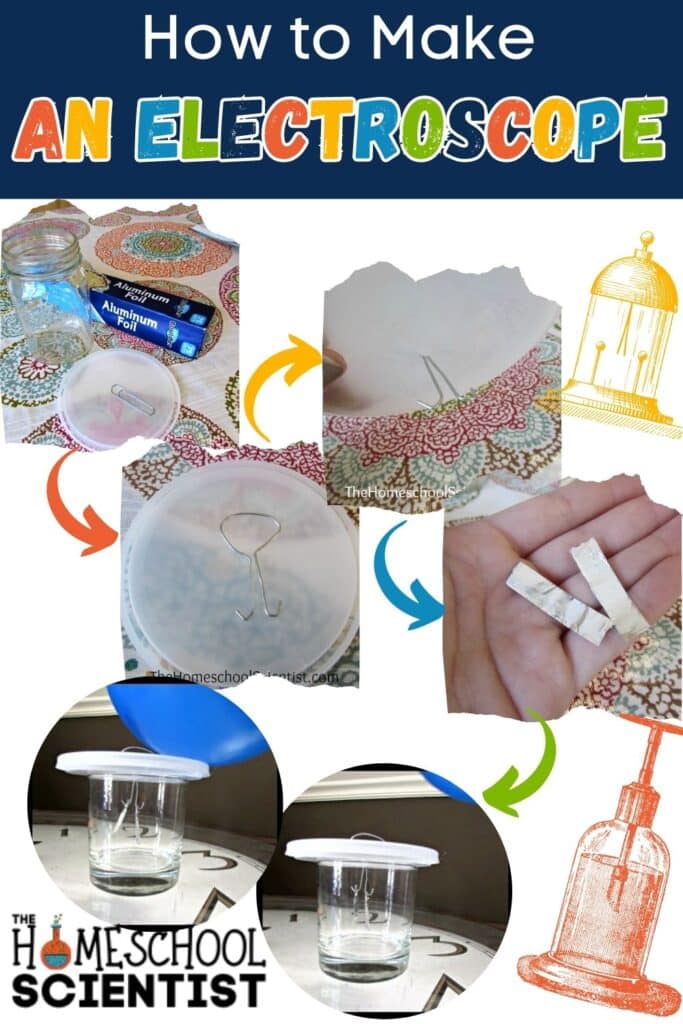
Making A Simple Electroscope
An electroscope detects electric charge. You can build one with common items like a glass jar, aluminum foil, and a paperclip. Start by straightening the paperclip and hanging two small foil strips from one end inside the jar. Touch the paperclip with a charged object, such as a comb rubbed on your hair. The foil strips will repel each other and move apart.
This movement happens because electrons transfer to the electroscope. It shows how charges push and pull. This simple device teaches about static electricity and electron flow.
Lighting An Led With Homemade Electrons
You can light a small LED using homemade electrons from a lemon or potato battery. Insert a copper coin and a galvanized nail into the fruit or vegetable. Connect wires from the copper and nail to the LED’s legs. The acid in the lemon or potato causes electrons to flow, creating a small electric current.
The LED lights up when electrons move through it. This experiment shows how chemical reactions produce electricity. It’s a great way to learn about batteries and electron movement in a simple setup.
Troubleshooting Common Issues
Troubleshooting is key when making electrons at home. Small errors can stop electron flow. Knowing common issues helps fix problems fast. This guide covers frequent challenges and simple fixes. Follow these tips to get your setup working smoothly.
No Electron Flow Detected
Check all connections first. Loose wires block electron movement. Clean any dirty surfaces touching wires or metals. Dirt and oil stop electron flow. Use a multimeter to test circuit parts. Replace broken wires or damaged components. Confirm your power source works well. A dead battery or weak light can cause no flow.
Also, check the materials you use. Some metals generate electrons better than others. Avoid rusted or corroded metals. They reduce electron flow. Make sure your setup is dry. Moisture can short circuit or reduce flow.
Improving Electron Generation
Increase surface area of metal parts. Larger contact areas generate more electrons. Use clean, smooth metals like copper or zinc. Add heat or light to boost electron creation. Sunlight or a small heat source helps. Adjust distance between metals carefully. Too close or too far reduces effect.
Try using different metal pairs. Some combinations create stronger electron flow. Check your setup regularly for wear. Replace worn parts to maintain good flow. Small changes can improve your results greatly.
Frequently Asked Questions
What Materials Are Needed To Make Electrons At Home?
You need simple items like copper wire, batteries, and a light bulb. These materials help create an electric current by moving electrons through a circuit. Household items like aluminum foil and magnets can also assist in generating electrons safely.
How Do I Safely Generate Electrons At Home?
Use low-voltage batteries and insulated wires to avoid shock. Ensure your workspace is dry and free of flammable materials. Always follow safety guidelines and never touch exposed wires when the circuit is powered on.
Can I Store Electrons Generated At Home?
Electrons themselves cannot be stored, but electric charge can. Use batteries or capacitors to store electrical energy created by moving electrons. These devices hold charge and release it when needed, simulating electron storage.
What Simple Experiments Show Electron Flow At Home?
Build a basic circuit with a battery, wires, and a light bulb. When connected, the bulb lights up, showing electrons flowing through the circuit. This simple experiment demonstrates electron movement in an easy and visual way.
Conclusion
Making electrons at home is simple and fun to try. Start with basic materials and follow easy steps carefully. Safety matters most; always work in a safe space. Experiment slowly and watch how electricity flows. This hands-on project helps you learn science clearly.
Keep practicing to understand more about energy. Small efforts lead to big knowledge gains. Stay curious and enjoy discovering how electrons work. You can explore more with patience and care. Science is all around us, ready to be explored.
Leave a Reply