Replacing your Lenovo system board might sound complicated, but it doesn’t have to be. If you have the Lenovo Maintenance Disk, you already hold a powerful tool that can make the process smoother and safer for your device.
In this guide, you’ll discover step-by-step how to use that disk to ensure your system board replacement goes off without a hitch. Whether you’re a beginner or have done repairs before, this article will help you save time, avoid costly mistakes, and get your Lenovo running like new again.
Keep reading, and you’ll gain the confidence to handle this critical upgrade yourself.
Preparing For System Board Replacement
Preparing for a system board replacement on your Lenovo device involves more than just having the right parts. Taking the time to organize tools, secure your data, and set up a safe workspace can save you hours of frustration. Your approach here can determine how smooth the entire process will be.
Gathering Necessary Tools
Before you open your laptop or desktop, make sure you have all the tools ready. Typical tools include a small Phillips screwdriver, an anti-static wrist strap, and a plastic pry tool. Missing even one tool can cause delays or damage to delicate components.
Think about your last repair project. Did you find yourself searching for a tool halfway through? Avoid that by laying everything out on a clean table beforehand. This simple preparation helps you stay focused and efficient.
Backing Up Important Data
Your system board holds many vital functions, but your data is irreplaceable. Always create a full backup of your important files before starting the replacement. Use external drives or cloud services to keep your data safe.
Have you ever lost photos or documents after a hardware failure? Don’t let that happen again. Backing up isn’t just a precaution—it’s a must.
Creating A Safe Work Environment
Electrostatic discharge can fry your components instantly. Use an anti-static mat or work on a surface that doesn’t generate static electricity. Avoid carpeted areas and wear an anti-static wrist strap to ground yourself.
Also, keep your workspace well-lit and organized. Clear away any clutter that might cause accidents or make you lose tiny screws. A calm, clean environment keeps your mind sharp and your hands steady.

Credit: www.reddit.com
Accessing The Lenovo Maintenance Disk
Accessing the Lenovo Maintenance Disk is essential for replacing the system board. This disk contains tools needed to diagnose and repair your Lenovo device. Proper access ensures smooth and safe system board replacement.
Locating The Maintenance Disk
Lenovo Maintenance Disk may come with your device or be available online. Check your device packaging for a physical disk. If not found, visit Lenovo’s official support website. Search for your device model and look for maintenance or recovery media.
Downloading The Latest Version
Always use the latest version of the maintenance disk. It has updated tools and fixes. On Lenovo’s support site, enter your device details. Download the maintenance disk image file (ISO). Make sure the download is complete before proceeding.
Creating A Bootable Usb Drive
Use a USB drive with at least 8GB space. Download a tool like Rufus or use Windows’ built-in tool. Open the tool and select the downloaded ISO file. Choose the USB drive as the destination. Start the process to create a bootable USB. After completion, safely eject the USB drive.
Booting From The Maintenance Disk
Booting from the Lenovo Maintenance Disk is the first step to replace the system board. It allows your computer to start using special software on the disk. This software helps check and install the new system board correctly.
Follow these steps carefully to boot your Lenovo device from the maintenance disk and prepare for the system board replacement.
Adjusting Bios Settings
Turn on your Lenovo computer and press the key to enter BIOS setup. This key is usually F1, F2, or Delete. Look for the “Boot” menu in the BIOS screen. Change the boot order to place the CD/DVD drive or USB device first. Save the changes and exit the BIOS. The computer will restart with the new settings.
Selecting Boot Options
After restarting, your Lenovo device will check the boot devices in the new order. If using a USB or DVD maintenance disk, it will detect this disk first. A prompt might appear asking to press any key to boot from the disk. Press a key quickly to start from the maintenance disk. Otherwise, it will boot to the normal system.
Initiating The Boot Process
The computer will load files from the maintenance disk. You will see a loading screen or menu. Follow the on-screen instructions to access the system board replacement tools. This process prepares the device to safely remove the old board and install the new one. Do not remove the disk until the process is complete.
Credit: www.ifixit.com
Navigating The Maintenance Disk Interface
Navigating the Lenovo Maintenance Disk interface can feel overwhelming at first. The layout is straightforward once you get the hang of it, but knowing where to find key options saves you time and frustration. Your goal is to replace the system board efficiently, and understanding the interface helps you avoid unnecessary clicks and confusion.
Understanding The Main Menu
The Main Menu is the control center of the Maintenance Disk. It presents a list of maintenance tasks clearly labeled for easy selection.
- Clear labels:Each option describes its function in simple terms.
- Navigation keys:Use arrow keys to move up and down the menu.
- Selection:Press Enter to choose an option.
One thing you might notice is that the interface doesn’t overload you with too many choices at once. This design helps you focus on the task at hand without feeling lost. Have you ever wasted time hunting for the right function in a cluttered menu? Lenovo’s design avoids that by keeping the Main Menu clean and direct.
Selecting The System Board Replacement Option
Once on the Main Menu, look for the option related to hardware maintenance or system board replacement. It’s usually listed under system diagnostics or hardware management.
- Highlight the “System Board Replacement” entry using arrow keys.
- Press Enter to open the specific replacement tool.
- Follow on-screen prompts carefully to confirm your choice.
At this stage, patience is key. The tool may ask you to confirm details or back up settings before proceeding. Skipping these warnings can lead to data loss or hardware issues. Are you prepared to double-check all prompts before making permanent changes?
Executing System Board Replacement
Executing system board replacement on a Lenovo device requires careful attention. This process ensures your computer works smoothly after hardware changes. Follow each step carefully to avoid damage and data loss.
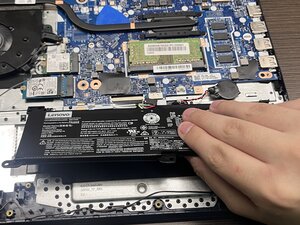
Removing The Old System Board
Begin by powering off the laptop and unplugging all cables. Remove the battery to prevent electrical damage. Open the back cover using the correct screwdriver. Disconnect all cables connected to the system board gently. Unscrew the mounting screws holding the system board in place. Carefully lift the old system board out without bending or forcing it.
Installing The New System Board
Place the new system board into the laptop case gently. Align the screw holes with the case mounts. Secure the board by tightening screws evenly. Reconnect all cables to their correct ports carefully. Double-check connections to ensure no cable is loose. Replace the battery and close the back cover firmly.
Configuring Settings On The Maintenance Disk
Insert the Lenovo maintenance disk into the optical drive or USB port. Restart the laptop and boot from the maintenance disk. Follow on-screen instructions to access system board settings. Update BIOS and firmware as recommended by Lenovo tools. Save all changes before exiting the maintenance software. Restart the laptop normally to complete the setup.
Verifying Successful Replacement
Verifying a successful system board replacement is essential to ensure your Lenovo device works correctly. This process confirms the new hardware functions well and avoids future issues. Several checks help verify the replacement is complete and effective.
Running Diagnostic Tests
Start by running Lenovo’s built-in diagnostic tools. These tests scan the system board and other components for errors. Use Lenovo Vantage or Lenovo Diagnostics software to perform quick or full tests. Look for any failure messages or warnings. Passing all tests means the board works properly.
Ensuring System Stability
Check how the laptop performs under normal use. Observe if it boots up smoothly and runs programs without crashing. Monitor temperature and fan activity to detect overheating. Use the device for a few hours to confirm stability. No random shutdowns or freezes indicate a stable system.
Checking For Firmware Updates
After replacement, update the system firmware to the latest version. Visit Lenovo’s support website and enter your device model. Download and install BIOS and firmware updates. Firmware updates improve compatibility and fix bugs. Keeping firmware current helps the new system board work efficiently.
Post-replacement Considerations
After replacing the system board using the Lenovo Maintenance Disk, several important tasks need attention. These steps help ensure the system runs smoothly and safely. Taking care of these post-replacement actions protects your data and improves performance.
Restoring Backed-up Data
Back up your data before starting the replacement. Use the Lenovo Maintenance Disk to restore files safely. Follow clear prompts to recover documents, pictures, and software settings. Check that all essential files are present after restoration. This prevents data loss and keeps your work intact.
Reconfiguring System Preferences
New system boards may reset your preferences. Adjust settings like display, sound, and network connections. Set power options to match your usage habits. Customize security settings to keep your system safe. Small tweaks improve your daily experience and system stability.
Maintaining System Health
Run full system scans to check for hardware or software issues. Update drivers using Lenovo’s official tools to ensure compatibility. Clean temporary files to free up space and speed up the system. Regular maintenance prevents future problems and extends device life.

Credit: www.youtube.com
Frequently Asked Questions
What Is Lenovo Maintenance Disk Used For?
Lenovo Maintenance Disk is used to update system firmware and BIOS after hardware changes. It ensures system stability and compatibility. It’s essential after replacing the system board to restore proper device function and prevent boot issues.
How To Create A Lenovo Maintenance Disk?
You can create a Lenovo Maintenance Disk using Lenovo’s official tools. Download the Maintenance Disk Creator from Lenovo’s support site. Follow the on-screen instructions to create a bootable USB or CD for system updates.
Why Use Lenovo Maintenance Disk After System Board Replacement?
Using the Maintenance Disk updates the firmware and serial numbers linked to the new system board. It avoids hardware mismatch errors and ensures the laptop runs smoothly with the replaced components.
Can Lenovo Maintenance Disk Fix Boot Problems?
Yes, the Maintenance Disk can fix boot issues caused by firmware mismatches after hardware replacement. It reinitializes system settings and updates firmware to resolve startup errors related to the system board.
Conclusion
Using the Lenovo Maintenance Disk makes system board replacement easier. It guides you step-by-step through the process. This tool helps avoid common mistakes and saves time. Follow the instructions carefully to ensure success. Keep the disk handy for future repairs.
Regular maintenance keeps your Lenovo device running smoothly. Trust the disk to support your hardware needs. Simple, clear, and effective.
Leave a Reply