Are you ready to take your bass playing to the next level by customizing your own J-Bass electronics? Building your own electronics may sound tricky, but with the right guidance, you can create a setup that perfectly matches your style and sound.
Imagine having full control over your tone, knowing exactly how every wire and component affects your music. You’ll discover simple, step-by-step instructions to build your J-Bass electronics from scratch. Whether you want to save money, learn new skills, or just love hands-on projects, this guide is made for you.
Keep reading, and soon you’ll be wiring your own bass like a pro!
Tools And Materials Needed
Building J-Bass electronics requires a clear list of tools and materials. Having the right items makes the process smooth and enjoyable. This guide covers essential tools, pickups, pots, and wiring supplies needed for your DIY project.
Essential Tools
- Soldering iron with a fine tip for precise work
- Wire cutters and strippers to prepare wires
- Screwdrivers, both Phillips and flat-head, for assembly
- Multimeter to test connections and continuity
- Helping hands or a small clamp to hold parts steady
- Small pliers for bending and positioning wires
- Heat shrink tubing or electrical tape for insulation
Choosing Pickups And Pots
Select pickups designed for J-Bass style sounds. Single-coil pickups provide the classic tone. Consider pickups with shielded wiring to reduce noise. Choose pots (potentiometers) based on resistance values: typically 250k or 500k ohms.
Use quality pots for smooth volume and tone control. Make sure pots fit your bass control cavity. Capacitors go with pots for tone shaping; common values are 0.022µF or 0.047µF.
Wiring And Soldering Supplies
- Stranded wire in various colors for clear identification
- Rosin-core solder for electrical connections
- Flux to improve solder flow and joint quality
- Heat shrink tubes to cover solder joints
- Wire labels or tape to mark wires
- Small brushes or cloth to clean flux residue
Preparing The Bass Body
Preparing the bass body is a crucial phase before you start wiring your J-Bass electronics. This step ensures a clean, safe, and efficient workspace inside your instrument. Taking the time to properly prepare the cavities can save you from headaches down the road and improve the overall sound quality.
Removing Old Electronics
Begin by carefully removing any existing electronics from your bass. Use a soldering iron to detach the wires connecting the pickups, pots, and output jack. Keep track of which wire goes where—taking pictures can help you avoid confusion later.
Once unsoldered, gently pull out the pickups and pots. Avoid forcing parts, as this could damage the wood or wiring holes. If you find any stuck components, a little patience and light twisting usually does the trick.
Cleaning And Inspecting Cavities
After removing the old electronics, inspect the cavities for dust, debris, or leftover solder blobs. Use a soft brush or compressed air to clean out every corner. This step is often overlooked but critical for ensuring a smooth fit for your new components.
Look closely for any cracks, chips, or wood damage inside the cavities. Small imperfections can cause grounding issues or rattling noises once the electronics are installed. If you spot any problems, consider filling or reinforcing these areas before moving forward.
Wiring Diagram Basics
Understanding wiring diagram basics is key to successfully building your own J-Bass electronics. It’s not just about connecting wires; it’s about knowing how each component interacts to shape your tone. Clear wiring ensures your bass sounds exactly how you want it, without the frustration of troubleshooting later.
Imagine spending hours soldering only to find a hum or no sound at all. That’s why a solid grasp of wiring basics saves time and headaches. Are you ready to wire your pickups and controls like a pro?
Pickup Wiring Options
Your J-Bass usually has two pickups: a neck and a bridge pickup. Wiring these pickups correctly affects your sound blend and output level.
- Series wiringconnects pickups end-to-end, increasing output and giving a thicker tone.
- Parallel wiringkeeps pickups separate but combined, offering a brighter, clearer sound.
- Split wiringlets you activate each pickup independently, giving more tonal variety.
Think about the sound you want. Do you prefer a punchy, powerful tone or a crisp, articulate one? Your wiring choice directly impacts that.
Volume And Tone Controls Setup
Volume and tone controls shape how your pickups deliver sound to the amp. Setting them up properly means smooth control without noise or signal loss.
- Volume potscontrol the overall output. Using 250k pots is common for J-Bass, balancing brightness and warmth.
- Tone potsadjust treble roll-off. Pair them with a 0.047µF capacitor for classic J-Bass tone shaping.
- Wiring ordermatters: typically, pickups feed into volume pots, then tone pots, and finally the output jack.
When wiring your controls, make sure all grounds are connected to avoid hum. Test each control as you go to catch wiring slips early.

Credit: www.youtube.com
Soldering Components
Soldering components is a key skill in building J-Bass electronics. It connects all parts securely. Good solder joints ensure clear sound and long-lasting performance. Proper technique prevents damage to sensitive parts.
Take your time and work in a well-lit, ventilated area. Use the right tools: a soldering iron with a fine tip, quality solder, and a helping hand tool to hold pieces steady. Keep your workspace clean to avoid mistakes.
Soldering Tips For Beginners
- Heat the joint, not the solder directly.
- Use rosin-core solder for electronics.
- Keep the soldering iron tip clean and tinned.
- Apply solder to the heated joint quickly and smoothly.
- Avoid cold joints; they look dull and grainy.
- Work on one connection at a time.
- Let joints cool naturally without moving the parts.
Connecting Pickups To Pots
Pickups send signals to pots (potentiometers) that control volume and tone. Start by identifying the pickup wires: usually hot and ground.
Heat the pot’s terminal and touch the solder to it. Then add the pickup wire. Wait for the solder to flow evenly around the wire and terminal.
Do not apply too much solder. Ensure a solid connection without bridges to other terminals. Check connections with a multimeter for continuity.
Grounding And Shielding
Grounding prevents unwanted noise in your bass. Connect all ground wires to a common grounding point, usually the back of a pot.
Shielding blocks electromagnetic interference. Line the control cavity with copper or aluminum tape. Solder the shielding to ground for best results.
Make sure no wires touch the shielding tape directly, except for the ground wire. This setup reduces hum and buzz for a clean tone.
Installing Electronics
Installing the electronics in your J-Bass DIY project is a crucial step that brings your instrument to life. This stage demands both precision and patience, ensuring each component fits securely and functions correctly. Handling pickups, pots, and wiring carefully will help avoid future issues and enhance your bass’s tone and reliability.
Mounting Pickups And Pots
Start by placing your pickups into their designated slots on the body. Secure them gently but firmly with screws, making sure they sit flush without warping the wood. Tightening too much can damage the pickup or the body, so find that balance.
Next, position the pots in their holes on the control plate or pickguard. Use the nuts and washers to fasten them from the front, ensuring they don’t move when you turn the knobs. You want the pots stable enough to avoid noise but easy to adjust.
Have you noticed how a slightly loose pot can cause scratchy sounds? Avoid this by testing each pot’s rotation before wiring. This simple check can save you hours troubleshooting later.
Securing Wiring Inside The Cavity
Once your pickups and pots are mounted, it’s time to focus on the wiring inside the cavity. Route the wires neatly to prevent tangles or interference. You can use small zip ties or electrical tape to bundle wires together.
Keep wires away from sharp edges or screw holes that might cut the insulation over time. Adding a bit of heat shrink tubing on exposed solder joints can prevent shorts and improve durability.
Think about how your wiring will affect future repairs or upgrades. Leaving some slack and organizing cables thoughtfully will make your bass easier to maintain. Have you ever struggled to trace a messy wiring job? Avoid that frustration by keeping it clean from the start.
Testing And Troubleshooting
Testing and troubleshooting are key steps in building your J-Bass electronics DIY project. These steps ensure your bass sounds clear and everything works right. Problems often come from small mistakes or loose connections. Careful testing helps spot these issues early.
Start by checking each connection. Then, identify common issues and learn how to fix them quickly. This approach saves time and keeps your project on track.
Checking Connections
Check every wire and solder joint. Look for loose wires or cold solder joints. Use a multimeter to test continuity between points. Make sure all ground wires connect properly. Inspect the pickup wires carefully. Confirm the switch and pot terminals are secure. A small loose wire can stop the signal.
Common Issues And Fixes
- No Sound:Check if the battery is good and connected. Test the output jack wiring. Re-solder any loose joints.
- Weak Sound:Look for bad solder joints or broken wires. Clean pots and switches with contact cleaner.
- Noise or Buzz:Ensure all grounds connect to a common point. Shield the control cavity with conductive paint or foil.
- One Pickup Not Working:Check pickup wiring and selector switch contacts.
Final Assembly And Setup
Final assembly and setup are where all your hard work on the J-Bass electronics comes together. This stage demands attention to detail and patience, as small adjustments now will shape your bass’s tone and playability. Let’s walk through reinstalling the pickguard, adjusting the pickup height, and performing sound checks to fine-tune your instrument.
Reinstalling The Pickguard
Before you screw the pickguard back onto your bass, make sure all the wiring is neatly tucked inside the cavity. Avoid pinching any wires under the pickguard—this could cause shorts or unwanted noise later. Take your time aligning the pickguard so it sits flush against the body without gaps.
If you find that some screws don’t align perfectly, don’t force them. Slightly adjusting the wiring placement or gently repositioning the pickguard can solve this. Using a magnetic screwdriver can save you from dropping screws into the cavity, which I learned the hard way during my first build!
Adjusting Pickup Height
Pickup height affects your bass’s volume and tone significantly. Start by setting the pickups about 2-3mm from the strings when pressed at the last fret. From there, play each string and listen closely to balance the output across all strings.
If one string sounds weaker or too harsh, raise or lower the pickup on that side. Use the pickup adjustment screws carefully; small turns can make a big difference. Don’t rush this step—experiment with different heights while playing your favorite riffs to find the sweet spot for your sound.
Sound Check And Fine Tuning
Plug your bass into your amp and play through various styles and dynamics. Listen for any hums, crackles, or uneven output levels. These issues can often be traced back to grounding problems or loose solder joints, so be ready to open the pickguard again if needed.
Fine-tune your tone by tweaking the tone and volume pots, and consider adjusting the pickup height one more time if something feels off. Remember, your ears are the best guide. Does your bass sound full and balanced? If not, what subtle changes could improve it?

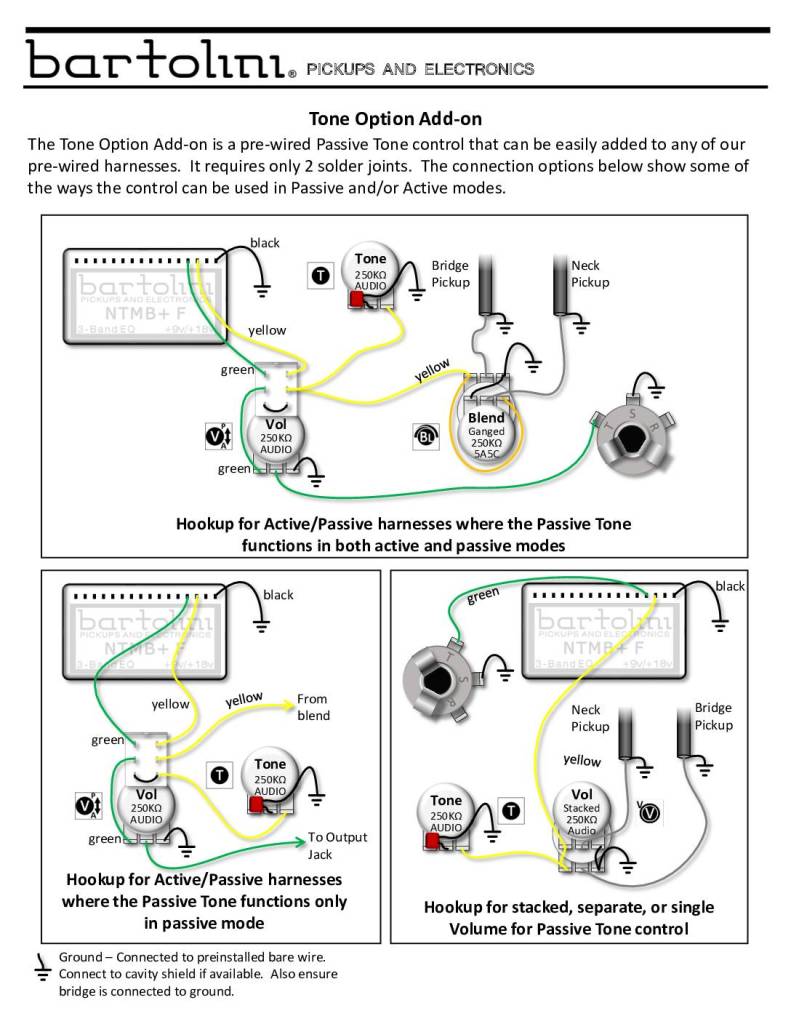
Credit: bartolini.net

Credit: www.reddit.com
Frequently Asked Questions
What Tools Are Needed For J-bass Electronics?
You will need a soldering iron, wire cutters, a multimeter, and screwdrivers. These tools are essential for assembling and testing the electronics. Make sure you have all components ready before starting. A clean workspace will also make the process smoother and more efficient.
How Do I Solder J-bass Components?
Start by heating the soldering iron and tinning its tip. Carefully solder each component, ensuring connections are secure. Avoid overheating to prevent damage. Practice on spare wires if you’re new to soldering. Always double-check your work to ensure functionality and reliability in your J-Bass setup.
Where Can I Find J-bass Wiring Diagrams?
Wiring diagrams are available online on guitar forums and manufacturer websites. They provide clear guidance on assembly. Always choose a diagram that matches your specific J-Bass model. A well-followed diagram ensures correct connections and optimal performance of your DIY electronics project.
Can I Customize J-bass Electronic Setup?
Yes, you can customize pickup configurations and control layouts. Experimenting can enhance sound quality and suit personal preferences. Ensure compatibility of components when making changes. Custom setups can offer unique tonal possibilities, adding a personal touch to your J-Bass guitar.
Conclusion
Building J-Bass electronics yourself is a rewarding experience. You gain full control over sound and tone. The process helps you understand your instrument better. Small steps make the task easier and more fun. Patience and care lead to great results.
Enjoy the satisfaction of playing your custom bass. Keep experimenting to find your perfect sound. This DIY project is both practical and creative. Start today and see how much you can achieve.
Leave a Reply