Are your gadgets acting up, but you’re not sure why? Knowing how to check faulty electronic components can save you time, money, and frustration.
Imagine fixing your device yourself instead of rushing to a repair shop or buying a new one. You’ll discover simple, clear steps to identify which parts are causing problems. By the end, you’ll feel confident troubleshooting your electronics like a pro.
Ready to take control and keep your devices running smoothly? Let’s dive in!

Credit: www.reddit.com
Common Faulty Components
Common faulty components include resistors, capacitors, and transistors. Testing these parts with a multimeter helps identify issues quickly and easily. Simple checks reveal if components are damaged or need replacement.
Electronic components are the heart of any device, yet they can be the trickiest to troubleshoot when something goes wrong. Knowing which components are prone to failure can save you time and frustration. In this section, we’ll explore some of the most common faulty components you’ll encounter.Resistors
Resistors are the most basic of electronic components, used to control the flow of current. They tend to fail due to overheating or physical damage. One quick test is to check the resistance with a multimeter. If the reading is significantly off from the specified value, it’s likely faulty. Ever found a burnt-looking resistor? That’s a clear sign of overheating.Capacitors
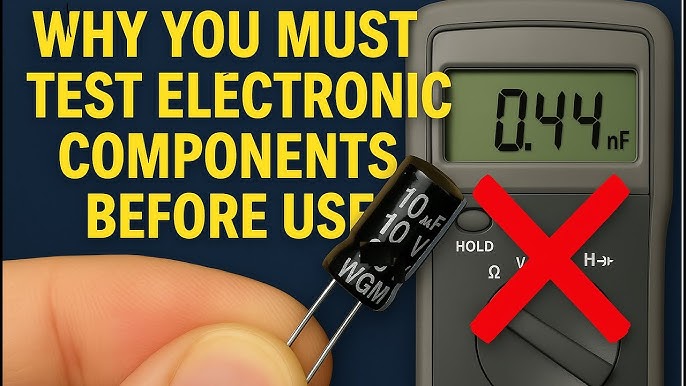
Capacitors store electrical energy and can fail over time, especially if exposed to high voltage. A bulging or leaking capacitor is a dead giveaway. You can use a multimeter to measure its capacitance. If the value is outside the normal range, it’s time for a replacement. Have you ever heard a device buzz unexpectedly? That might be a faulty capacitor.Diodes And Leds
Diodes and LEDs allow current to flow in one direction, and they often fail due to excessive current. A simple diode test on a multimeter can reveal a lot. If it shows zero in both directions, the diode is shorted. Has your LED stopped lighting up? Check for a faulty diode.Transistors
Transistors amplify or switch electronic signals and can fail when they overheat. Using a multimeter’s transistor check feature can help you identify issues. If the transistor doesn’t switch on and off as expected, it might be faulty. Is your amplifier acting up? A bad transistor could be the culprit.Integrated Circuits
Integrated circuits (ICs) are complex, with many components in one package. They can fail due to static discharge or overheating. Testing them often requires specific knowledge of their function in the circuit. If you suspect an IC, check for visible signs of damage like burns or cracks. Is your device not functioning at all? An IC might have given up the ghost. Understanding these common components and knowing how to test them can make troubleshooting far less daunting. Which component gave you the most trouble last time?
Credit: electronics.stackexchange.com
Basic Tools Needed
Before you dive into testing electronic components, having the right tools on hand makes the job easier and more accurate. These basic tools help you identify faults quickly and save you from unnecessary replacements. Let’s look at each essential tool that should be in your toolkit.
Multimeter
A multimeter is your best friend for checking voltage, current, and resistance in components. It gives you precise readings, helping you figure out if a part is working or not. I once saved a client hours of frustration just by spotting a faulty resistor with a simple multimeter test.
Look for a digital multimeter with easy-to-read displays and multiple functions. It allows you to test diodes, continuity, and even capacitance, which covers most of what you’ll need.
Soldering Iron
A soldering iron is crucial when you need to remove or replace faulty components on a circuit board. Having a reliable, temperature-controlled iron can make your job smoother and prevent damage to delicate parts. I always recommend starting with a 30 to 40-watt iron for general electronic repairs.
Make sure the tip is fine enough to handle small connections but sturdy enough to heat components evenly. This tool helps you fix issues rather than just identifying them.
Test Leads
Test leads connect your multimeter to the component you’re testing. Good quality leads ensure accurate measurements and reduce the risk of false readings. Over time, I’ve learned that cheap leads can introduce errors and even fail unexpectedly.
Look for leads with insulated grips and sturdy connectors. Having spare leads is smart because they wear out faster than you expect.
Magnifying Glass
Many faults in electronics come down to tiny cracks, cold solder joints, or damaged traces that are hard to see with the naked eye. A magnifying glass helps you spot these small but critical issues. I often catch problems others miss just by taking a closer look.
Choose a magnifier with built-in light if you can, as it makes inspecting circuit boards much easier in low-light conditions. This simple tool can save you hours of guesswork.
Visual Inspection Tips
Visual inspection is your first and most straightforward tool to spot faulty electronic components. It helps you catch obvious problems before using any testing equipment. Paying close attention can save you time and prevent further damage.
Checking For Burn Marks
Burn marks are clear signs of overheating or short circuits. Look closely around resistors, transistors, and circuit board traces for any dark or blackened areas. Even small discolorations can indicate a serious problem that needs immediate attention.
Have you ever missed a tiny burn spot only to find the device still malfunctioning? That’s why careful scrutiny under good lighting is essential. A magnifying glass can help reveal hidden signs you might otherwise overlook.
Identifying Swollen Capacitors
Capacitors often fail by swelling or bulging at the top. Check for any rounded or puffed-up surfaces instead of flat ones. This swelling usually means the capacitor has leaked or lost its ability to store charge effectively.
You might find capacitors that look fine from a distance but are actually damaged when viewed up close. Touching the component gently can also help detect heat, which often accompanies a faulty capacitor. Have you noticed that swollen capacitors often cause devices to restart unexpectedly?
Loose Or Broken Connections
Loose wires and broken solder joints can cause intermittent or complete failure. Wiggle the connectors gently to see if anything moves or feels unstable. Look for cracks or gaps where the metal meets the board.
Sometimes a connection might look fine but is actually cracked underneath. Tapping the board lightly while observing the component can reveal these hidden faults. How often do you find that a simple resoldering fixes what seemed like a complex problem?
Testing Resistors
Testing resistors is a key step in checking faulty electronic components. Resistors control electrical current in circuits. Faulty resistors can cause devices to work poorly or stop working. Testing ensures they have the right resistance and are not damaged.
Resistors are simple but vital parts. They come with color bands that show their resistance value. Comparing these values with measurements helps find problems fast. Two main ways to test resistors are measuring resistance and comparing with color codes.
Measuring Resistance
Use a digital multimeter to measure resistor resistance. Set the meter to the resistance mode (ohms). Touch the meter probes to the resistor leads. Read the value shown on the screen.
Resistor leads must be disconnected from the circuit for accurate reading. Note the value and compare it to the expected resistance. A big difference means the resistor may be faulty or damaged.
Comparing With Color Codes
Resistors have colored bands that show their resistance. Each color stands for a number. Use a resistor color code chart to decode these bands.
| Color | Number |
|---|---|
| Black | 0 |
| Brown | 1 |
| Red | 2 |
| Orange | 3 |
| Yellow | 4 |
| Green | 5 |
| Blue | 6 |
| Violet | 7 |
| Gray | 8 |
| White | 9 |
Check if measured resistance matches the color code value. If not, the resistor might be faulty. This method helps identify wrong or damaged resistors quickly.
Checking Capacitors
Capacitors store and release electrical energy in circuits. Faulty capacitors can cause devices to fail or perform poorly. Testing them helps find issues early and saves repair time. Understanding how to check capacitors is essential for electronic troubleshooting. Use simple tools and clear steps to ensure accuracy.
Using A Multimeter In Capacitance Mode
Set the multimeter to the capacitance mode. Disconnect the capacitor from the circuit first. Connect the multimeter leads to the capacitor terminals. The device will show a reading in microfarads (µF). Compare this value to the capacitor’s rated capacitance. A significant difference means the capacitor may be faulty. Repeat the test a few times for consistency.
Identifying Leakage Or Short Circuits
Switch the multimeter to resistance or continuity mode. Place the probes on the capacitor terminals. A good capacitor will show high resistance or no continuity. Low resistance or a beep indicates leakage or a short circuit. Such capacitors should be replaced immediately. Visual signs like bulging or leaking also suggest damage.
Diode And Led Testing
Testing diodes and LEDs is essential to find faulty components. These parts control current flow in circuits. A simple test can tell if they work properly or need replacement. Basic tools like a multimeter help perform these tests quickly. Understanding forward and reverse bias and using the diode test function are key steps.
Forward And Reverse Bias Testing
Diodes allow current to flow only in one direction. Forward bias means connecting the positive lead to the diode’s anode and the negative to the cathode.
Check the diode in forward bias for a low voltage drop. A healthy diode usually shows about 0.6 to 0.7 volts.
Reverse bias is the opposite connection: positive lead to cathode and negative to anode. A good diode blocks current here, showing no or very high resistance.
If the diode shows low resistance in reverse bias, it is faulty. If it shows high resistance in both directions, it might be open or broken.
Using The Diode Test Function
Many multimeters have a diode test mode. This mode applies a small voltage and measures the voltage drop across the diode.
Connect the probes as in forward bias. The display should show a voltage drop, confirming the diode is good.
Reverse the probes for reverse bias testing. The display should show “OL” or a high value, meaning no current flow.
This test is quick and accurate for both diodes and LEDs. LEDs will also light up dimly during forward bias testing, indicating they are working.
Testing Transistors
Testing transistors is essential to find faulty electronic parts. Transistors control current flow in circuits and can fail over time. Simple tests help identify bad transistors and keep devices working well. These tests check the transistor’s junctions or use special tools for accuracy.
Checking Junctions
Transistors have two junctions: base-emitter and base-collector. These junctions act like diodes and allow current in one direction. Use a digital multimeter set to diode mode. Test each junction by placing the probes on the transistor pins.
- Place the positive (red) probe on the base pin.
- Place the negative (black) probe on the emitter pin.
- Note the reading; a good junction shows a voltage drop around 0.6 to 0.7 volts.
- Reverse the probes; the meter should show no conduction (infinite or OL).
- Repeat for the base-collector junction.
A faulty transistor may show no voltage drop or conduct both ways. This simple check quickly spots many common transistor issues.
Using A Transistor Tester
Transistor testers give quick, accurate results. They identify transistor type, pinout, and gain (hFE). Insert the transistor into the tester’s socket following the device instructions. The tester runs a check and displays results on a screen or meter.
- Confirm transistor type: NPN or PNP.
- Check pin connections to avoid errors.
- View gain value; low gain may mean a weak transistor.
- Some testers detect leakage or short circuits.
Using a transistor tester reduces guesswork. It is helpful for beginners and professionals alike. This method speeds up troubleshooting and ensures reliable results.
Integrated Circuit Checks
Checking integrated circuits (ICs) is a crucial skill for anyone working with electronics. These tiny chips handle complex tasks, so even a small fault can cause big problems. Knowing how to spot issues early saves you time and prevents further damage to your device.
Visual Inspection
Start by closely examining the IC for physical damage. Look for cracks, burnt spots, or corrosion on the pins and body. Sometimes, discoloration or melted plastic indicates overheating, which is a common cause of failure.
Check the solder joints too. Cold or cracked solder can interrupt connections and mimic a faulty IC. Gently wiggle the component; if it moves, the connection might be loose or broken.
Have you noticed tiny black marks or bulges on your IC? These are often signs that the chip has been stressed beyond its limits and needs replacement.
Functional Testing Methods
Visual checks are helpful but not enough. You need to test if the IC works under real conditions. Using a multimeter, you can measure voltage and resistance at various pins to see if they match the datasheet specifications.
Another practical tool is the logic analyzer or an oscilloscope. These let you observe the IC’s input and output signals, confirming if it processes data correctly. If the output is missing or erratic, the IC could be faulty.
Some ICs can be tested by swapping them with a known working unit. This quick test often reveals if the chip is the problem without complicated equipment. Have you tried this simple swap in your troubleshooting?
Safety Tips During Testing
Testing electronic components can be both exciting and risky. Ensuring your safety is the top priority before you start probing circuits or swapping parts. Ignoring safety can lead to damage—not just to your device, but also to you.
Power Off Before Testing
Always disconnect power before testing any electronic component. Live circuits can deliver shocks or cause short circuits that damage components instantly. Have you ever felt that zap when touching a powered circuit? That’s a clear warning to switch off first.
Using a multimeter on a powered board without caution can fry your meter or the component. So, double-check the power status, unplug devices, and discharge capacitors before you touch anything. This simple step saves you from costly mistakes and injuries.
Handling Components Carefully
Electronic parts are delicate and static-sensitive. Holding a resistor or transistor without grounding yourself can introduce static electricity, ruining the component silently. Do you have an anti-static wrist strap or mat? If not, at least touch a grounded metal object before handling parts.
Use tweezers or component holders when possible to avoid bending pins or contaminating contacts with oils from your fingers. Treating components gently ensures accurate testing results and extends their lifespan. Remember, a tiny crack or bent lead can cause big problems later.

Credit: www.youtube.com
Frequently Asked Questions
How Can I Identify Faulty Electronic Components?
Check for physical damage, discoloration, or burnt marks on components. Use a multimeter to test continuity and resistance. Faulty parts often show irregular readings or no continuity.
What Tools Help Test Electronic Components Accurately?
A digital multimeter, oscilloscope, and component tester are essential. These tools measure voltage, current, resistance, and signal integrity to detect faults.
Can Faulty Components Cause Device Malfunction?
Yes, defective components often cause devices to fail or perform poorly. Identifying and replacing faulty parts restores proper device operation.
How To Test Capacitors For Faults?
Use a multimeter with capacitance testing or an ESR meter. Look for leakage, low capacitance, or short circuits to identify faulty capacitors.
Conclusion
Checking faulty electronic components takes patience and careful steps. Use basic tools like a multimeter to test parts quickly. Look for signs like burns, cracks, or unusual smells. Testing helps save money and avoid bigger problems later. Practice makes the process easier and faster.
Always follow safety rules to protect yourself. Keep learning and improving your skills with each test. This way, you can fix devices confidently and avoid unnecessary repairs. Simple checks make a big difference in electronics work.
Leave a Reply