You rely on electronic components every day, whether in your gadgets, projects, or repairs. But what happens when one of those parts is faulty?
A bad component can cause your device to fail, waste your time, and even damage other parts. Knowing how to spot these bad components before you use them can save you frustration and money. You’ll learn simple, effective ways to identify bad electronic components quickly and confidently.
Keep reading to protect your devices and ensure your projects work perfectly every time.

Credit: www.reddit.com
Signs Of Faulty Components
Spotting faulty electronic components early can save you time, money, and a lot of frustration. These signs often appear before a complete failure happens, giving you a chance to fix or replace parts before they cause bigger problems. Keep your eyes and ears sharp to catch these warning signals.
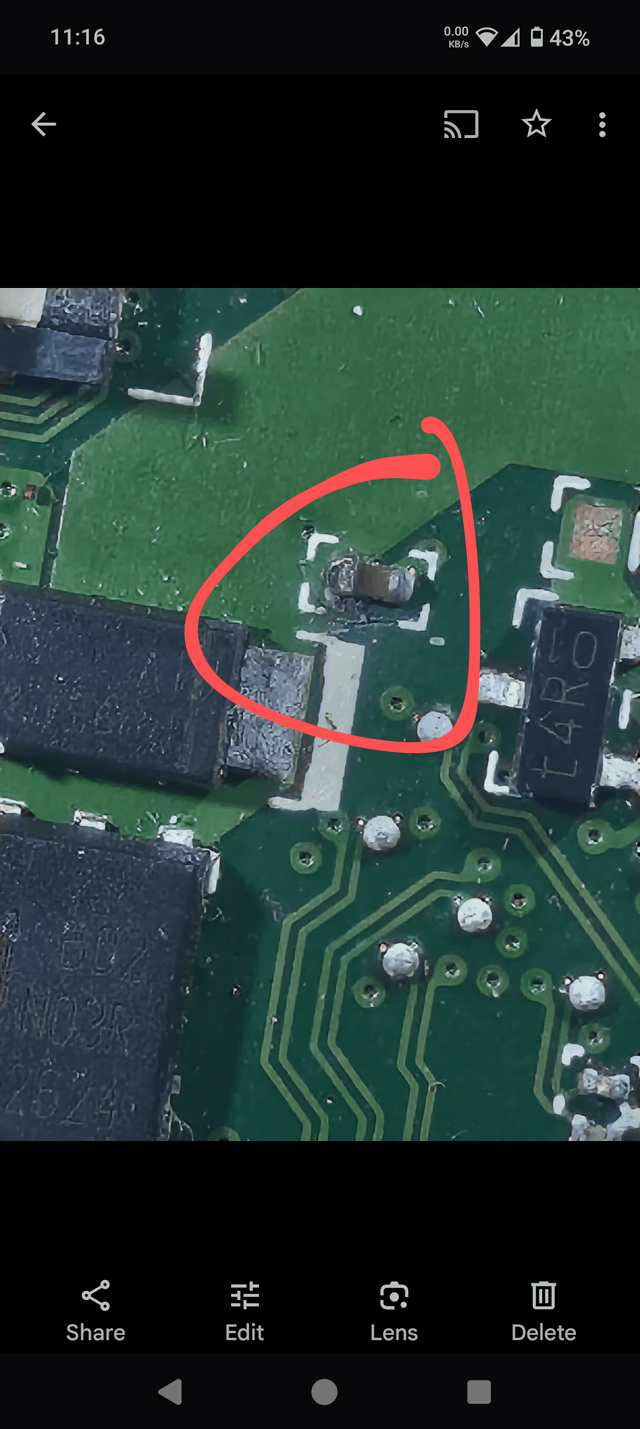
Visible Damage
Check your components closely for any physical damage. Look for cracks, burn marks, or corrosion on circuit boards and connectors. Even slight discoloration or bulging capacitors can mean trouble ahead.
Have you ever noticed a resistor that looked charred or a capacitor that seemed swollen? These are clear signs something is wrong. Ignoring visible damage often leads to complete breakdown.
Unusual Heat Emission
Electronic parts should not feel excessively hot to the touch. If you notice a component getting unusually warm, it might be failing or overloaded. Heat can quickly damage sensitive parts inside.
Try to localize the source of heat carefully. Sometimes, a tiny chip or transistor is the culprit, and replacing it can restore your device’s function. Have you ever felt a hotspot on your device and traced it back to a faulty part?
Odd Noises
Uncommon sounds like buzzing, clicking, or humming can signal electrical issues. These noises often come from transformers, capacitors, or coils struggling to perform. Pay attention if your device suddenly starts making noises it didn’t before.
Listening closely can help you identify which component might be at fault. Have you ever turned off a device just because a strange noise made you suspicious? That instinct is often right on target.
Testing Techniques
Testing electronic components is crucial to ensure your devices work correctly and safely. Without proper testing, you might end up replacing parts unnecessarily or missing a faulty component that causes bigger problems. Different tools and techniques help you pinpoint issues accurately, saving you time and frustration.
Using A Multimeter
A multimeter is your best friend for quick checks. It measures voltage, current, and resistance, which helps you spot broken or shorted components.
For instance, if you suspect a resistor is bad, set your multimeter to resistance mode and compare the reading to the resistor’s rated value. A significant difference means it’s time to replace it.
Testing diodes and transistors with the diode test function can also reveal if they are damaged. Have you ever tried testing a capacitor this way? While you can check for shorts, more advanced tools are needed for full capacitor testing.
Oscilloscope Diagnostics
Oscilloscopes show electrical signals as waveforms on a screen, giving you a detailed view of what’s happening inside your circuit. This is especially useful for detecting signal distortions or intermittent faults.
When you see irregular wave patterns or unexpected noise, it often points to a faulty component or wiring issue. For example, a clean sine wave turning choppy could mean a bad capacitor or transistor.
Don’t shy away from experimenting here—observe how signals change with different components to understand their behavior better. How often do you use an oscilloscope to verify your circuit’s health?
Signal Tracing Methods
Signal tracing involves following the flow of electricity through a circuit step-by-step. This hands-on approach helps you isolate where the problem starts.
Start at the power source and move through each component, checking if the signal continues as expected. If the signal stops or changes unexpectedly, you’ve found a potential bad component.
Tools like signal injectors and logic probes can assist in this process, making it easier to see where signals fail. Have you noticed how signal tracing can often reveal issues that other tests miss?
Common Problematic Components
Electronic devices rely on many small parts. Some components fail more often than others. Knowing common problematic parts helps in spotting issues fast. This saves time and money during repairs or assembly.
Bad components cause devices to work poorly or stop working. They may look fine but fail under power. Identifying these parts early prevents bigger damage or malfunction.
Capacitors
Capacitors store and release electrical energy. They often fail by leaking or bulging. A bad capacitor may cause device resets or no power. Look for:
- Swollen or cracked casing
- Leaking fluid or corrosion
- Unusual bulges on the top
- Burn marks near terminals
Testing capacitance with a meter confirms if it works. Replace if the value is far from the rating.
Transistors
Transistors control electrical signals. Faulty transistors cause no signal or constant output. Signs of bad transistors include:
- Burnt smell or dark spots
- Loose or broken legs
- Device overheating
Use a multimeter to check transistor junctions. Shorts or open circuits indicate failure. Replace damaged transistors to restore function.
Resistors
Resistors limit current flow in circuits. Bad resistors cause incorrect voltage or overheating. Common signs are:
- Discolored or burnt bodies
- Broken or cracked casing
- Values outside tolerance range
Measure resistance with a meter. Values far from the labeled rating mean replacement is needed.

Credit: www.reddit.com
Environmental Factors
Environmental factors play a crucial role in the lifespan and reliability of electronic components. You might not always notice how your surroundings affect the quality of parts, but these factors can silently damage components over time. Understanding these effects helps you spot potential issues before they become costly failures.
Humidity Effects
Humidity can cause moisture to seep into electronic components, leading to corrosion and short circuits. Have you ever noticed a device failing after being stored in a damp place? That’s the moisture breaking down metal contacts and insulation inside the parts.
Check for signs like rust, discoloration, or sticky residues on connectors and circuit boards. Using a moisture meter or storing components in a dry, controlled environment can protect them from humidity damage.
Temperature Extremes
Extreme heat or cold stresses electronic components beyond their design limits. When temperatures rise too high, parts can warp, melt, or lose conductivity. On the other hand, freezing temperatures can cause brittle materials to crack or solder joints to fail.
Think about devices left in a hot car or outside during winter—you might see these temperature-induced damages more often than you realize. Always verify the operating temperature range specified by the manufacturer and avoid exposing components to harsh climates.
Dust And Debris
Dust and debris may seem harmless, but they can cause serious issues inside electronics. Particles can clog ventilation, trap moisture, and create conductive paths that lead to shorts. Have you ever cleaned out dust from a fan or circuit board and noticed improved performance?
Regularly inspect and clean your components with compressed air or soft brushes. Keeping your workspace clean helps ensure that dirt doesn’t sneak into your devices and degrade their function over time.
Preventive Measures
Preventing damage to electronic components is key to extending their life. Taking simple steps stops defects before they start. Careful handling and smart choices save money and time. Small changes in storage, maintenance, and selection keep parts working well longer.
Proper Storage Solutions
Store components in dry, cool places away from sunlight. Use anti-static bags to protect sensitive parts from static electricity. Label containers clearly to avoid confusion. Avoid stacking heavy items on delicate components. Keep humidity low to prevent corrosion and rust.
Regular Maintenance Practices
Clean components gently with soft brushes or compressed air. Check for signs of damage, like cracks or discoloration. Test components regularly to catch faults early. Replace worn or damaged parts immediately. Maintain clean, dust-free workspaces to reduce contamination risks.
Quality Component Selection
Choose components from trusted manufacturers with good reviews. Verify specifications match your project requirements exactly. Avoid very cheap parts that may fail quickly. Purchase from authorized dealers to ensure authenticity. Keep records of batch numbers and purchase dates for tracking.
Tools For Component Analysis
Identifying bad electronic components requires the right tools. Accurate analysis helps avoid costly mistakes and ensures device reliability. Tools for component analysis come in various forms, from simple handheld devices to complex software. Each tool serves a unique purpose in testing and verifying electronic parts.
Essential Diagnostic Tools
Basic diagnostic tools detect common faults in components quickly. A multimeter measures voltage, current, and resistance. It helps spot broken circuits and shorted parts. An LCR meter checks inductance, capacitance, and resistance values precisely. These tools are easy to use and essential for any electronics workbench. A soldering iron with a quality tip aids in component removal and replacement. Visual inspection with a magnifying glass or microscope reveals physical damage like cracks or corrosion.
Advanced Testing Equipment
Advanced equipment provides deeper insight into component health. An oscilloscope visualizes electrical signals in real-time. It shows waveform shapes and timing issues. A curve tracer plots the voltage-current relationship of semiconductors. This identifies faulty diodes and transistors. Spectrum analyzers measure signal frequencies and noise levels. Automated test systems perform batch testing for large quantities of parts. These tools require more skill but offer accurate diagnostics.
Software For Simulation
Simulation software models component behavior before physical testing. Circuit simulators predict how parts perform under various conditions. They save time and reduce the risk of damage. Software tools include SPICE-based simulators and specialized apps for microcontrollers. Simulation helps compare component specs and find potential faults. It also aids in designing circuits that avoid component stress and failure.
Expert Advice And Resources
Finding bad electronic components can be tricky without the right help. Expert advice and trusted resources make the process easier and more accurate. They provide knowledge, tools, and support to identify faulty parts confidently. Access to professionals and educational platforms ensures better understanding and safer electronics work.
Consulting Professionals
Experts in electronics can spot bad components quickly. They use specialized tools and years of experience. Seeking help from certified technicians or engineers reduces errors. Professionals often share practical tips and troubleshooting steps. Their advice saves time and prevents damage to devices.
Online Forums And Communities
Communities of electronics enthusiasts offer valuable insights. Users share real problems and solutions about bad components. Forums like Electronics Stack Exchange or Reddit’s electronics groups host helpful discussions. Members post photos, test results, and advice. Joining these forums connects beginners with experienced hobbyists and experts.
Educational Workshops And Courses
Workshops and online courses teach how to test and identify bad parts. They cover essential skills like reading datasheets and using multimeters. Hands-on training improves confidence in handling components. Many free and paid courses are available to fit different learning needs. These programs help build a strong foundation in electronics basics.

Credit: www.reddit.com
Frequently Asked Questions
How Can I Visually Identify Bad Electronic Components?
Look for discoloration, burnt marks, or physical damage on components. Swollen capacitors or cracked resistors often indicate failure. Always check for corrosion or loose connections to spot bad parts quickly.
What Tools Help Detect Faulty Electronic Components?
A multimeter is essential for testing voltage, resistance, and continuity. An oscilloscope helps analyze signal quality. These tools provide accurate diagnostics to identify malfunctioning components effectively.
What Are Common Signs Of Bad Capacitors?
Bulging tops, leaking electrolyte, and unusual noises indicate bad capacitors. They may cause circuit instability or failure. Regular inspection can prevent damage to the entire electronic device.
How Does Heat Affect Electronic Component Quality?
Excessive heat can degrade components, causing cracks or solder joint failure. Overheating reduces lifespan and performance. Proper cooling and heat management are crucial to maintain component health.
Conclusion
Identifying bad electronic components saves time and money. Check for physical damage, unusual smells, or loose parts. Use simple tools like multimeters for basic tests. Trust your senses and common sense during inspection. Avoid using doubtful parts to keep devices safe.
Regular checks help maintain device performance. Stay careful and patient when handling electronics. This skill improves with practice and experience. Keep learning and testing for better results.
Leave a Reply