
Are you tired of feeling like your home’s temperature is always a little off? Replacing a heat-only basic electronic thermostat might be the simple solution you need.
Imagine stepping into a home that’s warm and welcoming every single time. With the right guidance, you can make this upgrade yourself. It’s easier than you think, and doing it yourself can save you money. You’ll learn the step-by-step process to replace your thermostat without any hassle.
Plus, we’ll share tips that could help you avoid common mistakes. Ready to take control of your home’s comfort? Let’s dive in and get started on making your space just the way you like it.
Tools And Materials Needed
Before you dive into replacing your heat-only basic electronic home thermostat, gathering the right tools and materials is crucial. Having everything on hand makes the process smoother and safer. Missing even one small item can lead to delays or mistakes, so preparation is key.
Basic Tools Checklist
- Screwdrivers:Both flathead and Phillips screwdrivers are essential for removing the thermostat cover and securing wires.
- Voltage Tester:This tool helps you confirm the power is off before touching any wires, keeping you safe.
- Wire Strippers:You’ll need these to strip insulation if you have to adjust wire lengths or make new connections.
- Needle-Nose Pliers:These assist in bending or positioning wires neatly into terminals.
- Electrical Tape:Use it to wrap exposed wires or secure connections if needed.
- Level:Ensures your new thermostat is mounted straight for a professional look.
- Notebook and Pen:Jot down wire colors and terminal labels to avoid confusion during installation.
Having these tools ready will help you work efficiently and avoid last-minute trips to the hardware store.
Choosing The Right Thermostat
Not all thermostats work the same, especially when dealing with heat-only systems. Picking a compatible thermostat that matches your heating setup is vital. For example, some models require a C-wire (common wire), which many basic heat-only systems don’t have.
Think about how simple or advanced you want your thermostat to be. Do you want a basic electronic model with easy controls, or something with programmable features? Also, check if the thermostat supports your heating voltage and system type—24V is common, but older systems might use different voltages.
Have you checked your current thermostat’s specifications? Matching those details will save you headaches. And remember, a thermostat that’s easy to install means you’re less likely to make wiring mistakes.
Credit: www.doityourself.com
Safety Precautions
Safety should be your top priority when replacing a heat-only basic electronic home thermostat. Working with electrical devices can be risky, and taking the right precautions can prevent accidents and damage to your system. Before you start, it’s important to understand how to properly manage power and handle electrical components safely.
Power Shutoff Steps
Always turn off the power to your heating system before touching the thermostat. Locate your home’s circuit breaker panel and switch off the breaker that controls your heating system. Double-check by trying to turn the thermostat on; it should not respond if the power is off.
Have you ever rushed to fix something only to realize the power was still on? That moment of shock can be avoided by taking a few extra seconds to confirm the power is fully cut off. Safety means patience.
Handling Electrical Components
Use insulated tools when working with wires and terminals to avoid electric shocks. Avoid touching exposed wires or metal parts with your bare hands. If you notice any damaged wires or corrosion, address those issues before proceeding.
Label each wire before disconnecting it from the old thermostat to avoid confusion later. Keeping your workspace organized reduces mistakes and speeds up the process. Remember, a simple slip can cause injury or damage, so stay focused and work carefully.
Removing The Old Thermostat
Removing your old heat-only basic electronic thermostat is a crucial step before installing a new one. This process requires attention to detail to avoid damaging the wiring or the wall. Taking the time to carefully detach and label everything will save you headaches later.
Detaching The Cover
Most thermostat covers snap off easily, but some models have small screws securing them. Check around the edges for any screws and use a screwdriver if needed. Gently pull the cover away from the wall to avoid cracking the plastic.
Have you ever tried yanking the cover off too quickly? It can break fragile parts, making the replacement more complicated. Patience here pays off.
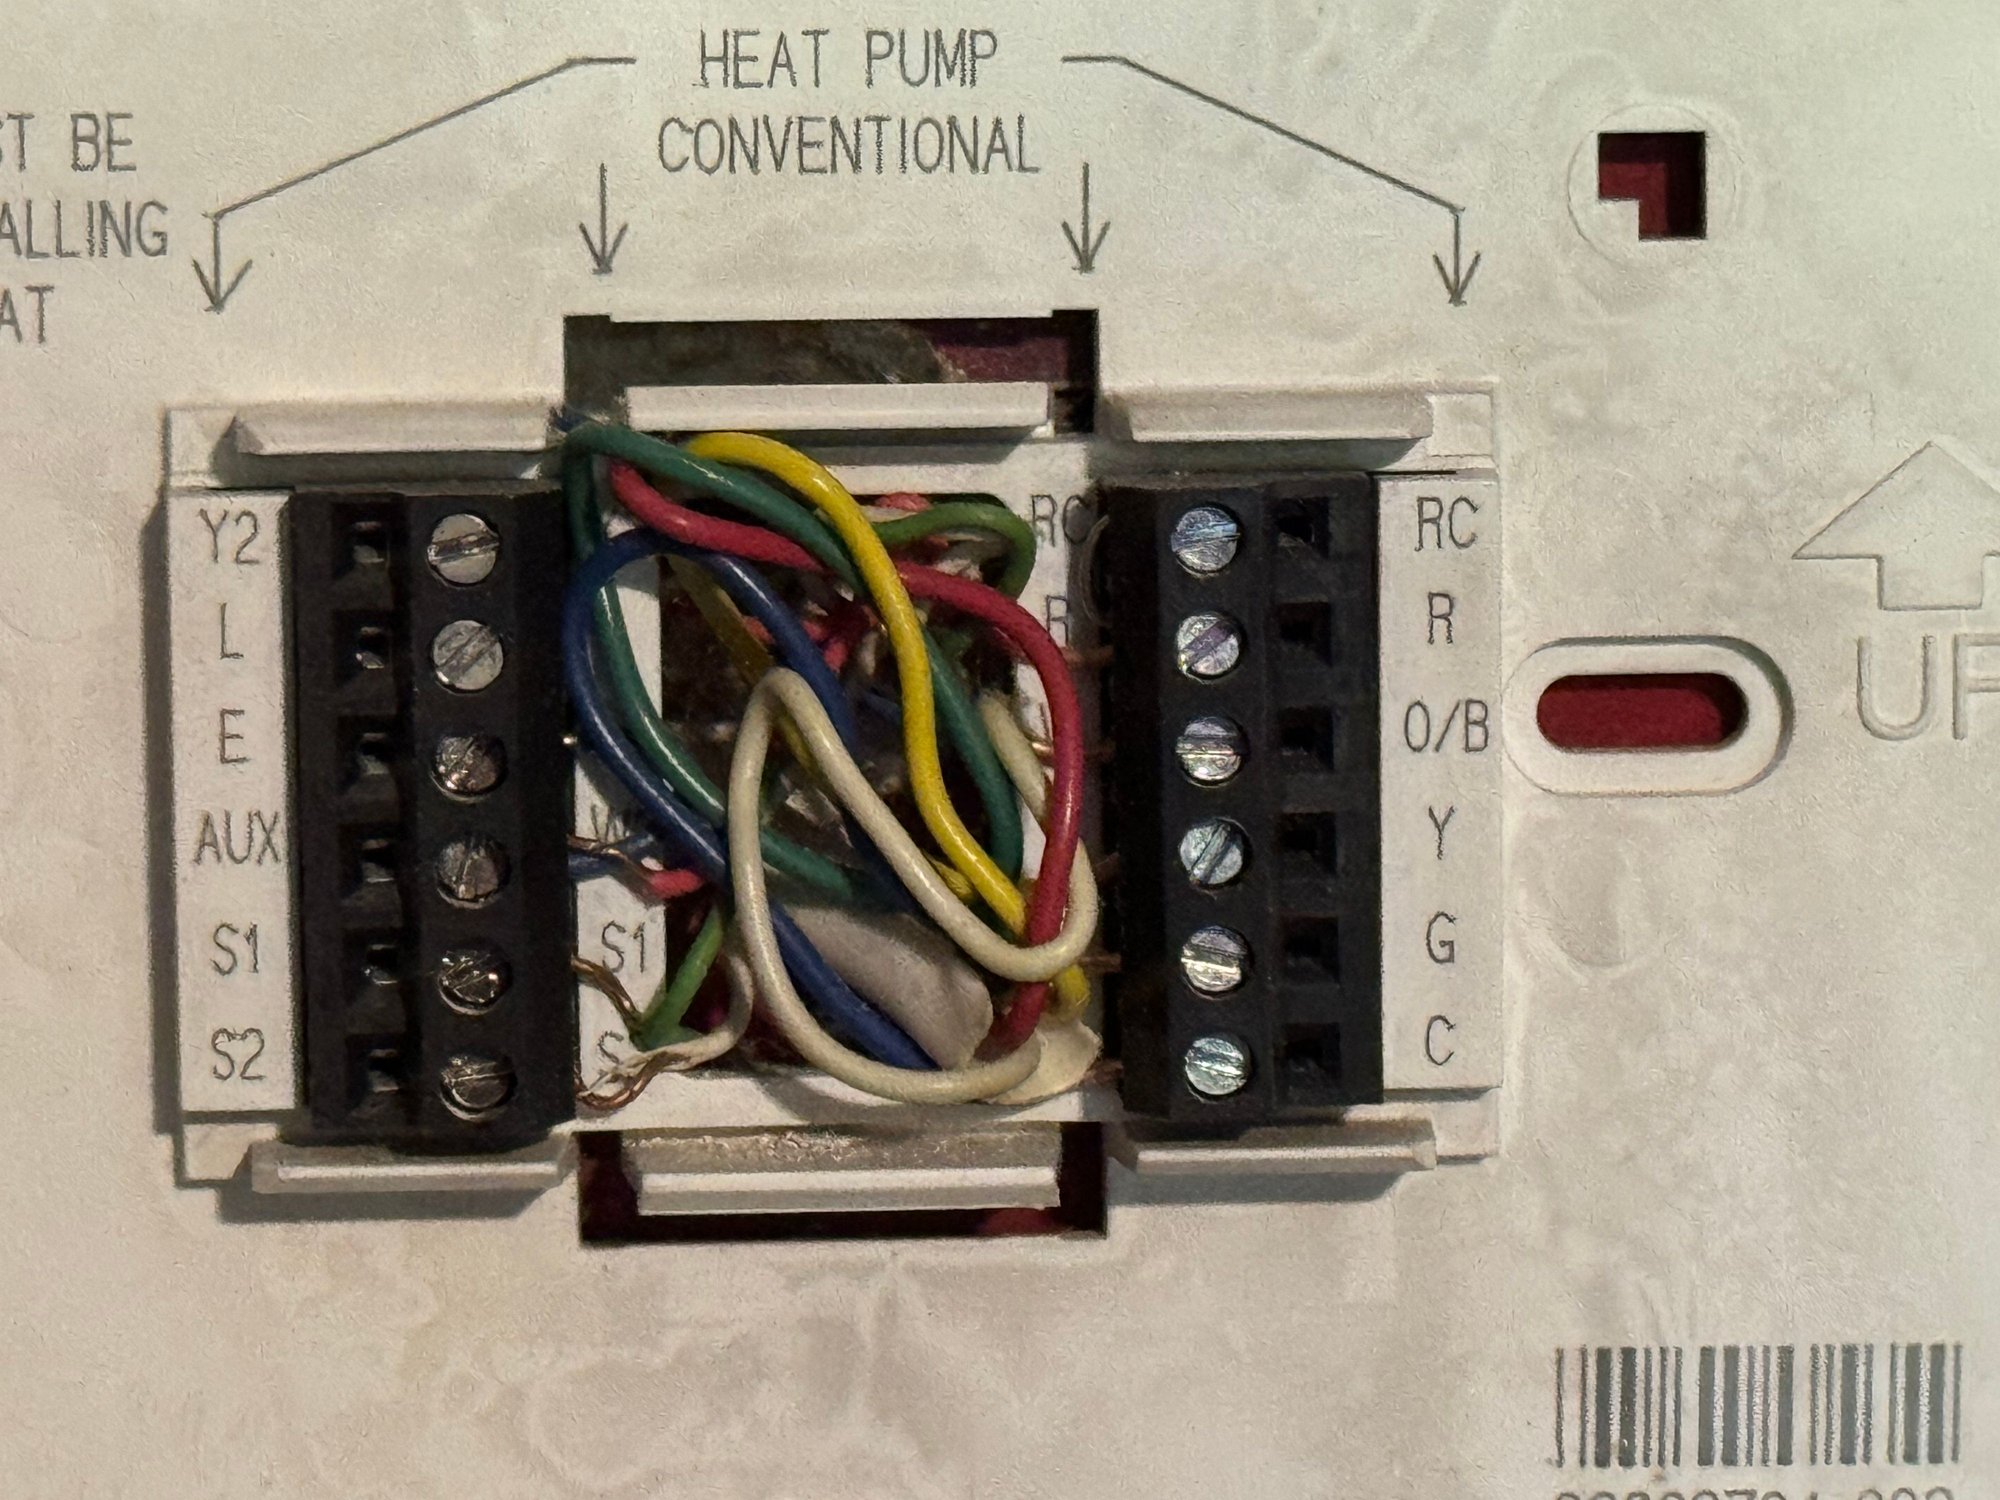
Labeling The Wires
Once the cover is off, you’ll see several wires connected to the thermostat base. Before disconnecting anything, label each wire with masking tape or small stickers. Write down the letter or color code printed on the wire or terminal.
This step prevents confusion when you install the new thermostat. Imagine trying to guess which wire goes where—that’s a recipe for errors and frustration. Taking a few minutes to label wires properly makes your job smoother.
Disconnecting The Wiring
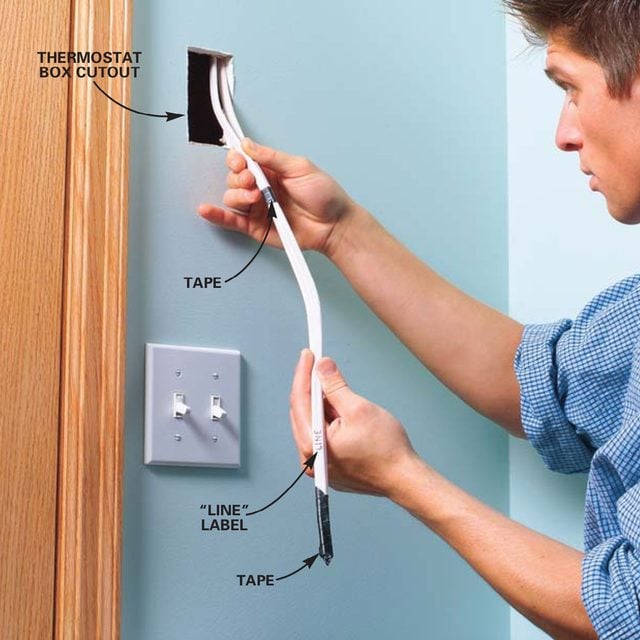
After labeling, gently loosen the screws holding the wires to the thermostat terminals. Use a small screwdriver and be careful not to nick or cut the wires. Pull each wire free and tuck them safely back into the wall box.
Double-check that the power to your heating system is turned off before doing this. Safety is not optional here. If you’re unsure, test the wires with a voltage tester.

Credit: inspectapedia.com
Preparing The Wall And Wiring
Preparing the wall and wiring is a vital step before installing a new heat-only electronic thermostat. It ensures the surface is ready and the wiring is safe and functional. This preparation avoids future problems and helps the thermostat work correctly.
Cleaning The Surface
Start by removing the old thermostat and any screws or anchors left behind. Use a damp cloth to wipe the wall clean. Remove dust, dirt, and grease to help the new thermostat stick well. Let the wall dry completely before moving on.
Checking Wire Conditions
Inspect each wire carefully. Look for damaged or frayed insulation. Make sure wires are straight and not bent or broken. If wires are dirty, wipe them gently with a dry cloth. Confirm the wires match the thermostat’s instructions for proper connection.
Installing The New Thermostat
Installing your new heat-only basic electronic thermostat is where the project really comes to life. This part requires patience and attention to detail to ensure your system works efficiently and reliably. Let’s break down the process into clear, manageable actions that anyone can tackle with the right tools and mindset.
Mounting The Base
Start by selecting the right spot for your thermostat base. It should be away from direct sunlight, drafts, or heat sources to avoid false readings. Use a level to keep the base straight, which helps with both aesthetics and functionality.
Secure the base to the wall using the screws provided. If your previous thermostat left holes, reuse them if they align; otherwise, drill new ones carefully. Double-check that the base is firmly attached before moving on.
Connecting The Wires
Before touching any wires, make sure your power is off to avoid shocks or damage. Identify the wires coming from your heating system and match them to the labels on your new thermostat base.
Use a small screwdriver to attach each wire securely to its corresponding terminal. If your wires have frayed ends, trim and strip them slightly for a clean connection. Loose wiring can cause the system to malfunction, so take your time here.
Securing The Thermostat
Once the base is wired, attach the thermostat faceplate by aligning it with the base and pressing firmly until it clicks into place. This step usually requires a gentle but steady push.
Test the fit by gently wiggling the thermostat to ensure it’s not loose. If it feels shaky, remove and check the base mounting and wiring again. A secure fit not only looks better but also protects your device from accidental damage.
Testing The Thermostat
Testing the thermostat is a vital step after installation. It ensures the device controls your home’s heating properly. Skipping this step might cause heating issues later. A quick test confirms the thermostat is wired correctly and working as expected. Follow simple checks to restore power and run initial tests. These checks help avoid costly repairs and discomfort during cold days.
Restoring Power
Turn the circuit breaker back on to restore power to the thermostat. Check the display screen for signs of life. A blank screen means no power, so double-check the breaker. Some thermostats have batteries; insert fresh ones if needed. Wait a few moments for the thermostat to boot up. The screen should show the current temperature and settings.
Running Initial Tests
Set the thermostat to heat mode and increase the temperature above room temperature. Listen for the heating system to start. Feel the warm air coming from vents or radiators. If the heater doesn’t start, recheck the wiring connections. Lower the temperature setting to turn off the heat. Confirm the heating system stops as expected. These simple tests confirm the thermostat controls heating properly.
Troubleshooting Common Issues
Troubleshooting common issues with a heat only basic electronic home thermostat helps keep your heating system running smoothly. Simple problems can stop your thermostat from working properly. Identifying these issues early saves time and effort.
Focus on three main problems: no power or display, heating not activating, and incorrect temperature readings. Each problem has clear signs and simple fixes. These tips guide you through basic checks before calling a professional.
No Power Or Display
The thermostat screen stays blank, or no lights show up. Check if the thermostat is properly connected to power. Look at the circuit breaker or fuse box to see if a breaker tripped or fuse blew.
- Replace batteries if your thermostat uses them.
- Ensure all wires are securely connected.
- Check for loose or damaged wiring behind the thermostat.
A reset might help. Turn off power at the breaker, wait a few minutes, then turn it back on. If the display stays off, the thermostat might need replacement.
Heating Not Activating
The thermostat shows settings, but the heater does not turn on. Verify the thermostat is set to “Heat” mode and the temperature is higher than the current room temperature. A low setting prevents heating activation.
- Inspect the wiring from the thermostat to the heating system.
- Test the furnace or heating unit separately to ensure it works.
- Look for error codes or blinking lights on the thermostat.
Sometimes, the issue lies with the furnace or its power supply. Check furnace switches and filters for blockages or faults.
Incorrect Temperature Readings
The thermostat shows wrong room temperature or fluctuates a lot. Place the thermostat away from direct sunlight, drafts, or heat sources. These affect sensor accuracy.
- Clean the thermostat to remove dust and dirt from sensors.
- Calibrate the thermostat following the manufacturer’s instructions.
- Replace the thermostat if readings remain inaccurate after cleaning and calibration.
Accurate temperature readings ensure efficient heating and energy savings.
Maintaining Your Thermostat
Maintaining your heat-only basic electronic home thermostat is key to keeping your heating system running smoothly and efficiently. Simple upkeep can prevent unexpected breakdowns and keep your home comfortable all winter long. Understanding the right maintenance steps will save you time and money in the long run.
Regular Cleaning
Dust and dirt can build up inside your thermostat, causing it to misread temperatures or respond slowly. Gently wiping the thermostat’s exterior and removing the cover to clean the inside with a soft brush can make a big difference.
Be careful not to use water or harsh chemicals, as these can damage the electronics. Instead, use a dry cloth or a small vacuum attachment to clear dust from vents and sensors.
Have you noticed your thermostat acting erratically after a long winter? Cleaning might be the simple fix you need.
Battery Replacement Tips
Your thermostat’s batteries power its display and controls, so keeping them fresh is essential. Replace batteries at least once a year, or immediately if the low battery indicator appears.
Use high-quality alkaline batteries for longer life and better performance. Keep spare batteries nearby to avoid being caught off guard during cold days.
If your thermostat loses settings often, weak batteries are usually the culprit. Don’t wait for your system to stop working—check those batteries regularly.
Credit: www.familyhandyman.com
Frequently Asked Questions
How Do I Safely Remove An Old Electronic Thermostat?
Turn off power at the circuit breaker first. Unscrew the thermostat faceplate carefully. Label the wires before disconnecting to avoid confusion during installation.
What Tools Are Needed To Replace A Heat-only Thermostat?
You typically need a screwdriver, wire stripper, and voltage tester. These tools help remove the old unit and install the new thermostat safely.
Can I Replace My Thermostat Without Professional Help?
Yes, if you follow safety steps and wiring instructions. Basic electronic thermostats are user-friendly for DIY replacement with proper care.
How Do I Wire A New Heat-only Thermostat Correctly?
Match each wire to the terminal labeled on the new thermostat. Refer to your labels and manufacturer instructions for precise wiring connections.
Conclusion
Replacing a heat-only basic electronic thermostat is simple and clear. Follow each step carefully, and you will save money and time. Double-check all connections before finishing the job. Your home will feel warm and comfortable again soon. This small task can improve your heating system’s efficiency.
Enjoy the easy control of your new thermostat. Stay safe and take your time during the process. You can do this yourself with patience and care.
Leave a Reply