Setting up your own hobby electronics workbench can transform the way you create and learn. Imagine having a dedicated space where every tool and component is within reach, making your projects smoother and more enjoyable.
Whether you’re repairing gadgets, building circuits, or experimenting with new ideas, the right workspace makes all the difference. In this guide, you’ll discover simple steps to organize your workbench efficiently, save time, and boost your creativity. Ready to turn your corner into an electronics haven?
Let’s dive in and build the perfect setup just for you.

Credit: k4fmh.com
Choosing The Right Space
Choosing the right space for your hobby electronics workbench sets the foundation for your projects. It’s about more than just finding an empty corner. The space you pick can boost your creativity, comfort, and productivity.
Size And Lighting
Make sure your workspace is large enough to hold all your tools, parts, and projects without feeling cramped. A cluttered bench can slow you down and increase mistakes. Think about how much room you need for your soldering station, multimeter, and storage bins.
Good lighting is essential. Natural light is ideal, but if that’s limited, invest in bright, adjustable LED lamps. Shadows can hide tiny components and cause eye strain. Have you noticed how much easier it is to work when your bench is well-lit?
Ventilation Needs
Soldering and working with certain chemicals release fumes that you don’t want to breathe in. Your workbench should be in a well-ventilated area or near a window you can open. If that’s not possible, consider a small exhaust fan or fume extractor to keep the air clean.
Think about how often you’ll be soldering or using sprays. The better the airflow, the safer and more comfortable your workspace will be. How can you improve airflow in your chosen space without disturbing your setup?
Noise Considerations
Electronics work can involve noisy tools like drills or fans. If you live with others or near neighbors, think about how sound will carry. A basement or spare room with a door can help contain noise, letting you work without interruptions.
On the flip side, if your chosen space is noisy, can you add soundproofing materials? Rugs, curtains, or foam panels might reduce noise and echo. How does your workspace noise level affect your focus and enjoyment?
Essential Tools And Equipment
Setting up a hobby electronics workbench requires more than just space—it demands the right tools and equipment to bring your projects to life efficiently and safely. Choosing the essential gear helps you avoid frustration and speeds up your learning curve. Let’s look at the key tools that form the backbone of any successful electronics workspace.
Soldering Station
A reliable soldering station is your best friend in electronics. It allows you to join components with precision and control the temperature to avoid damaging delicate parts.
Look for a station with adjustable temperature settings and a comfortable, heat-resistant handle. A built-in stand and sponge for cleaning the tip make your work cleaner and faster.
Have you noticed how a good soldering station transforms your work from shaky joints to neat, professional connections? It’s a game-changer.
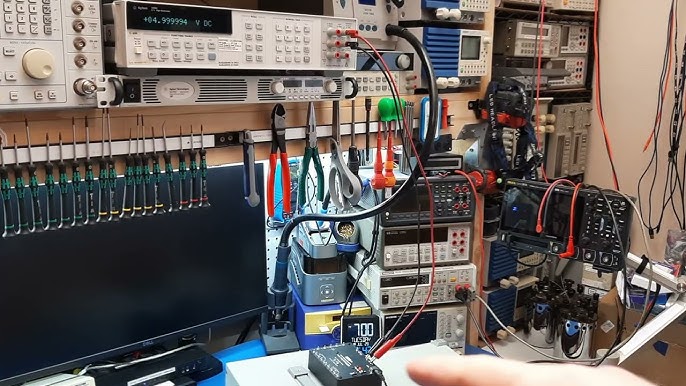
Multimeter And Testers
Multimeters are indispensable for measuring voltage, current, and resistance. They help you troubleshoot circuits and ensure everything works as expected.
Invest in a digital multimeter with clear displays and multiple functions like continuity testing and diode checks. Complement it with specialized testers such as logic probes or transistor testers for advanced diagnostics.
Using the right tester can save you hours of trial and error. How often do you find yourself guessing what’s wrong before measuring it?
Hand Tools
Hand tools are the everyday essentials that keep your work smooth. Wire cutters, needle-nose pliers, and precision screwdrivers are absolute must-haves.
Quality matters here; tools that fit well and last long reduce strain and improve accuracy. Adding a wire stripper and tweezers can make component handling much easier, especially for tiny parts.
Think about the last time you struggled with a stubborn wire or tiny screw—having the right hand tool would have saved you from frustration.
Power Supplies
Power supplies provide the necessary voltage and current to test and run your circuits safely. Adjustable bench power supplies are perfect for hobbyists because they let you set exact parameters.
Choose one with overload protection and clear readouts to protect your components and yourself. If you’re working on smaller projects, a USB power supply can also be handy.
How confident are you in powering your circuits without risking damage? The right power supply gives you control and peace of mind.
Workbench Setup And Organization
Setting up your hobby electronics workbench with effective organization can save you hours of frustration. A well-planned workspace helps you focus on your projects instead of hunting for tools or dealing with clutter. Think about how much smoother your workflow could be with everything within easy reach and neatly arranged.
Workbench Surface Options
The surface you choose for your workbench impacts both comfort and productivity. A wooden top offers a sturdy, durable base that can handle soldering heat and tool impacts. If you prefer easy cleaning, a laminate or metal surface might be better, especially when working with flux and solder residues.
Consider adding a cutting mat or anti-static mat on top for extra protection and safety. Have you tried using modular surfaces, like pegboards or interchangeable panels, to customize your workspace for different projects?
Storage Solutions
Good storage keeps your components and tools visible and accessible. Clear plastic bins, small drawers, and labeled containers work well for resistors, capacitors, and tiny screws. Use stackable units to save space and keep parts sorted by type or project.
Wall-mounted shelves or pegboards let you hang frequently used tools, freeing up bench space. I once switched to magnetic tool strips, and it cut down the time spent searching for screwdrivers and pliers dramatically.
Cable Management
Tangled cables slow you down and create hazards. Use cable ties, Velcro straps, or cable clips to bundle wires neatly along the edges of your bench. Label cables with tags to quickly identify power cords, USB leads, or test probes.
Think about setting up dedicated cable channels or trays under your bench to keep cords off your workspace. How much easier would your projects be if your cables never got in your way?
Safety Measures
Setting up a hobby electronics workbench is exciting, but safety should always come first. Without proper safety measures, a simple project can quickly turn into a dangerous situation. Paying attention to safety helps you focus on your work and keeps your space secure for creative exploration.
Personal Protective Gear
Always wear protective gear when working with electronics. Safety glasses shield your eyes from sparks and small debris that can fly off during soldering or cutting wires.
Consider using gloves to protect your hands from hot soldering irons or sharp components. Even a simple apron can prevent burns or stains on your clothes.
Do you check your gear before starting each project? Making it a habit ensures you’re ready for any unexpected mishap.
Fire Safety
Electronics work often involves heat sources, so fire safety is crucial. Keep a small fire extinguisher rated for electrical fires nearby and know how to use it.
Clear your workbench of flammable materials like paper, cloth, or solvents. A clean, organized space reduces fire risks significantly.
Remember to unplug soldering irons and other heat tools when not in use. This simple step can prevent many accidents.
Electrical Safety Tips
Handle all electrical components with care to avoid shocks. Always work on a non-conductive surface like a rubber mat or wooden table.
Double-check your circuit connections before powering them on. Incorrect wiring can cause shorts, damage components, or even harm you.
Use a multimeter to test voltages and currents. It helps you understand your circuit’s behavior and catch potential hazards early.
Component Storage And Inventory
Keeping your electronic components organized can make a huge difference in how quickly and efficiently you work on projects. Without a good storage and inventory system, you might waste time hunting for resistors or accidentally buy duplicates. Setting up a clear, accessible system for your components lets you focus on creating rather than searching.
Labeling Techniques
Clear labeling saves you from opening every drawer or bin to find what you need. Use labels that are easy to read and durable—printed labels on adhesive paper work better than handwritten ones. Color coding can add another layer of organization; for example, use blue labels for capacitors and red for resistors.
Try including key information on your labels, like component value, tolerance, and quantity. You might even add a small schematic symbol if space allows. When I started labeling my parts this way, I noticed I spent half the time locating components during builds.
Bins And Drawers
Choosing the right storage containers is crucial. Transparent plastic bins let you see contents at a glance, while small drawers keep tiny parts separated and protected. Stackable drawer units save space and help you keep similar parts grouped together.
Consider modular systems that let you customize the number of compartments. Using foam inserts or anti-static dividers inside drawers can protect sensitive parts. Ask yourself—do you prefer components sorted by type, size, or project? Tailor your setup to what makes sense for your workflow.
Digital Inventory Management
Keeping a digital list of your components can prevent overbuying and help track what you have on hand. Simple spreadsheets can do the trick, but there are also apps designed specifically for electronics inventory. These tools let you record part numbers, quantities, and even link to datasheets.
Updating your digital inventory as you use or add parts keeps the list accurate. I found that syncing my inventory app across devices means I can check stock before heading to the store. Could a digital system save you time and money by avoiding unnecessary purchases?

Credit: techexplorations.com
Power And Connectivity
Power and connectivity are the backbone of any hobby electronics workbench. Without reliable electrical access and a solid network setup, your projects can stall or become frustrating. Think about how often you’ve had to unplug one device just to power another—avoiding that starts with smart planning.
Power Strip Placement
Position your power strips where they’re easy to reach but won’t clutter your workspace. Mounting strips under your desk or on the side of a shelf keeps cords off your bench and reduces tangles.
Consider using power strips with individual switches. This way, you can power off tools you’re not using without unplugging them. Have you noticed how much easier it is to manage devices when you can control them independently?
Grounding And Surge Protection
Protect your sensitive electronics with proper grounding. A grounded workbench prevents static electricity from damaging your components. If you’ve ever fried a microcontroller, you know this is non-negotiable.
Invest in surge protectors to shield your gear from voltage spikes. These spikes can happen during storms or power fluctuations. A good surge protector can save you hundreds in repairs or replacements.
Wi-fi And Network Setup
Stable internet access is essential if you’re downloading datasheets, firmware, or remote debugging. Place your Wi-Fi router close enough to your workbench or use a network extender to avoid dead zones.
Wired connections through Ethernet can offer faster and more reliable speeds if your setup supports it. How often do you find yourself frustrated by slow downloads during a build? Minimizing this downtime keeps your workflow smooth and efficient.
Lighting Solutions
Good lighting is key for a hobby electronics workbench. It helps you see small parts and details clearly. Proper lighting reduces eye strain and makes your work more accurate. Choose lighting that suits your space and tasks.
Task Lighting Options
Task lighting shines directly on your work area. LED desk lamps are bright and use little power. Magnifying lamps combine light with a lens to help see tiny components. Flexible gooseneck lamps let you point light exactly where needed. Choose lights with daylight bulbs for true color view.
Natural Vs Artificial Light
Natural light is soft and easy on the eyes. Place your workbench near a window if possible. It changes during the day, which may cause shadows. Artificial light stays constant and works at any time. Use a mix of both for best results. Avoid glare by positioning lights carefully.
Adjustable Lighting Fixtures
Adjustable fixtures give control over light direction and intensity. Swing-arm lamps move closer or farther as needed. Dimmable lights let you set brightness for different tasks. Track lighting can be aimed at multiple spots on your bench. Flexibility in lighting helps reduce shadows and improve visibility.
Workflows And Project Planning
Setting up efficient workflows and planning your projects carefully can transform your hobby electronics workbench from a cluttered mess into a productive creative space. Thoughtful organization of your tasks and tools helps you maintain focus and reduces the frustration of hunting for components or losing track of progress. How you design your workspace around your workflow directly impacts how smoothly your projects move from concept to completion.
Designated Work Zones
Divide your workbench into clear zones based on different activities. For example, have a soldering area with heat-resistant mats and fume extraction, a testing zone with multimeters and oscilloscopes, and a component storage section nearby. This separation keeps each task contained and prevents cross-contamination of tools and parts.
When I started using zones, I noticed I wasted far less time switching between tasks. You can also customize zones to fit your workflow, like adding a prototyping area with breadboards and wires if you do a lot of circuit testing.
Tool Accessibility
Arrange your most-used tools within arm’s reach to speed up your work and minimize distractions. Use pegboards, magnetic strips, or small shelves to keep screwdrivers, pliers, and wire cutters visible and easy to grab. Less frequent tools can be stored in drawers but still need to be logically organized.
Think about how often you use each tool and place them accordingly. Have you ever stopped mid-solder to search for a tiny screwdriver? Keeping tools accessible prevents breaks in your concentration and helps maintain a steady workflow.
Project Documentation
Track your progress by keeping detailed notes and diagrams for each project. Use a dedicated notebook or digital tools like note-taking apps to record circuit designs, test results, and problems you encounter. This documentation saves time when troubleshooting or revisiting old projects.
Writing down your steps can also spark new ideas and help you learn from mistakes. How often do you find yourself repeating the same errors simply because you didn’t document what went wrong the first time? Good documentation turns your workbench into a knowledge hub.
Maintaining Your Workbench
Maintaining your hobby electronics workbench is key to keeping your projects running smoothly and efficiently. A well-kept workspace reduces errors and saves time. It also helps you stay motivated and ready to tackle new challenges.
Regular Cleaning
Dust and debris can quickly accumulate on your workbench, affecting both your tools and components. Wipe down surfaces daily with a microfiber cloth to remove dust and solder residue.
Keep a small vacuum or compressed air canister nearby to clean out tight spaces and circuit boards. This prevents short circuits and keeps your workspace tidy.
Tool Calibration
Accurate measurements are vital in electronics. Regularly check and calibrate tools like multimeters, oscilloscopes, and soldering irons.
Calibration ensures your readings are reliable, preventing mistakes that could ruin a project. Mark calibration dates on a calendar to remind yourself when the next check is due.
Upgrading Equipment
Technology evolves, and so should your workbench. Consider upgrading tools that no longer meet your needs or that slow down your workflow.
Adding a high-quality soldering station or a digital oscilloscope can make a big difference. What’s one tool you wish you had right now to improve your projects?
Credit: www.thegeekpub.com
Frequently Asked Questions
What Tools Are Essential For A Hobby Electronics Workbench?
Essential tools include a soldering iron, multimeter, wire cutters, screwdrivers, and a breadboard. These basics help you build and test circuits efficiently.
How To Organize Components On An Electronics Workbench?
Use labeled bins, drawer organizers, and small containers. This keeps parts easily accessible and prevents clutter, improving workflow and productivity.
What Safety Measures Should I Take At My Workbench?
Wear safety goggles, keep a fire extinguisher nearby, and maintain good ventilation. Always unplug tools when not in use to prevent accidents.
How To Choose The Right Lighting For Electronics Workbench?
Select bright, adjustable LED lighting. Proper lighting reduces eye strain and helps you see small components clearly for precise work.
Conclusion
Setting up a hobby electronics workbench is simple and rewarding. Start small. Basic tools and equipment are enough for beginners. Focus on organization. This keeps your workspace tidy and efficient. Safety should be a top priority. Always wear protective gear when needed.
Use proper lighting to avoid strain. A well-lit area makes tasks easier. Keep learning and experimenting. This is key to growing your skills. Regularly review and update your setup. This ensures you have everything needed. Enjoy the process. Building and experimenting can be fun and fulfilling.
Leave a Reply