Are you ready to dive into the exciting world of electronics right from the comfort of your home? Setting up your very own home electronics lab isn’t just a dream—it’s a rewarding project that can open the doors to endless creativity and learning.
Imagine having a space where you can tinker, innovate, and bring your tech ideas to life, all while gaining hands-on experience with the gadgets you love. But where do you start? How do you transform a corner of your home into a hub of electronic exploration?
Whether you’re a seasoned tech enthusiast or just beginning to explore the fascinating world of circuits and sensors, this guide is crafted just for you. We’ll walk you through simple steps to set up your lab, ensuring it’s both functional and inspiring. So, if you’re ready to unleash your inner inventor and make the most of your DIY spirit, keep reading. Your perfect home electronics lab awaits!

Credit: www.youtube.com
Choosing The Right Space
Choosing the right space for your home electronics lab sets the foundation for everything else. The area you pick will impact your comfort, safety, and productivity. Think about how much room you really need and the conditions that will help you focus and work efficiently.
Size And Lighting
Pick a space that gives you enough room to spread out your tools and projects without feeling cramped. A cluttered workbench slows you down and increases the chance of accidents.
Natural light is ideal because it reduces eye strain and keeps you alert. If natural light is limited, invest in bright, adjustable LED lighting so you can clearly see small components and wiring details.
Have you noticed how harsh or dim lighting affects your ability to solder or read tiny labels? Getting the lighting right makes a big difference in your accuracy and endurance.
Ventilation And Safety
Electronics work often involves soldering and handling chemicals, which can produce fumes. Good ventilation is crucial to keep the air fresh and your workspace safe.
If you can, set up near a window or use a fume extractor or fan to pull fumes away from your breathing zone. Safety should never be an afterthought in your lab setup.
Also, consider having a fire extinguisher and first aid kit nearby. Small accidents happen, but being prepared helps you handle them calmly and quickly.
Noise Considerations
Think about how noise affects your concentration. If your lab is in a noisy part of your home, you might find it hard to focus on detailed tasks.
Look for a quieter room or use noise-cancelling headphones to block distractions. Conversely, if you live with others, consider how your electronics work might disturb them and plan lab hours accordingly.
What’s your noise tolerance? Knowing this helps you create an environment where you can work deeply without interruptions or stress.
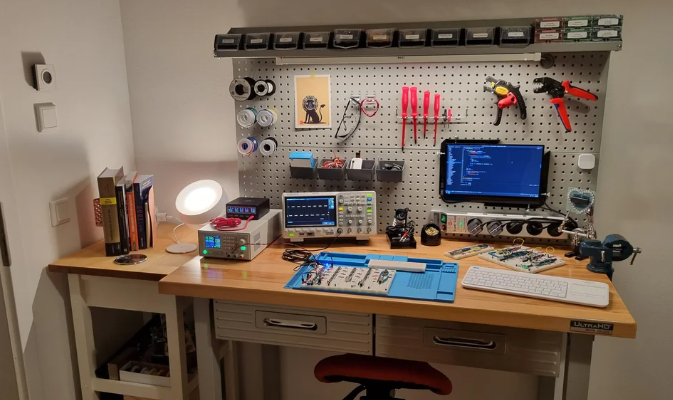
Essential Tools And Equipment
Setting up a home electronics lab starts with gathering the right tools and equipment. These essentials create the foundation for every project you tackle, making your work easier and more accurate. Let’s look at the key items you need to get started and why each one matters.
Basic Hand Tools
Your toolbox should include a variety of hand tools designed for electronics work. Precision screwdrivers, needle-nose pliers, wire cutters, and tweezers are must-haves. These tools let you handle small components with control and care.
Having a quality set of hand tools saves you time and frustration. I once tried assembling a circuit with dull cutters and ended up damaging wires—don’t let that happen to you. Invest in tools that feel comfortable and sturdy in your hand.
Measuring Instruments
Accurate measurements are key in electronics. A reliable digital multimeter is essential for checking voltage, current, and resistance. It helps you troubleshoot and verify your circuits step-by-step.
Consider adding a logic analyzer or oscilloscope if you plan to work on more complex digital circuits. These instruments reveal signals and timing that you can’t see with a multimeter alone. Think about your projects and choose instruments that match your needs.
Soldering Station
A good soldering station is more than just a soldering iron; it offers temperature control and safety features. This control prevents overheating components and ensures clean, strong joints. I found that adjustable stations reduce mistakes and make soldering less stressful.
Look for a station with a comfortable grip and a stand that holds the iron safely when not in use. Don’t forget to add solder wire, flux, and a desoldering pump to your kit for complete soldering work.
Power Supplies
Stable power supplies provide the correct voltage and current your projects demand. A bench power supply with adjustable output is ideal because it lets you tailor power settings to each circuit.
Using batteries can be convenient but may not offer the consistency needed for testing and debugging. Having a power supply with built-in protection features also shields your components from damage. What type of projects do you plan to power? This can guide your choice in power equipment.
Selecting Components And Materials
Selecting the right components and materials forms the heart of a home electronics lab. These parts define what projects you can build and how well they will work. Quality and variety matter a lot. Start with basic, versatile components that suit many experiments. This approach saves money and space while boosting creativity.
Organize components by type to find them fast. Store them in clear containers or labeled drawers. This setup keeps your workspace tidy and efficient. Each component type has unique uses and features. Understanding these helps in choosing the best parts for your projects.
Resistors, Capacitors, And Inductors
Resistors control current and voltage in circuits. Buy a range of values, from low to high resistance. Choose standard types like carbon film or metal film for reliability.
Capacitors store and release electrical energy. Include ceramic and electrolytic capacitors in various sizes. They help with filtering, timing, and signal processing.
Inductors store energy in magnetic fields. Small inductors work well for radio and filter circuits. They are less common but important for specific projects.
Semiconductors And Ics
Semiconductors include diodes, transistors, and MOSFETs. They act as switches or amplifiers. Get common types like 1N4001 diodes and 2N2222 transistors for general use.
Integrated Circuits (ICs) combine many components in one chip. Popular ICs include timers (555), op-amps (LM358), and logic gates (7400 series). These chips simplify complex circuits.
Wires And Connectors
Wires connect components to build circuits. Use flexible, insulated wires in different colors. Color coding helps identify connections easily.
Connectors like jumper wires, terminal blocks, and headers speed up assembly. They allow quick changes without soldering. Keep a variety of lengths and types for flexibility.
Prototyping Boards
Breadboards are essential for testing circuits without soldering. Choose medium to large sizes with many tie points. They support quick changes and troubleshooting.
Perfboards and stripboards help create permanent circuits. They require soldering but offer durability. Start with breadboards, then move to perfboards for finished projects.
Setting Up Workbenches And Storage
Setting up your workbenches and storage is crucial for an efficient home electronics lab. Your workspace should make it easy to access tools and components quickly, so you can focus on the project rather than hunting for parts. Thoughtful organization saves time and reduces frustration, especially during complex builds.
Organizing Tools
Arrange your tools based on how often you use them. Keep frequently used items like screwdrivers, wire cutters, and multimeters within arm’s reach. You might hang tools on a pegboard or place them in small bins on the bench for quick access.
Grouping tools by type or function helps you spot what you need faster. Magnetic strips can hold metal tools neatly, while drawer organizers prevent clutter. Have you noticed how much easier soldering becomes when your soldering iron and flux are right next to each other?
Component Storage Solutions
Small electronic parts demand special attention to avoid losing or mixing them. Use clear plastic bins or stackable drawers labeled with the component type, value, and size. This setup lets you identify parts at a glance without opening every container.
Consider a tackle box or a craft organizer with adjustable compartments for resistors, capacitors, and ICs. If you work with lots of similar components, color-coded labels can speed up your search. Do you find it easier to keep everything sorted when you assign a permanent spot for each part?
Workspace Ergonomics
Comfort matters when you spend hours at your bench. Choose a sturdy table at a height that doesn’t strain your back or shoulders. An adjustable chair with good support can make long sessions less tiring.
Good lighting is essential—use a bright, adjustable desk lamp to reduce eye strain. Keep cables and cords organized to prevent accidents and maintain a clean work area. How much more productive could you be if your workspace helped you stay comfortable and focused?
Safety Measures And Best Practices
Setting up a home electronics lab requires careful attention to safety. Protecting yourself and your workspace is crucial. Following safety measures helps prevent accidents and damage. Best practices keep your projects smooth and trouble-free.
Electrical Safety
Always disconnect power before working on circuits. Use insulated tools to avoid shocks. Check wires and cables for damage regularly. Never work with wet hands or in damp areas. Use a grounded power supply to protect devices and yourself.
Fire Prevention
Keep a fire extinguisher nearby, rated for electrical fires. Avoid overloading power strips or outlets. Store flammable materials away from heat sources. Ensure good ventilation to prevent overheating of devices. Turn off equipment when not in use to reduce fire risks.
Proper Handling Of Components
Handle electronic parts with clean, dry hands. Use anti-static mats or wristbands to protect sensitive components. Store components in labeled containers to avoid mix-ups. Avoid touching pins or leads directly to prevent damage. Follow manufacturer instructions for safe use and disposal.
Basic Electronics Projects For Beginners
Starting with basic electronics projects helps build strong skills fast. These projects teach simple concepts and give a clear understanding of how electronics work. Beginners can gain confidence by experimenting with easy setups. Hands-on practice improves learning and makes the experience fun.
Simple Circuits To Start
Begin with circuits using batteries, resistors, and LEDs. These parts are safe and easy to handle. Try creating a blinking LED or a basic light switch. Use a breadboard to connect components without soldering. This setup allows quick changes and tests.
- Connect an LED to a battery with a resistor to prevent damage.
- Build a simple switch to turn the LED on and off.
- Experiment with different resistor values to see brightness changes.
Using Microcontrollers
Microcontrollers add control and flexibility to projects. Arduino and Raspberry Pi are popular choices for beginners. They can read sensors and control devices like motors and lights. Start with simple codes to blink an LED or read a button press. These projects teach programming and hardware basics.
- Use Arduino to blink an LED with a small program.
- Connect a push button to control an LED light.
- Try reading temperature or light sensors for real-time data.
Troubleshooting Techniques
Problems happen in electronics projects. Learning to fix them is important. Check all connections first. Use a multimeter to test voltage and resistance. Follow the circuit diagram carefully. Change one part at a time to find errors. Keep notes on what you test and change.
- Inspect wires and components for loose or wrong connections.
- Measure power supply voltages with a multimeter.
- Test individual components to ensure they work correctly.
- Refer to circuit diagrams to spot mistakes.
Learning Resources And Communities
Building a home electronics lab is exciting and rewarding. Learning from the right resources and joining communities makes the journey easier. These sources help you understand concepts and solve problems. They also connect you with others who share your interest.
Online Tutorials And Courses
Many websites offer free and paid tutorials. They cover basics to advanced topics in electronics. Video lessons make complex ideas clear and simple. Interactive courses let you practice skills step-by-step. Platforms like YouTube, Coursera, and Udemy have excellent options. Choose courses that match your skill level and goals.
Books And Magazines
Books provide detailed explanations and projects. Look for beginner-friendly titles with clear instructions. Magazines often feature new trends and simple projects. They keep you updated on the latest tools and techniques. Libraries and bookstores have a good selection. Reading regularly builds a strong knowledge base.
Forums And Local Groups
Forums are great for asking questions and sharing ideas. Communities like Reddit’s r/electronics or EEVblog offer expert advice. Local groups or clubs provide hands-on learning and meetups. Joining these groups helps you find mentors and friends. Active participation speeds up your learning process.

Credit: www.youtube.com

Credit: www.reddit.com
Frequently Asked Questions
What Essential Tools Do I Need For A Home Electronics Lab?
Basic tools include a soldering iron, multimeter, wire cutters, and a breadboard. These are vital for circuit building and testing. Additional items like a power supply and oscilloscope enhance functionality. Start with essentials and expand based on your projects.
How Do I Organize Components In My Home Lab?
Use labeled storage bins or drawers to sort components by type and value. Keep small parts like resistors and capacitors in separate containers. Proper organization saves time and prevents damage to sensitive electronics. Regularly update your inventory.
What Safety Measures Are Important In A Home Electronics Lab?
Always work in a well-ventilated area and use safety glasses. Avoid loose clothing and keep liquids away from electronics. Use insulated tools and double-check connections before powering circuits. Follow manufacturer instructions to prevent accidents and equipment damage.
How Can I Improve My Skills Using A Home Electronics Lab?
Start with simple projects and gradually increase complexity. Follow online tutorials and experiment with different circuit designs. Join electronics forums and communities for advice and feedback. Consistent practice and problem-solving boost your knowledge and confidence.
Conclusion
Setting up a home electronics lab opens many learning doors. Start small, then add tools as you grow. Keep your space clean and organized for best results. Practice often to build your skills and confidence. Enjoy solving problems and creating new projects.
This lab can become a place for fun and discovery. Stay curious, keep experimenting, and watch your knowledge expand. Your electronics journey begins right at home.
Leave a Reply