Have you ever wondered how electronic chips, those tiny powerhouses in your gadgets, come to life? Imagine the thrill of creating one right at your kitchen table!
You don’t need a high-tech lab or a degree in engineering. All it takes is curiosity, a few simple materials, and a bit of guidance. By the end of this article, you’ll discover how accessible and fascinating the world of electronics can be.
Whether you’re a tech enthusiast or just someone who loves a good DIY project, crafting your own electronic chip at home can be an exciting adventure. Ready to unlock the secrets and impress your friends with your very own creation? Let’s dive in and explore the step-by-step process that will turn you from a beginner into a chip-making maestro!
Credit: circuitdigest.com
Materials Needed
Making an electronic chip at home needs several materials. You must gather all items before starting. Each part plays a key role in the process. Proper tools help you work with precision. Components form the chip’s basic structure. Safety gear protects you from harm. Below is a clear list of what you need.
Essential Tools
- Soldering iron for joining parts
- Multimeter to check connections
- Wire cutters and strippers
- Tweezers for handling small pieces
- Magnifying glass to see details
- Breadboard for testing circuits
- PCB board or prototyping board
Required Components
- Microcontroller chip or processor
- Resistors to control current
- Capacitors for energy storage
- Diodes to direct current flow
- Transistors for switching signals
- Connecting wires or jumper cables
- Power source like batteries or adapters
Safety Gear
- Safety goggles to protect eyes
- Heat-resistant gloves
- Ventilated workspace or fan
- Anti-static wrist strap to prevent damage
Basic Concepts
Understanding the basic concepts of electronic chips helps you build one at home. This section explains what an electronic chip is, how it works, and the different types you might encounter. Clear knowledge makes the process easier and safer.
What Is An Electronic Chip
An electronic chip is a small piece of material that controls electrical signals. It contains many tiny components like transistors and resistors. These parts work together to process information or control devices.
Chips are usually made from silicon. Silicon is a material that can control electric current. This control allows the chip to perform tasks like computing or sensing.
How Chips Work
Chips work by managing electric signals through circuits. Inside the chip, tiny pathways guide electrons to turn signals on or off. This creates binary code, the language computers use.
The chip’s circuits can store, process, or transfer data. The speed and power of a chip depend on how many circuits it has and how they are arranged.
Types Of Chips
There are many types of electronic chips, each with a specific job. Common types include:
- Microprocessors:Act as the brain of computers and smart devices.
- Memory Chips:Store data and information temporarily or permanently.
- Analog Chips:Handle continuous signals like sound or light.
- Digital Chips:Manage digital signals and perform logic operations.
Choosing the right chip type depends on your project’s needs and complexity.
Designing Your Chip
Designing your electronic chip is a crucial step in making it at home. This stage shapes how your chip will work and what it can do. Clear planning and smart design choices save time and reduce errors later.
Focus on creating a simple, effective design that matches your project goals. Keep your chip’s functions clear and avoid unnecessary complexity. A good design helps you build a reliable chip with fewer problems.
Choosing A Circuit Design
Start by selecting the right circuit design for your chip’s purpose. Think about the functions your chip needs to perform. Choose between analog, digital, or mixed circuits depending on your needs.
Simple designs are easier to build and test. Use basic components like resistors, capacitors, and transistors for beginner projects. Complex circuits require advanced skills and tools.
Using Design Software
Design software helps you create and test your chip virtually. It shows how your circuit will behave before building it. Many free and easy-to-use programs are available online.
These tools let you draw circuit layouts and run simulations. They catch mistakes early and improve your design. Save your work often and use software tutorials to learn faster.
Creating A Schematic
A schematic is a detailed drawing of your circuit. It shows all components and their connections clearly. Use standard symbols for each electronic part.
Keep the schematic neat and organized. Label each component with its value or type. A clear schematic guides you during chip assembly and testing.

Credit: news.uchicago.edu
Preparing The Substrate
Preparing the substrate is a crucial part of making an electronic chip at home. This step sets the foundation for all other processes. A clean and well-prepared substrate ensures better performance and fewer defects in the chip. Careful attention during this phase improves the overall quality of your homemade chip.
Selecting The Base Material
Choose a smooth, flat material as the base. Silicon wafers are common in professional labs, but you can use glass or plastic for simple projects. The material must be thin and sturdy. Avoid rough or uneven surfaces, as they can cause errors during chip creation.
Cleaning The Surface
Clean the base thoroughly to remove dust and oils. Use distilled water and mild soap to wash the surface gently. Rinse well and dry with a lint-free cloth or air blower. Any dirt or grease can block the circuits from forming properly.
Applying Photoresist
Photoresist is a light-sensitive coating applied to the substrate. It helps create the chip’s pattern during exposure to light. Spread the photoresist evenly using a clean brush or spin coater. Let it dry in a dark, dust-free space to avoid accidental exposure.
Etching The Circuit
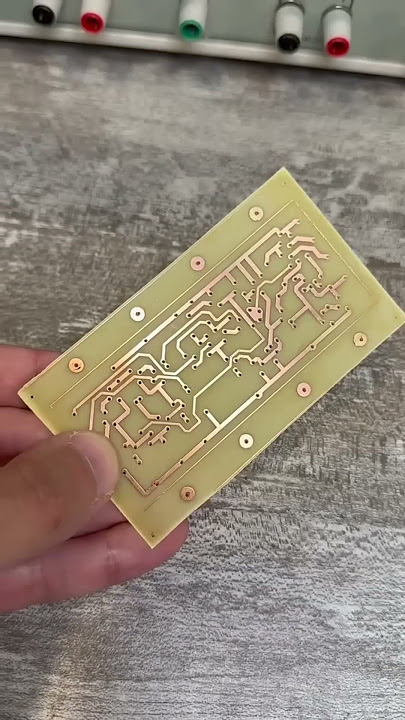
Etching the circuit is a crucial part of making an electronic chip at home. This process removes unwanted copper from the board, leaving behind the exact pattern of your circuit design. Getting this step right ensures your chip will work as intended without short circuits or broken connections.
Transferring The Design
You need to transfer your circuit layout onto the copper board before you start etching. A popular method is using a laser printer to print the design on glossy paper, then pressing it onto the copper with a hot iron. The toner acts as a resist, protecting the copper underneath during etching.
Make sure your design is mirrored before printing; otherwise, the circuit will be reversed. Have you checked the quality of your print? Faint or incomplete toner coverage can ruin the entire etching process.
Etching Techniques
There are several ways to etch the board, but the most common home method uses a solution of ferric chloride. Submerge your board in the etching solution and gently shake it to speed up the process. The exposed copper will dissolve, leaving the protected areas intact.
Wear gloves and work in a well-ventilated area. Some hobbyists prefer using alternatives like vinegar and hydrogen peroxide for a less toxic option, but they usually take longer. Which etching method fits your setup and safety preferences?
Rinsing And Drying
Once the unwanted copper is etched away, remove your board from the solution and rinse it thoroughly with water. This stops the chemical reaction and removes any leftover etchant. Dry the board completely with a soft cloth or paper towel to prevent water spots or corrosion.
After drying, inspect your circuit carefully. Are all traces clean and intact? If not, you may need to touch up the design or start the etching again. This careful final check can save you from frustrating troubleshooting later on.

Credit: www.wired.com
Adding Components
Adding components to your homemade electronic chip is a crucial step. It brings your design to life by connecting all parts. Proper handling ensures your chip works correctly and lasts long.
Soldering Basics
Soldering joins electronic parts with metal alloy. Use a low-watt soldering iron for safety. Heat the joint, then apply solder wire. Avoid overheating to protect components.
Keep the tip clean and shiny. Work in a well-ventilated area. Practice on spare parts to improve skill. Steady hands create strong, reliable connections.
Placing Microcomponents
Microcomponents are tiny parts like resistors and capacitors. Use tweezers to handle them carefully. Place each component on its marked spot.
Check component orientation before soldering. Some parts have polarity and must face correctly. Double-check the circuit diagram for accurate placement.
Testing Connections
Testing confirms your soldered joints work well. Use a multimeter to check for continuity. A beep sound means the connection is good.
Look for cold joints or bridges between pins. Reheat or resolder if you find problems. Testing early saves time and prevents errors.
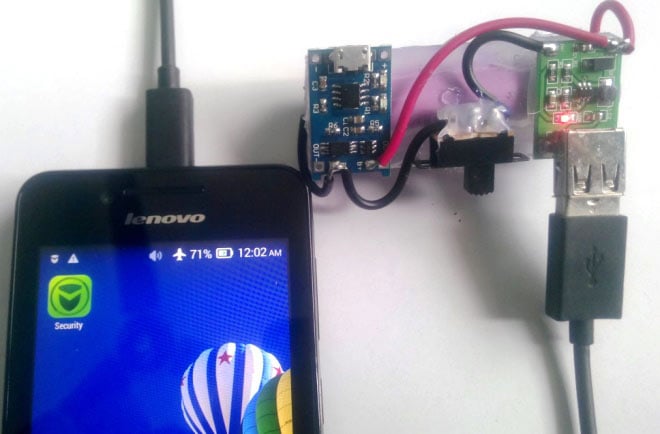
Testing The Chip
Testing the electronic chip you made at home is a crucial step to ensure it works correctly. Without proper testing, you might miss small faults that can cause the chip to fail in real applications. Let’s look at how to check your chip carefully and what tools you’ll need.
Using Multimeters
A multimeter is one of the simplest and most effective tools for testing your chip. It measures voltage, current, and resistance, helping you verify if the chip’s connections are correct.
Start by checking the resistance across different points to see if there are any short circuits or open circuits. Use the continuity test mode to ensure your solder joints are solid and wires are connected properly.
Don’t forget to test the power supply pins to confirm the chip receives the correct voltage. This step saved me hours of frustration when I found a loose wire causing the chip not to power up.
Troubleshooting Common Issues
Sometimes, your chip might not work as expected, even if everything looks fine. Begin troubleshooting by revisiting your circuit layout and comparing it to your design schematic.
Look for cold solder joints, incorrect component placement, or damaged parts. I once spent a day chasing a non-working chip, only to discover a resistor was placed in the wrong spot.
Try swapping out suspicious components and rechecking your wiring. Ask yourself: Are all components compatible? Are the connections stable under test conditions?
Verifying Functionality
After checking electrical connections, test if the chip performs its intended function. Create simple test circuits that simulate how the chip will be used in a real environment.
Use input signals and observe the output with an oscilloscope or logic analyzer if available. If you don’t have these tools, simple LED indicators can also show if the chip reacts correctly to inputs.
Does the chip respond reliably every time? If not, note the conditions where failures occur to pinpoint the problem. This careful verification helps you ensure your homemade chip is truly ready for use.
Tips For Success
Making an electronic chip at home requires careful attention to detail. Small mistakes can ruin your work. Follow these tips to improve your chances of success. Each step matters for a working chip. Precision, cleanliness, and design tweaks help a lot.
Maintaining Precision
Use tools that give accurate measurements. Keep your workspace steady and avoid shaking. Check your alignment often while working. Small errors can cause big problems later. Work slowly and carefully to avoid mistakes. Precision ensures the chip functions properly.
Avoiding Contamination
Clean your tools and workspace regularly. Dust and dirt can damage the chip’s circuits. Wear gloves to keep oils off materials. Store parts in closed containers to keep them clean. Avoid touching sensitive areas with bare hands. A clean environment improves chip quality.
Improving Your Design
Start with a simple design and test it first. Learn from each attempt and make changes. Use software to check your layout before building. Ask for feedback from experienced hobbyists or online groups. Keep notes on what works and what doesn’t. Better designs lead to better chips.
Frequently Asked Questions
What Materials Are Needed To Make An Electronic Chip At Home?
You need a silicon wafer, photoresist, UV light source, etching chemicals, and a clean workspace. These materials help create circuit patterns on the chip safely and effectively.
How Long Does It Take To Make A Chip At Home?
Making a chip at home typically takes several hours to a few days. The process depends on complexity and drying times of chemicals used.
Is It Safe To Make Electronic Chips At Home?
Yes, if you use protective gear and follow safety protocols. Handle chemicals carefully and work in a well-ventilated area to avoid risks.
Can Beginners Make Functional Chips At Home?
Beginners can create simple chips with patience and proper guidance. Start with basic designs and gradually learn advanced techniques for better results.
Conclusion
Making an electronic chip at home takes patience and care. You need simple tools and clear steps. Each stage helps you learn more about electronics. Mistakes are part of the process. Keep trying and improving your skills. This project builds your confidence and knowledge.
Enjoy the challenge and have fun creating something new. Your effort makes a real chip come alive. Keep exploring and making small changes to grow. Soon, you’ll understand electronics better than before.
Leave a Reply